
Hello there, fellow baker! I’m Claudia, a health coach, healthy food enthusiast, and amateur sourdough baker. My journey into gluten-free sourdough baking began in February 2022. Since then, daily practice and valuable insights from readers who have embraced my method have expanded my knowledge, and I’m excited to pass on what I’ve learned.
Starting your adventure in sourdough baking, gluten-free or otherwise, can seem a bit overwhelming. That’s why I’ve created this comprehensive guide to baking gluten-free sourdough for beginners, designed to demystify the process and ignite your passion for this craft.
Baking your own artisan bread is not just an important life skill; it’s a rewarding escape from the fast-paced convenience of modern eating, offering deep satisfaction and a tangible connection to the age-old tradition of bread making. Join me on this delightful journey and discover the joys of creating homemade sourdough bread — a true labor of love.
Understanding Sourdough: It’s More Than Just a Recipe, It’s a Method
Making sourdough bread is hard work, but it isn’t rocket science, and you can do it by feel.
Michael Pollan
Often, I’m asked: “What is the recipe?” whenever I share photos of my gluten-free and lectin-free loaves. If only it were that simple. This sourdough guide for beginners will cover all you need to know about the process of making artisan gluten-free bread at home.
Sourdough baking, be it with traditional wheat or gluten-free alternatives, involves creating and nurturing a starter (your very own wild yeast culture), mastering specific techniques, and honing your baking skills.
While it might sound complicated, and perhaps that’s why many shy away from making sourdough at home, the process is easier than it looks. Before my own sourdough adventure began, I had no bread-baking experience.
If I could do it, you can do it!
Gluten-Free Sourdough Ebook
If you’d like to master gluten-free sourdough with clarity and confidence, my ebook Raising a Gluten-Free Sourdough Loaf brings the entire method together in one structured, cohesive guide.
While many of the elements are shared across my website, this book organizes everything into a clear progression — from building a strong, resilient starter to mastering the core method you can apply to artisan loaves, sandwich bread, bagels, pizza, and more. No searching between posts — just one complete roadmap supported by original visuals and 15 thoughtfully sequenced recipes across 130+ pages.
Different Approaches to Sourdough Baking
Sourdough baking is as varied as the bakers themselves, with each adopting a method that best suits their environment, knowledge, and preferences.
The approach I share here has been adapted from a seasoned artisan baker and tailored through my own experience. I love it because it produces some of the best bread I’ve ever had, gluten-free or not.
My suggestion? Choose a method, give it a go, and if it resonates with you, stick with it. Amidst a sea of different opinions, remember that variations in technique don’t denote right or wrong but simply different paths to making bread.
Always stay open to learning; the quest for improvement is endless in the world of baking.
Why Opt for Gluten-Free (and Lectin-Free) Sourdough?
Fermentation is key to health. All grains need to be fermented. Sourdough culture is this mixed ecosystem of bacteria and yeast slowly breaking down the carbohydrates and gluten and releasing the nutrients in the grain.
Richard Bourdon
The decision to bake gluten-free sourdough stems from necessity, preference, and a passion for crafting authentic, nourishing food at home.
Many can’t tolerate wheat, gluten, or lectins, and the gluten-free options available in stores often fall short in flavor, texture, and nutritional value—not to mention their exorbitant cost.
My gluten-free sourdough method offers a gut-friendly alternative for those sensitive or allergic to both gluten and lectins (in fact, gluten is a type of lectin, but that’s another story). If you are extremely sensitive to gluten, or have celiac disease, please make sure you buy ingredients that are certified gluten-free, as cross-contamination can occur.
There are a few common ingredients in other methods of making gluten-free bread that are heavy in lectins, and you won’t find them in my method: potato starch, rice flour, quinoa flour, buckwheat, corn, and oats.
The Essential Tools
Beginning your sourdough journey requires some basic kitchen tools that you probably already have in your kitchen, such as whisks, bowls, jars, and spatulas.
Others are more specific to sourdough baking, like a Dutch Oven, digital scale, banneton (proofing basket), and lame (scoring razor), and you might need to purchase them before starting your journey. And then there are some tools that you might want to have with time but are not necessary to start.
Check out this helpful guide to gluten-free sourdough tools, where I explain everything in more detail.

The Steps for Making Gluten-Free Sourdough Bread
Here’s a streamlined overview of the process:
- Begin with the Starter: Begin by creating your sourdough starter and becoming familiar with its feeding routine to keep it active and healthy.
- Recipe Selection and Preparation: Choose your sourdough recipe and assemble the necessary ingredients and tools, ensuring everything is ready for the baking process.
- Preparing the Preferment (Levain): Create a preferment, or levain, from your starter; this is crucial for naturally leavening your bread.
- Dough Mixing: Follow your chosen recipe or method to mix the ingredients, carefully combining them to form the dough.
- Bulk Fermentation: Allow the dough to undergo bulk fermentation, a critical phase where it rises and develops flavor.
- Shaping: Once fermented, shape the dough into your desired loaf form, preparing it for its final rise.
- Final Proofing: Let the shaped dough undergo final proofing, setting the stage for optimal oven spring.
- Baking: Bake your loaf according to the recipe’s instructions, transforming the dough into a beautiful, aromatic bread.
- Cooling: After baking, allow your bread to cool properly, ensuring the texture and flavor are fully developed before slicing.
Creating Your Gluten-Free Sourdough Starter
The foundation of making sourdough bread is the starter, a fermented mixture of flour and water that captures wild yeast and beneficial bacteria from the environment.
For a gluten-free sourdough, the choice of flour can be a bit tricky. The common flours used to make GF sourdough are rice (especially brown rice), buckwheat, sometimes millet, and sorghum.
My starter is quite unique—it’s not only gluten-free but also made from a blend of lectin-free flours: teff, millet, and sorghum. This combination ensures the bread is safe for those with gluten sensitivities and also lower in other lectins, which can be inflammatory.
The process begins with creating wild yeast water, a natural yeast source derived from mixing water with organic fruits like blueberries, apples, and some dried fruits such as dates or aronia berries. Over about six days, this mixture ferments, capturing wild yeast from the fruits.
The next step involves combining 100 grams of this yeast water with 100 grams of the flour blend to form a paste. This paste ferments for 24 hours, becoming the base of the starter.
To create the starter, take 10 grams of this mixture, add it to a clean jar, and mix with 30-35 grams of water and 35 grams of the flour blend (to get a well-hydrated paste consistency), repeating this feeding process every 12 hours. This method nurtures a vibrant and healthy ecosystem in your starter, which is crucial for leavening your gluten-free sourdough bread.
For a comprehensive guide on creating and maintaining this special gluten-free and lectin-free starter, refer to my detailed article, where I dive into each step, ensuring you can cultivate a healthy and active starter.

Selecting Flours and Ingredients
While wheat sourdough only requires flour, starter, water, and salt, for gluten-free sourdough, we need to add a few more ingredients to make up for the absence of gluten. In my method, these are tapioca starch, psyllium husk flakes, and extra virgin olive oil.
The flour selection is very important for creating not only a good-looking loaf but also a nourishing one. I chose a mix of organic teff, sorghum, and millet, and I make my own gluten-free flour blend from equal parts of these three flours.
Store-bought gluten-free blends are usually full of starches, lectin-heavy ingredients, and gums. Plus, you can’t control the quality of each ingredient.
While I use a mix of these flour to feed my starter, for individual recipes they can be used alone or in combination, empowering you to experiment and discover the blend that best suits your baking goals.
For the gluten-free and lectin-free baker, teff, millet, and sorghum flours offer the best combination of flavor, nutrition, and baking properties. These flours, along with tapioca starch and psyllium husk flakes for binding and structure, create a versatile base for various sourdough recipes, allowing for endless experimentation and customization.
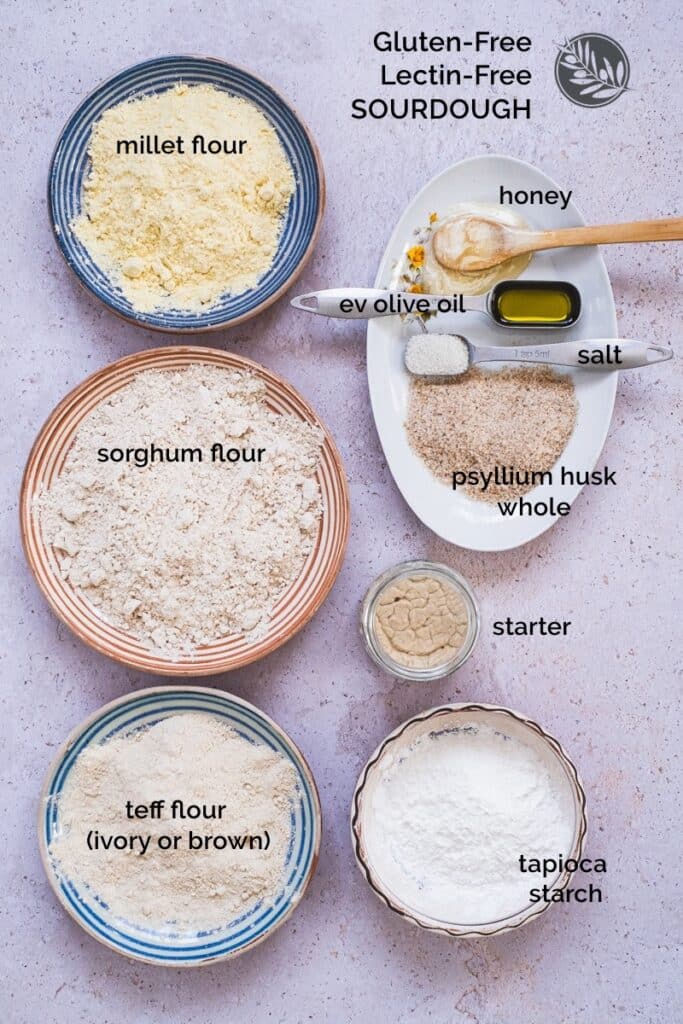
This is the complete list of ingredients for a regular sourdough loaf made with the three flours.
- Teff, Millet, and Sorghum Flour: The choice of flour significantly impacts the bread’s flavor and texture. Opt for fresh, organic varieties if available from reputable suppliers to ensure the best results, especially for feeding your starter. These flours can be used in any combination, allowing for customization based on preference and availability.
- Tapioca Starch: Contributes to the bread’s structure, improving the texture.
- Psyllium Husk Flakes: Essential for binding the dough, psyllium husk flakes (also called whole) cannot be substituted with powder. The flakes ensure the right texture and moisture retention within the loaf. LATER EDIT: Meanwhile, I’ve developed a recipe that is made with psyllium husk powder: Gluten-Free Multigrain Sourdough Bread (Open-Baked).
- Honey: A small amount of local, organic honey is recommended for its natural sweetness and fermentation benefits. If honey is not an option, organic maple syrup serves as a suitable alternative.
- Extra Virgin Olive Oil: A high-quality olive oil enhances the crumb and crust, adding subtle flavor and improving the bread’s overall texture.
- Water: The quality of water used can affect the sourdough’s development. Avoid chlorinated or fluoridated tap water and demineralized water, such as that from reverse osmosis systems. Spring or filtered water, retaining its natural minerals, is ideal for encouraging healthy fermentation.
- Salt: Steer clear of iodized options, as iodine inhibits fermentation. Sea salt, Celtic salt, or Himalayan pink salt are preferred for their natural composition and contribution to the bread’s flavor complexity.
- Add-Ons: The list of add-ons to create special recipes is unlimited. You can add spices, nuts and seeds, other flours like chestnut, hemp, and almond, dry fruits, cheese, butter, eggs, and more.
Your First Sourdough Recipe and The Preferment (Levain)
With your starter ready and your kitchen equipped, it’s time to tackle your first sourdough recipe.
To familiarize yourself with the process, begin with something simple, like this basic loaf using millet and sorghum flour, which is also one of my most popular recipes. Following the recipe closely will build your confidence and understanding, setting a strong foundation for future experimentation.
Since I am keeping a small starter, I will make a preferment whenever I need to bake. The preferment is a mix of starter, water and flour, unique for each recipe (let’s say a ‘personalized starter’). I usually make it just before I go to sleep so I can use it for the dough early the following day.

VIDEO: The Beginner’s Guide to Mixing Gluten-Free Sourdough Bread
Mixing your dough correctly is vital to the success of your bread. The good news is that gluten-free sourdough is generally simpler to handle than its wheat-based counterpart, requiring less time and effort.
Detailed instructions and visuals, such as videos or step-by-step photos, can be incredibly helpful in mastering this stage.
That’s why I’m sharing here a video of me making my Hemp Sourdough Bread With Walnuts. This video will provide you with a visual guide to my mixing method and, hopefully, will convince you that the process of making gluten-free bread is not as difficult as it seems.
Understanding Proofing and Fermentation in Sourdough Baking
Proofing, also known as fermentation, is a crucial step where the dough rises and develops its unique sourdough flavor. This process has two main parts: bulk fermentation, where the dough grows before shaping, and final proofing, where it rises again after being shaped.
Getting the right balance in fermentation is essential for your sourdough bread’s taste and texture. The time needed for this can vary based on your environment, like the temperature and humidity, and can be done at room temperature or in the fridge. In cooler environments, fermentation takes longer, which can enhance the flavor and sourness of your bread.
For gluten-free sourdough, expect a subtler rise in the dough, around 20-30%, as the ideal fermentation level. A more visible rise can often indicate overfermentation. With my method, a normal loaf might need 2 to 4 hours at room temperature, or up to 8 hours in the fridge.
When overprooved, the bread might turn out hollow on top and have a gummy bottom. Underproofing, on the other hand, can cause the bread to burst at the bottom or sides.
Avoiding overproofing and underproofing is a big challenge (probably the biggest challenge of making bread). Recipes offer a guideline, but you’ll likely need to adjust based on your kitchen’s specific conditions. That’s where experience and practice play a role, and Michael Pollan’s advice comes in handy: do it by feel.
It’s helpful to keep track of your baking experiments, noting down what works and what doesn’t. This way, you gradually learn to adjust the process based on feel and experience, aiming for that perfect bake every time.

Scoring the Dough
Scoring the dough with a lame or a sharp razor is not just an artistic expression; it’s a crucial step that guides the bread’s expansion in the oven.
This technique allows the baker to control where the loaf will open as it bakes, ensuring it rises uniformly and achieves the desired shape. Without proper scoring, the bread might crack unpredictably, affecting its appearance and texture.
Baking Your Bread
There are primarily two methods to bake gluten-free sourdough bread, catering to different preferences for crust and crumb.
Baking in a Dutch Oven
The first method involves baking in a Dutch Oven, known for its ability to mimic a professional baker’s oven by trapping steam and creating a beautifully crusty crust.
Begin by preheating your Dutch Oven to the highest temperature your oven can reach. After proofing and scoring, place the dough into the hot Dutch Oven, lid on, and bake. Start at a very high temperature for about 40 minutes, then remove the lid, slightly lower the temperature, and continue baking to perfect the crust and crumb. Ovens are different, so take notes and adjust temperature and timing as needed.
This technique is ideal for those who love a thick, crunchy crust on their bread.
Open Baking
The second method, open baking, yields a softer crust and is done on a baking sheet or stone in an open oven.
To mimic the steamy environment crucial for bread rise and crust formation, place a tray of hot water at the bottom of the oven during the first 20 minutes of baking. This steam helps create a delicate crust and supports the oven spring. After the steam phase, remove the tray and continue baking until the loaf is golden and sounds hollow when tapped, indicating it’s done (about 30-35 minutes).
Open baking has the advantage of accommodating more loaves at once, also making it versatile for baking buns, bagels, flatbread, pizza, etc.
Regardless of the chosen method, high heat is crucial for activating the yeast and achieving the oven spring in the initial baking phase. Experimenting with both methods will enable you to find your personal preference and the ideal baking technique for your gluten-free sourdough bread.

The Cooling Process
Cooling is the final, often overlooked step that is crucial for achieving the ideal texture and flavor.
Resist the temptation to cut into your bread immediately after baking. Instead, allow it to rest on a cooling rack for about five hours.
This patience pays off by ensuring the crumb sets properly and moisture is evenly distributed, resulting in a loaf that’s satisfying to slice and eat.

The Crust, the Crumb, and the Texture
Initially, the slightly moist crumb of gluten-free sourdough bread may catch you off guard. While a bit of extra moisture is typical for these loaves, an overly gummy texture isn’t. Extending the cooling time and opting for toasting can effectively reduce this moisture.
I personally lean towards toasting the bread for a better texture, though some of my family members enjoy it as it is. Ultimately, it comes down to individual taste preferences.
How a successful gluten-free sourdough bread should look:
- Have a visible rise, with expanded scoring lines
- Golden brown crust
- Light, airy, soft, and even crumb
If the dough expands sideways and the bread is slightly flat, but it still has a light and airy crumb, it might be because you are using a banneton that is too large for this dough size.
A gluten-free sourdough bread SHOULDN’T be heavy, dense, and gummy. If this is the case, something isn’t working, and you will have to figure out what the problem is.

No Waste: Using Sourdough Discard
Sourdough discard, the leftover starter from feedings, is not a waste but a versatile ingredient for a variety of recipes, from pancakes to crackers to cakes. You can even make bread with discard (recipe coming soon and link will be added here).
Storing discard in the refrigerator and using it within two weeks maximizes its potential, reducing waste and inspiring creativity in your gluten-free baking endeavors.
To minimize waste from feedings, in the case you are not baking every day, you can store your starter in the refrigerator, and only take it out one day before baking (feed it once or twice twice before making a preferment).
Gluten-Free Sourdough Discard Recipes:
- Sourdough Pinwheels With Cheese
- Healthy Sourdough Discard Waffles
- Onion and Caraway Sourdough Crackers
- Sugar-Free German Plum Cake
- Sourdough Discard Coffee Cake with Blueberry Jam
- Gluten-Free Rusk Bread
- High-Protein Sourdough Crackers (Gluten-Free)

About Storing Gluten-Free Sourdough Bread
The sourdough bread I make is resilient and easy to store. I wrap it in a clean, organic cotton towel and store it on the counter, where it will last for up to three days (even more if it’s not too hot or humid in the room).
You can also store it in a paper bag or a bread container. Just don’t use plastic bags.
This bread can also be sliced and the slices separated with culinary paper and frozen. It thaws at room temperature or directly in a toaster or oven.
Gluten-Free Sourdough Recipes
A sourdough starter is a gift that keeps on giving. Once you have an established starter, the possibilities are endless. Not only can you make delicious loaves of bread, but you can make bread rolls, pizza, focaccia, flatbread, breadsticks, bread muffins, bagels, baguettes and even croissants.
- Gluten-Free Sourdough Bread Recipe With Sorghum and Millet (Lectin-Free)
- Guten-Free Sourdough Focaccia (Lectin-Free)
- Rustic Sourdough Rolls With Teff, Millet, and Sorghum (Lectin-Free)
- Sourdough Flatbread with Sorghum Flour
- Sourdough Pizza Crust with Millet and Sorghum
- Hemp Sourdough Bread with Walnuts
- Walnut Cranberry Sourdough Bread
- Teff Sourdough Bread With Cardamom
- Soft and Cheesy Sourdough Breadsticks
- Gluten-Free Sourdough Croissants
- Gluten-Free Sourdough Muffins with Halloumi Cheese
- Gluten-Free Sourdough Bagels with Teff, Millet, and Sorghum
- Gluten-Free Sourdough Cinnamon Rolls (Chai-Infused)
- Gluten-Free Multigrain Sourdough Bread (Open-Baked)
- Soft Gluten-Free Sourdough Rolls
- Easy Millet Sourdough Bread (Gluten-Free)
- Easy Sorghum Sourdough Bread (Gluten-Free)
- Easy Teff Sourdough Bread (Gluten-Free)
- Gluten-Free Rustic Sourdough Baguettes

Happy Baking!
Embarking on the journey to master lectin-free and gluten-free sourdough bread has been among the most fulfilling culinary adventures of my life.
It’s taught me not just a valuable skill but also offered profound lessons about patience, the beauty of slowing down, and the joy of delayed gratification in our instant-gratification world.
I’ve heard from many readers who feel overwhelmed or even scared to start—’terrified’ is a word that comes up often. But really, what’s the worst that can happen? My path to perfecting this method was paved with numerous failed loaves, and I still fail every now and then. Most failed loaves can be turned into bread crumbs or croutons, anyway. Remember, mistakes are simply stepping stones to learning.
I sincerely hope that this gluten-free sourdough guide for beginners will inspire you to try my sourdough method and find as much joy in it as I do.
Happy baking!
*This post contains affiliated links, which means I get a small commission if you choose to purchase something via one of my links, at no extra cost to you.
39 Comments
Deanne Forshee
March 20, 2026 at 9:52 pmHi Claudia,
I’m curious why you use yeast water? Most sour dough starters I cling gluten free, just use filtered water.
Thank you for sharing your experience and recipes!
Deanne
Claudia
March 25, 2026 at 8:28 amHi Deanne! There are a few reasons I love using yeast water to make a starter. A regular starter will take a lot of flour, and days of discarding to get to the starting point. And then it takes longer to mature and be able to bake good bread with it. And many people fail. The wild yeast collected from fruits will make the process very easy and fast. Yes, it takes about 5 days for the wild yeast to develop, but the handling time is minimal: you just have to stir for 5 seconds, twice a day. Then you mix the water with flour once, and from this culture you will use just 10g to make your starter. That’s it. You only discard once. From this point on you feed it for a couple of days, and then you can make great bread. Also, I think a starter made this way is very strong and resilient. So yeah, these are my reasons, I hope it helps. xx -Claudia