
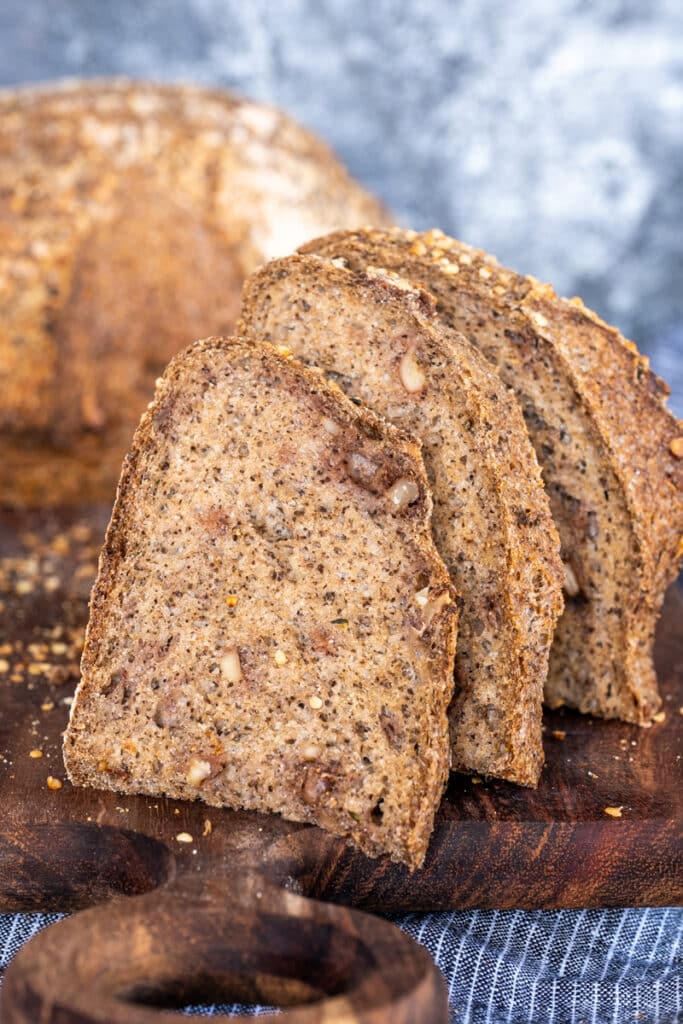
If you want to give more nutritional power to your lectin-free and gluten-free sourdough bread, adding hemp flour is the way to go.
Not only is hemp packed with protein, fiber, essential minerals, and vitamins, but it also makes this bread extra tasty. Plus, adding walnuts gives it a crunchy, nutty flavor and even more nutritional benefits.
This gluten-free hemp sourdough bread with walnuts recipe is perfect for anyone looking to up their gluten-free baking game or simply enjoy a wholesome and delicious slice of bread. So, grab your ingredients and get ready to bake!
If you’re just starting your journey into gluten-free and lectin-free sourdough baking, we strongly suggest exploring our Beginner’s Guide to Baking Gluten-Free Sourdough Bread. It provides a thorough introduction to our baking method, ensuring you have all the knowledge needed to embark on this delicious adventure.
Are you new to sourdough making?
This hemp sourdough bread with walnuts is made with our lectin-free and gluten-free sourdough starter. If you don’t have the starter already, you can make it in just six days. Don’t worry; the hands-on time for this process is only two minutes daily.
If you already have our starter and have made our bread before
If you are already familiar with my sourdough method, this hemp sourdough with walnut loaf is similar to our gluten-free and lectin-free sourdough bread with sorghum and millet.
It’s the same method, but you are using a mix of three flours (teff, sorghum, and millet), and adding hemp flour and walnuts.

Is hemp flour good for baking?
Hemp flour is excellent for baking. It is particularly great for making bread but also other kinds of baked goods that are more on the savory side (like savory muffins). Hemp flour can also be used as a filler for meatballs, meatloaf, or sausage.
What is hemp flour?
Since hemp flour is quite new in the modern culinary world, there is some confusion about what hemp flour is. Let’s explore the forms culinary hemp comes in:
- Hemp hearts. This is the most common, and you can find it in many stores. Hemp hearts are hulled hemp seeds (the outer layer is removed). They are great for making hemp milk, and adding to salads, smoothies, porridge, ground meat, bread, and even cakes. Hemp hearts are more concentrated in protein and fats.
- Hemp seeds. Hemp seeds are the whole seeds of the hemp plant. They can be used the same way as hemp hearts, but have more fiber and a stronger taste.
- Hemp flour is made by grinding whole hemp seeds and has the same nutritional value as the seeds. Great for baking.
- Hemp protein powder. It’s made by removing most of the fiber in the hemp flour, which results in a powder that is concentrated in protein. Great for adding to smoothies, cakes, pancakes, and porridge.

Nutritional value of hemp seeds
Hemp seeds are considered a superfood, being packed with nutritional value. They are an excellent source of protein, containing all 9 essential amino acids that the body needs for optimal health.
They are also high in healthy fats, including omega-3 and omega-6 fatty acids, which have been linked to improved heart health, brain function, and reduced inflammation.
In addition, hemp seeds are a good source of fiber, iron, magnesium, zinc, and vitamin E, all of which play important roles in supporting overall health and well-being. Incorporating hemp seeds in any form into your diet is an easy and delicious way to boost your nutrient intake and support a healthy lifestyle.
Tools needed to make gluten-free sourdough bread
You might already be familiar with this list if you have a starter and made any of my sourdough recipes before, but just in case, this is a reminder.
These are just suggestions:
- Digital Kitchen Scale
- Small jars for preferments (and starter)
- Glass bowl (one that can hold about 9-10 cups of fluid, around 80oz, 2.5 Qt)
- Plastic covers (if the glass bowl doesn’t have a lid, but also for the proofing basket)
- Silicon or plastic bowl/dough scraper
- Wooden spatula / spoon
- Banneton basket , round (fermenting basket with liner)
- Banneton basket, small oval
- Towels for the banneton and for wrapping bread
- Parchment paper sheets (get the heaviest duty you can find as we work at high temperatures)
- Dough scoring razor/lame (a simple razor will work too, but it’s easier if it has a handle)
- Ball tea strainer for dusting (or any small, fine sieve)
- Dutch oven or an appropriate cooker that works for baking bread. My friend uses this Lodge Cooker that can be used for bread, so far I’ve been using my red Staub cocotte.
- Sourdough baking starter kit (alternative to getting some of the items on this list separately). Don’t get one with a metal scraper, as that won’t be useful in our case.
- Proofing box: Brod and Taylor Folding Proofer and Slow Cooker (This is optional. It can be helpful if you can’t control the temperature and humidity in your home, if you live at a high altitude, if the air is too dry, etc). My friend bought this one and uses it to make bread; I don’t have one.
Links to ingredients and equipment can also be found on our SHOP page under the category ‘Project sourdough‘.

Ingredients to make gluten-free hemp sourdough bread
For the preferment (make the night before, right before you feed the starter)
- 10 grams starter
- 30 grams of water, or the amount your flour needs, up to 35 grams (spring, filtered, non-chlorinated)
- 35 grams of flour mix (for this bread, equal quantities of sorghum, teff, and millet)
The wet mix
Use spring, filtered, or bottled water, but not reverse osmosis water.
- 17 grams psyllium husk flakes or whole psyllium (not powder)
- 420 grams of water (separated, 400 grams + 20 grams)
- 10 grams organic, raw honey, preferably local
- 6 grams extra virgin olive oil
- 75 grams sorghum + millet + teff preferment (made the night before)
The dry mix (we have a total of 300 grams flour)
- 50 grams teff flour
- 75 grams millet flour
- 75 grams sorghum flour
- 30 grams hemp flour
- 70 grams tapioca flour
- 6 grams non-iodized, good quality fine salt
Add-ins
- 1/3 cup chopped walnuts (raw)
- a few tablespoons of hemp hearts for topping
VIDEO: How to make gluten-free sourdough
For the video and printable recipe, scroll to the recipe card at the bottom of this post.
How to make this gluten-free hemp sourdough bread, step by step
For visual help, please watch the video in the recipe card. While it might look overwhelming initially, making this bread is not complicated at all, and once you get used to the method, it will seem so easy.
Make the preferment
- Mix all the ingredients the night before (you will prepare the dough in the morning). Please remember the preferment doesn’t have a long life. Please use it within 10 hours maximum from the moment you make it. So if you make the preferment at 11 pm before sleep, make sure you use it by 9 am the next morning.
The mixing method
- In a glass or plastic bowl, combine 400g of the water, psyllium husk flakes, honey, and extra virgin olive oil. Mix well and set it on the side. Once the psyllium husks absorb the water, this mixture will have a gel-like texture (it needs about 5 minutes).
- In the meantime, combine all the dry ingredients in a glass bowl.
- Now add the preferment to the psyllium husk gel. Add the remaining 20g of water to the preferment jar, shake, and pour the content into the psyllium husk mixture (this is to make sure we use all the preferment that gets stuck on the jar). Mix well with a spatula or wooden spoon.
- Add the preferment gel mixture to the dry ingredients bowl, and incorporate as much as possible with a spatula or wooden spoon. Start mixing with your hand until the dough is homogeneous and has no lumps. Add the walnuts and mix until the nuts are getting evenly distributed. The dough is soft and sticky.
- Now you can start mixing with the silicone or plastic dough scraper, scraping the dough from the sides of the bowl, and folding it into the center. Rotate the bowl and repeat with the same movement for about 30 seconds. Please watch the video in the post above for a visual guide.
- Cover the bowl with a plastic cover, then wrap it in two extra big plastic bags and tighten them. From now on, the fermentation starts. I keep my bowl on the kitchen counter. Ideally, it needs a place where the temperature stays constant throughout the process.
Bulk fermentation
- Let it ferment for 1 hour and 15 minutes if the temperature in the house is around 21 degrees Celcius (70 degrees Fahrenheit). If it’s hotter than that, the time will decrease; if it’s colder, the time will increase. You must experiment until you find the right time for your situation.
Shaping the dough
- The video will be the most helpful here; please watch it. Gently invert the dough on a working surface, dusted with just a tiny bit of flour. Gently lift one-third of the dough and fold it on top of itself. Then fold it one more time, so now what was on the bottom on the working surface is on the top. Now you will shape the dough and seal the bottom part, as seen in the video.
Proofing the dough
- Dust the lining of the Banneton or the towel with flour. Now that the dough is sealed and shaped, gently transfer it to the proofing basket with the sealed side facing upward (the smooth face down), as shown in the video.
- Dust the top with flour, and cover with plastic wrap or wrap it in a towel. Because my house is pretty dry, I spray a little bit of water on the towel. I cover it in plastic wrap and then in two plastic bags that I tighten well. Again, you might not need these extra steps in your house. The proofing time will be about the same as the bulk fermentation. At around 70F, it will be 1 hour and 15 minutes.
Preheat the oven
- Start the oven to 250C/480F for about 45 minutes before baking, with the Dutch oven and the lid inside the oven
Scoring and transferring to the oven
- When the dough is proofed and your oven and cast iron are preheated, gently invert the dough from the basket to the middle of a parchment paper sheet.
- Spray the top of the dough with a little bit of water, and sprinkle the hemp hearts on top. You will have to use the palm of your hand to help them stick to the surface. Then dust with flour (I like to use sorghum).
- When you are ready to score the bread, take the Dutch oven out next to you (carefully so you don’t burn yourself). Score the bread: I like a cross pattern for this bread.
- Lift the dough with the edges of the parchment paper and gently lower it into the cast iron. Spray the dough with water to create steam, cover it with the lid, and put it back into the oven. Alternatively, you can throw two ice cubes into the pot, but not on top of the bread, somewhere next to it, or outside the paper.
- Bake covered for 40 minutes.
- After 40 minutes, carefully remove the lid (leaving the lid inside the oven to maintain the temperature), lower the temperature to 225C/440F, and bake for 40 more minutes (watch the bread after 30 minutes, some ovens run hotter).
- Take the pot out, and carefully remove the bread.
- Let the bread rest on a cooling rack for at least 5 hours. I know it can be tempting, but don’t slice it before 5 hours, as you will ruin the texture. For the best crumb, I recommend letting it rest overnight.
- Store the bread for 2 to 3 days at room temperature, in a paper bag, or wrapped in a cotton towel. The first and second day is great fresh, but from day 3, I prefer it toasted. I actually love it toasted, even when it is fresh. You can also slice it, separate the slices with parchment paper and freeze it. I thaw it in the toaster.
For troubleshooting and frequently asked questions, please visit our Sorghum and Millet Sourdough Bread Recipe.

How to store and serve this hemp sourdough bread
This can be a difficult rule to obey, but this bread should be left to rest for at least 5 hours before slicing it. This is when the crumb, texture, and taste continue to develop.
In my experience, the best loaves of bread are those left to rest overnight.
One of the reasons I love this gluten-free and lectin-free sourdough bread is that it stays fresh on the counter for a few days. I only wrap it in a cotton towel.
I love to toast each slice before I eat it. Toasting the bread will take some moisture specific to gluten-free sourdough bread. And if you increase toasting time, you can get a crunchy toast.
This bread also freezes really well. Slice it, separate the slices with parchment paper, and freeze it in a plastic or silicon bag. Thaw it directly in the toaster.
Enjoy this lectin-free and gluten-free hemp sourdough bread with walnuts. Let me know in the comments if you make it. ❤️
*This post contains affiliated links, which means I get a small commission if you choose to purchase something via one of my links, at no extra cost to you.
Print
Hemp Sourdough Bread with Walnuts (Gluten-Free)
- Prep Time: 30 minutes
- Cook Time: 1 hour 20 minutes
- Total Time: 1 hour 50 minutes
- Yield: 1 loaf
- Category: Sourdough
- Method: Baking
- Diet: Gluten-Free
Description
If you want to give more nutritional power to your lectin-free and gluten-free sourdough bread, adding hemp flour is the way to go. Not only is hemp packed with protein, fiber, essential minerals, and vitamins, but it also makes this bread extra tasty. Plus, adding walnuts gives it a crunchy, nutty flavor and even more nutritional benefits. This gluten-free hemp sourdough bread with walnuts recipe is perfect for anyone looking to up their gluten-free baking game or simply enjoy a wholesome and delicious slice of bread. So, grab your ingredients and get ready to bake!
Ingredients
FOR THE PREFERMENT (make the night before, right before you feed the starter)
- 10 grams starter
- 30 grams of water, or the amount your flour needs, up to 35 grams (spring, filtered, non-chlorinated)
- 35 grams of flour mix (for this bread, equal quantities of sorghum, teff, and millet)
THE WET MIX
- 17 grams psyllium husk flakes (not powder)
- 420 grams of water (spring, filtered, bottled, no chlorine, no tap, and don’t use reverse osmosis water)
- 10 grams organic, raw honey, preferably local
- 6 grams extra virgin olive oil
- 75 grams sorghum + millet + teff preferment (made the night before)
THE DRY MIX
- 50 grams teff flour
- 75 grams millet flour
- 76 grams sorghum flour
- 30 grams hemp flour
- 70 grams tapioca flour
- 6 grams non-iodized good quality fine salt
ADD-INS
- 1/3 cup chopped walnuts (raw)
- a few tablespoons of hemp hearts for topping
Instructions
MAKE THE PREFERMENT
- Mix all the ingredients the night before (you will prepare the dough in the morning). Please remember the preferment doesn’t have a long life. Please use it within 10 hours maximum from the moment you make it. So if you make the preferment at 11 pm before sleep, make sure you use it by 9 am the next morning.
THE MIXING METHOD
- In a glass or plastic bowl, combine 400g of the water, psyllium husk flakes, honey, and extra virgin olive oil. Mix well and set it on the side. Once the psyllium husks absorb the water, this mixture will have a gel-like texture (it needs about 5 minutes).
- In the meantime, combine all the dry ingredients in a glass bowl.
- Now add the preferment to the psyllium husk gel. Add the remaining 20g of water to the preferment jar, shake, and pour the content into the psyllium husk mixture (this is to make sure we use all the preferment that gets stuck on the jar). Mix well with a spatula or wooden spoon.
- Add the preferment gel mixture to the dry ingredients bowl, and incorporate as much as possible with a spatula or wooden spoon. Start mixing with your hand until the dough is homogeneous and has no lumps. Add the walnuts and mix until the nuts are getting evenly distributed. The dough is soft and sticky.
- Now you can start mixing with the silicone or plastic dough scraper, scraping the dough from the sides of the bowl, and folding it into the center. Rotate the bowl and repeat with the same movement, for about 30 seconds. Please watch the video in the post above for a visual guide.
- Cover the bowl with a plastic cover, then wrap it in two extra big plastic bags and tighten them. From now on, the fermentation starts. I keep my bowl on the kitchen counter. Ideally, it needs a place where the temperature stays constant throughout the process.
BULK FERMENTATION
- Let it ferment for 1 hour and 15 minutes if the temperature in the house is around 21 degrees Celcius (70 degrees Fahrenheit). If it’s hotter than that, the time will decrease; if it’s colder, the time will increase. You must experiment until you find the right time for your situation.
SHAPING THE DOUGH
- The video will be the most helpful here; please watch it. Gently invert the dough on a working surface, dusted with just a tiny bit of flour. Gently lift one-third of the dough and fold it on top of itself. Then fold it one more time, so now what was on the bottom on the working surface is on the top. Now you will shape the dough and seal the bottom part, as seen in the video.
PROOFING THE DOUGH
- Dust the lining of the Banneton or the towel with flour. Now that the dough is sealed and shaped, gently transfer it to the proofing basket with the sealed side facing upward (the smooth face down), as shown in the video. Dust the top with flour, and cover with plastic wrap or wrap it in a towel. Because my house is pretty dry, I spray a little bit of water on the towel. I cover it in the plastic wrap, and then in two plastic bags that I tighten well. Again, you might not need these extra steps in your house. The proofing time will about the same as the bulk fermentation. At around 70F, it will be 1 hour and 15 minutes.
PREHEAT THE OVEN
- To 250C/480F for about 45 minutes before baking, with the Dutch oven and the lid inside the oven.
SCORING AND TRANSFERRING TO THE OVEN
- When the dough is proofed and your oven and cast iron are preheated, gently invert the dough from the basket to the middle of a parchment paper sheet.
- Spray the top of the dough with a little bit of water, and sprinkle the hemp hearts on top. You will have to use the palm of your hand to help them stick to the surface. Then dust with flour (I like to use sorghum).
- When you are ready to score the bread, take the Dutch oven out next to you (carefully so you don’t burn yourself). Score the bread: I like a cross pattern for this bread.
- Lift the dough with the edges of the parchment paper and gently lower it into the cast iron. Spray the dough with water to create steam, cover it with the lid, and put it back into the oven. Alternatively, you can throw two ice cubes into the pot, but not on top of the bread, somewhere next to it, or on the outside of the paper.
- Bake covered for 40 minutes.
- After 40 minutes, carefully remove the lid (leaving the lid inside the oven to maintain the temperature), lower the temperature to 225C/440F and bake for 40 more minutes (watch the bread after 30 minutes, some ovens run hotter).
- Take the pot out, and carefully remove the bread.
- Let the bread rest on a cooling rack for at least 5 hours. I know it can be tempting, but don’t slice it before 5 hours, as you will ruin the texture. For the best crumb, I recommend letting it rest overnight.
- Store the bread for 2 to 3 days at room temperature, in a paper bag, or wrapped in a cotton towel. The first and second day is great fresh, but from day 3 I prefer it toasted. I actually love it toasted, even when is fresh. You can also slice it, separate the slices with parchment paper and freeze it. I thaw it in the toaster.
15 Comments
Cindy
September 14, 2025 at 2:22 pmWhere is the video?
Rose Best
April 15, 2025 at 4:47 amIs it just me ? I cannot find the video that is mentioned. I have looked everywhere.
Janelle
November 26, 2023 at 8:30 pmI’m so excited to try this recipe! Do you think it would work with a gf sourdough starter I have that I feed with brown rice flour?
Claudia
November 27, 2023 at 4:05 amHi Janelle! While I’ve never tried my recipes with another starter, I know there are people who make my recipes using their own starters, many made with brown rice flour. So I believe it works. I would love to hear from you if you give it a try. -Claudia
Lisa
October 23, 2023 at 9:41 pmThank. you! I just ordered some hemp flour and I am eager to try this recipe. I am so happy I found you as your knowledge and recipes have made it possible for me to make delicious and nutritious, low carbohydrate sourdough bread for family members with celiac and diabetes. It is hard to find flour blends that have a low glycemic index–but yours does.