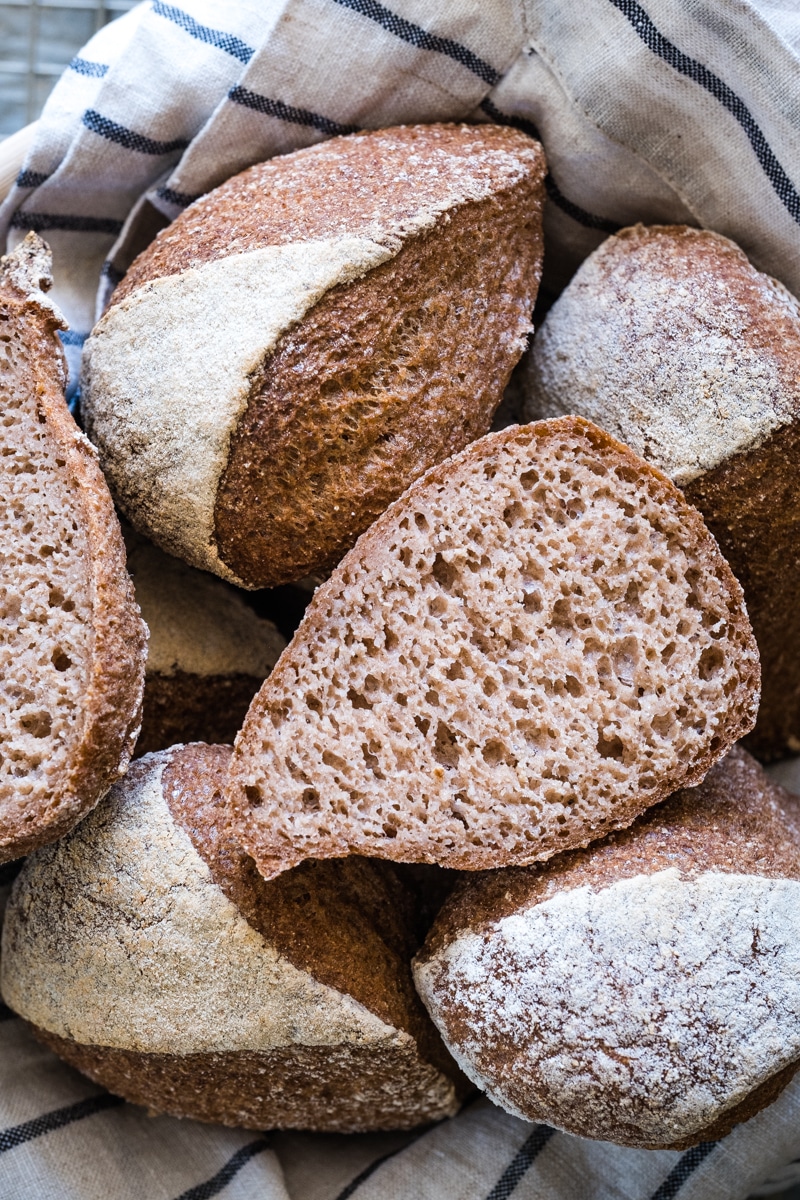
These crusty, rustic-style gluten-free sourdough rolls are the perfect breakfast bread. They are made with my lectin-free sourdough starter and a mix of lectin-free and gluten-free flours: teff, millet, and sorghum. With these rolls, you get a fair amount of crust but a pliable slice and a soft and airy crumb.
My lectin-free and gluten-free sourdough adventure continues. Inspired by a fellow sourdough baker – EvaBakesBread – and motivated by my husband’s request for bread rolls, I created these rustic-style bread rolls.
So far, they are my favorite way of enjoying lectin-free sourdough bread. You see, I am a lover of crust, so the ratio of crust to crumb in these bread rolls is perfect for me.
Up to the point of the final shaping into rolls, the process is almost the same as making my millet and sorghum bread recipe, which I will link below. So if you are already familiar with my method of making bread, making these rolls will be easy. Briefly, there are the differences:
- We are using a different mix of flours: teff + millet + sorghum
- We might be adding a little bit more water (10-20g), since teff can absorb more
- We are adding an extra step after proofing the bread, the final shaping into triangles, which is easy.
- We are using a different baking method.

New to lectin-free and gluten-free sourdough making?
If you are new to lectin-free and gluten-free sourdough baking, the first thing you need to know is that you first need a sourdough starter.
Making sourdough is a process that involves some learning at the beginning, but I assure you it is not rocket science. Once you are set up with a good starter and become familiar with my method, you acquire a skill for life, and the sky is the limit.
You can find my recipe for sourdough starter and a classic bread in my previous posts:
- Gluten-Free Sourdough Starter With Millet, Teff, and Sorghum Flour (Lectin-Free)
- Gluten-Free Sourdough Bread Recipe With Sorghum and Millet
If you prefer a softer bread, you will also find a recipe for lectin-free sourdough focaccia:
If you don’t know what lectins are and which flours are both gluten-free and lectin-free, I recommend this article:

Ingredient shopping list:
- Teff flour
- Millet flour
- Sorghum flour
- Tapioca starch
- Psyllium husk flakes (not powder)
- Extra virgin olive oil
- Non-iodized quality fine salt
- Raw, organic, local honey
Equipment & tools :
- Digital Kitchen Scale
- Small jars for preferments (and starter)
- Glass bowl (one that can hold about 9-10 cups of fluid, around 80oz, 2.5 Qt)
- Plastic covers (if the glass bowl doesn’t have a lid, but also for the proofing basket)
- Silicon or plastic bowl/dough scraper
- Wooden spatula / spoon
- Banneton (round fermenting basket with liner)
- Towels for the banneton and for wrapping bread
- Parchment paper sheets (get the heaviest duty you can find as we work at high temperature)
- Ball tea strainer for dusting (or any small, fine sieve)
- Large oven baking sheet (I use the one provided with the oven)
The above ingredients and equipment can also be found on our SHOP page under the category ‘project sourdough’.
Visual help
I made this video to show you how I do the final shaping and better see the final result and the texture of the rolls. For more videos of the process of making bread, check the posts linked in the first paragraphs.
The second video is showing how I seal the dough and transfer it to the proofing basket.
Ingredients for making lectin-free and gluten-free sourdough rolls
FOR THE PREFERMENT (make the night before):
- 10 grams unfed starter (using the starter you fed earlier in the day)
- 30 grams of water (spring, filtered, non-chlorinated)
- 35 grams of flour mix (equal quantities of teff, millet, and sorghum – you can use the mix for feeding the starter)
THE WET MIX:
- 17 grams psyllium husk flakes (not powder)
- 420 grams of water + 10-20 more grams if necessary (spring, filtered, bottled, no chlorine, no tap, and don’t use reverse osmosis water)
- 10 grams organic, raw honey, preferably local
- 6 grams extra virgin olive oil
- 75 grams teff + millet + sorghum preferment (made the night before)
THE DRY MIX:
- 230 grams flour: 76g teff + 76g millet + 77g sorghum
- 70 grams starch (tapioca flour)
- 6 grams non-iodized good quality fine salt
NOTE about the flour mix: For a more rustic taste and texture, I love to add to the mix some coarse sorghum and millet flour. I have found two types of sorghum flour and millet flour here in Denmark: one type is very fine, and the other one is coarse. I will add about 50-60% coarse flour to the mix, keeping the proportions. Eg. For the 77g millet part, I will add a mix of fine plus coarse millet flour, about 60% coarse. Same with sorghum. I don’t have coarse teff flour, but you can play with that, too, if you have some. If you don’t have all these different types of flour, don’t worry, use any type you have. But keep the equal mix of teff + millet + sorghum (230 grams in total).


The Method: How to Make Gluten-Free Sourdough Rolls
MAKE THE PREFERMENT:
- Mix all the preferment ingredients the night before (you will prepare the dough the next morning)
THE MIXING METHOD:
In a glass or plastic bowl, combine the water, psyllium husk flakes, honey, and extra virgin olive oil. Mix well and set it on the side. Once the psyllium husks absorb the water, this mixture will have a jelly-like texture (it needs about 5 minutes).
In the meantime, mix all the dry ingredients in a glass bowl.
Now add the preferment to the psyllium husk jelly. Mix well with a spatula or wooden spoon.
Add the preferment jelly mixture to the dry ingredients bowl, incorporate as much as possible with a spatula or wooden spoon, then start mixing with your hand. Mix well until the dough is homogeneous and has no lumps. The dough is soft and sticky.
Now you can start mixing with the silicone or plastic dough scraper, scraping the dough from the sides of the bowl, and folding it into the center. Rotate the bowl and repeat with the same movement for about 1 minute. Please watch the video in the bread post linked above for a visual guide.
Cover the bowl with a plastic cover, then wrap it in two extra big plastic bags and tighten the bags. From now on, the fermentation starts. I keep my bowl on the kitchen counter. Ideally, it needs a place where the temperature stays constant throughout the process.
BULK FERMENTATION:
Let it ferment for 1 to 2 hours, depending on the temperature and humidity in your house. At about 20 degrees Celcius (68 degrees Fahrenheit), it can take 2 hours. If it’s hotter than that, the time will decrease. At about 72-74 degrees Fahrenheit, my bulk fermentation takes about 1 hour. When teff is involved, the dough might ferment faster, so keep an eye on it at the 45-minute mark.
SHAPING THE DOUGH:
The videos from the bread post linked above will be the most helpful here; please watch them. Gently invert the dough on a working surface, dusted with just a tiny bit of flour. Gently lift one-third of the dough and fold it on top of itself. Then fold it one more time, so now what was on the bottom of the working surface is on the top. The following step is to shape the dough and seal the bottom part. For this part, please watch the second video above, where you ca see how I seal the dough and transfer it to the proofing basket.
PROOFING THE DOUGH:
Ensure the lining of your Banneton or proofing basket (or a towel if it doesn’t have a liner) is dusted with flour. Now that the dough is sealed and shaped, gently transfer it to the proofing basket with the sealed side up, as shown in Part 2 Video.
Dust the top with flour, and cover with plastic wrap or wrap it in a towel. Because my house is pretty dry, I spray a little water on the towel. I cover it in plastic wrap, and then in two plastic bags that I tighten very well. Again, you might not need these extra steps in your house.
The proofing time will be about the same as the bulk fermentation. At 72F, it might be 1h. Whenever I use teff flour in my bread, fermentation time, in general, tends to lower.
When you start the proofing, you can start preheating the oven, at 250C (480F). Prepare a baking sheet (I use the one provided with the oven), by lining it with parchment paper. No need to preheat it.
Make sure you have about 150g of hot water (you can use normal tap water) and another small baking dish where you will add the hot water (the first 20 minutes of the baking will be done using steam).


FINAL SHAPING AND TRANSFERRING TO THE OVEN:
When the dough is proofed, gently invert the dough from the basket to the middle of the baking sheet covered in parchment paper.
Dust the dough with sorghum or millet flour and gently spread it on the surface of the dough with your palm.
Put the smaller baking dish into the oven to preheat it before you add the hot water to it).
With the help of a dough scraper, cut the dough into 8 equal parts (first halves, then quarters, then each quarter into two parts). Separate the 8 triangles and insert the baking sheet into the hot oven. This is also when you add the hot water to the preheated small baking dish/tray.
Close the door, lower the heat to 240C/460F and bake for 20 minutes with steam.
After 20 minutes, remove the small tray from the oven (the water has probably evaporated by now), and turn the heat down to 230C/450F. Bake for 35 more minutes.
Take the baking tray out, transfer the bread rolls to a cooling rack and let them cool for at least 2 hours before slicing/eating.

How to serve gluten-free sourdough rolls?
They are the perfect size for breakfast and takeaway lunches. Serve them with eggs, good-quality butter, honey, or avocado. I also like to use them for sandwiches. The flat part makes a great base for an open burger.
How to store the gluten-free sourdough rolls?
After they have cooled down completely, you can keep them in a bread basket, wrapped in a cotton or linen towel for 2 days.
If you won’t finish them in two days, the best way to store them is in the freezer. You can freeze them whole or sliced. When they are already sliced, it’s easier to throw them straight into the toaster. Thaw them in the oven or at room temperature, slice, and toast.
Avoid slicing them when they are super hot.
Add sesame seeds and poppy seeds
We made these beautiful rolls for Thanksgiving. The recipe is the same; you will just dip them in sesame seeds and poppy seeds before putting them in the oven.
I love the look and the taste of the seeds, especially when toasted.

Soft and Fluffy Gluten-Free Sourdough Rolls
If you prefer a softer roll, or want to try something different, check out my recipe for soft sourdough rolls.
*This post contains affiliated links, which means I get a small commission if you choose to purchase something via one of my links, at no extra cost to you.
Print
Rustic Sourdough Rolls With Teff, Millet, and Sorghum (Lectin-Free)
- Prep Time: 30 minutes
- Cook Time: 55 minutes
- Total Time: 1 hour 25 minutes
- Yield: 8 rolls
- Category: Sourdough
- Method: Baking
- Diet: Gluten-Free
Description
These crusty, rustic-style gluten-free sourdough rolls are the perfect breakfast bread. They are made with my lectin-free sourdough starter and a mix of lectin-free and gluten-free flours: teff, millet, and sorghum. With these rolls, you get a fair amount of crust but a pliable slice and a soft and airy crumb.
Ingredients
FOR THE PREFERMENT (make the night before)
- 10 grams unfed starter (using the starter you fed earlier in the day)
- 30 grams of water (spring, filtered, non-chlorinated)
- 35 grams of flour mix (equal quantities of teff, millet, and sorghum – you can use the mix for feeding the starter)
THE WET MIX
- 17 grams psyllium husk flakes (not powder)
- 420 grams of water + 10-20 more grams if necessary (no-chlorine water)
- 10 grams organic, raw honey, preferably local
- 6 grams extra virgin olive oil
- 75 grams teff + millet + sorghum preferment (made the night before)
THE DRY MIX
- 230 grams flour (76g teff + 76g millet + 77g millet) – PLEASE read the note about the flour mix in the post
- 70 grams starch (tapioca flour)
- 6 grams non-iodized good quality fine salt
Instructions
MAKE THE PREFERMENT
- Mix all the ingredients the night before (you will prepare the dough in the morning)
THE MIXING METHOD
- In a glass or plastic bowl, combine the water, psyllium husk flakes, honey, and extra virgin olive oil. Mix well and set it on the side. Once the psyllium husks absorb the water, this mixture will have a jelly-like texture (it needs about 5 minutes).
- In the meantime, mix all the dry ingredients in a glass bowl.
- Now add the preferment to the psyllium husk jelly. Mix well with a spatula or wooden spoon. Add 10 grams of water to the preferment jar, shake to clean all the paste left on the walls, and add it to the mix.
- Add the preferment jelly mixture to the dry ingredients bowl, incorporate as much as possible with a spatula or wooden spoon, then start mixing with your hand. Mix well until the dough is homogeneous and has no lumps. The dough is soft and sticky. If you feel your dough is too hard, you can add extra 10 grams of water.
- Now you can start mixing with the silicone or plastic dough scraper, scraping the dough from the sides of the bowl, and folding it into the center. Rotate the bowl and repeat with the same movement for about 1 minute. If you need help with this step, please watch the video from the sorghum and millet bread recipe linked in the post above.
- Cover the bowl with a plastic cover, then wrap in two extra big plastic bags and tighten the bags. From now on, the fermentation starts. I keep my bowl on the kitchen counter. Ideally, it needs a place where the temperature stays constant throughout the process.
BULK FERMENTATION
- Let it ferment for 1 to 2 hours, depending on the temperature and humidity in your house. At about 20 degrees Celcius (68 degrees Fahrenheit), it can take 2 hours. If it’s hotter than that, the time will decrease. At about 72-74 degrees Fahrenheit, my bulk fermentation takes about 1 hour. When teff is involved, the dough might ferment faster, so keep an eye on it at the 45 minutes mark.
SHAPING THE DOUGH
- Gently invert the dough on a working surface, dusted with just a tiny bit of flour. Gently lift one-third of the dough and fold it on top of itself. Then fold it one more time, so now what was on the bottom on the working surface is on the top. Seal and shape the dough as seen in the bread-making video linked in the above post (the second video).
PROOFING THE DOUGH
- Dust your proofing basket liner (or towel) with flour. Now that the dough is sealed and shaped, gently transfer it to the proofing basket with the sealed side up. Dust the top with flour, and cover with plastic wrap or wrap it in a towel. Because my house is pretty dry, I spray a little bit of water on the towel. I cover it in plastic wrap, and then in two plastic bags that I tight very well. Again, you might not need these extra steps in your house. The proofing time will about the same as the bulk fermentation. At 72-74F, it might be around 1h. Whenever I use teff flour in my bread, fermentation time, in general, tends to lower.
- When you start the proofing, you can preheat the oven at 250C/480F. Prepare a baking sheet (I use the one provided with the oven) by lining it with parchment paper. No need to preheat it, but you can try both ways and see what you like best.
- Make sure you have about 150g of hot water (you can use normal tap water) and another small baking dish where you will add the hot water (the first 20 minutes of the baking will be done using steam).
FINAL SHAPING AND TRANSFERRING TO THE OVEN
- When the dough is proofed, gently invert the dough from the basket to the middle of the baking sheet covered in parchment paper.
- Dust the dough with sorghum or millet flour and gently spread it on the surface of the dough with your palm.
- Put the smaller baking dish into the oven to preheat it before you add the hot water to it).
- With the help of a dough scraper, cut the dough into 8 equal parts (first halves, then quarters, then each quarter into two parts). Separate the 8 triangles and insert the baking sheet into the hot oven. This is also the time when you add the hot water to the preheated small baking dish/tray.
- Close the door, lower the heat to 240C/460F and bake for 20 minutes with steam.
- After 20 minutes, remove the small tray from the oven (the water has probably evaporated by now), and turn the heat down to 230C/450F. Bake for 35 more minutes.
- Remove the baking tray from the oven, transfer the bread rolls to a cooling rack and let them cool for at least 2 hours before slicing/eating.
Notes
If you are new to making bread and struggle with visualizing the process, check my Sorghum and Millet Bread Recipe for videos. The process is the same up until the shaping into triangles.
20 Comments
Brenda Teshka
August 1, 2025 at 4:46 pmCan I make this is a cadt iron loaf pan with lid, instead of the rolls? Thanks
Claudia
August 3, 2025 at 3:32 amHi Brenda! Yes, you can! -Claudia
Ellie
March 1, 2025 at 10:22 amHi! I would really like to make these rolls as round rolls rather than the triangular shape shown. How would I go about doing this? Should I shape them individually before proofing or cut them as you have in this recipe and then shape them into round rolls? Thank you!!
Claudia
March 4, 2025 at 5:10 amHi Ellie! There are more options, and one is to shape them directly into rounds (after bulk fermentation) and let them proof like this. Or, shape it as in this recipe, cut it into triangles a bit earlier, and shape them into rounds, then let them proof for a little bit longer. You can try both options and see which one you prefer. I hope this helps. xx -Claudia
Ellie
March 13, 2025 at 6:28 amThank you so much! I’ll try both of these methods and see how it goes 🙂
Claudia
March 14, 2025 at 5:16 amMy pleasure! Please let us know which one you prefer. xx -Claudia
S.H
January 20, 2024 at 12:54 pmTurned out great…I got bubbles and rise during baking.Great recipe!
Claudia
January 21, 2024 at 4:22 amI’m glad to hear they turned out great! -Claudia
Lisanne Lombardo
June 22, 2023 at 8:05 amHi, mine came out a little flat. I was in a bit of a rush and I think I didn’t leave enough time during the fermenting and proofing stage. For both of these stages I didn’t see any sort of clue to know when it is done, like “wait until it doubles in size”. It woukd be helpful if you could provide clues to help us know when those stafes are done. I’ll try again and give myself more time next time. The rolls are delicious though!
Claudia
June 23, 2023 at 2:44 amHi Lisanne! It’s true, I don’t feel comfortable with giving cues, because this dough is very different than normal gluten dough… It is growing in size, but is not that visible, I would say 30%, which I think is very hard to judge. There is also something about the way it looks and feels to touch that you will figure out once you get familiar with making this bread. My best advice when it comes to fermentation time, is follow the temperature vs time instructions. That worked for most people. If it’s colder than 72F in your house, experiment with increasing the time (I would say about 15-20 minutes for each 4-5 degrees F). If it’s hotter (like it is also for me in the summer), decrease the fermentation time, or ferment the dough in the fridge. Also, take notes when you make a bread, to keep track of what you did, otherwise is easy to forget. I hope next one comes out better. -Claudia