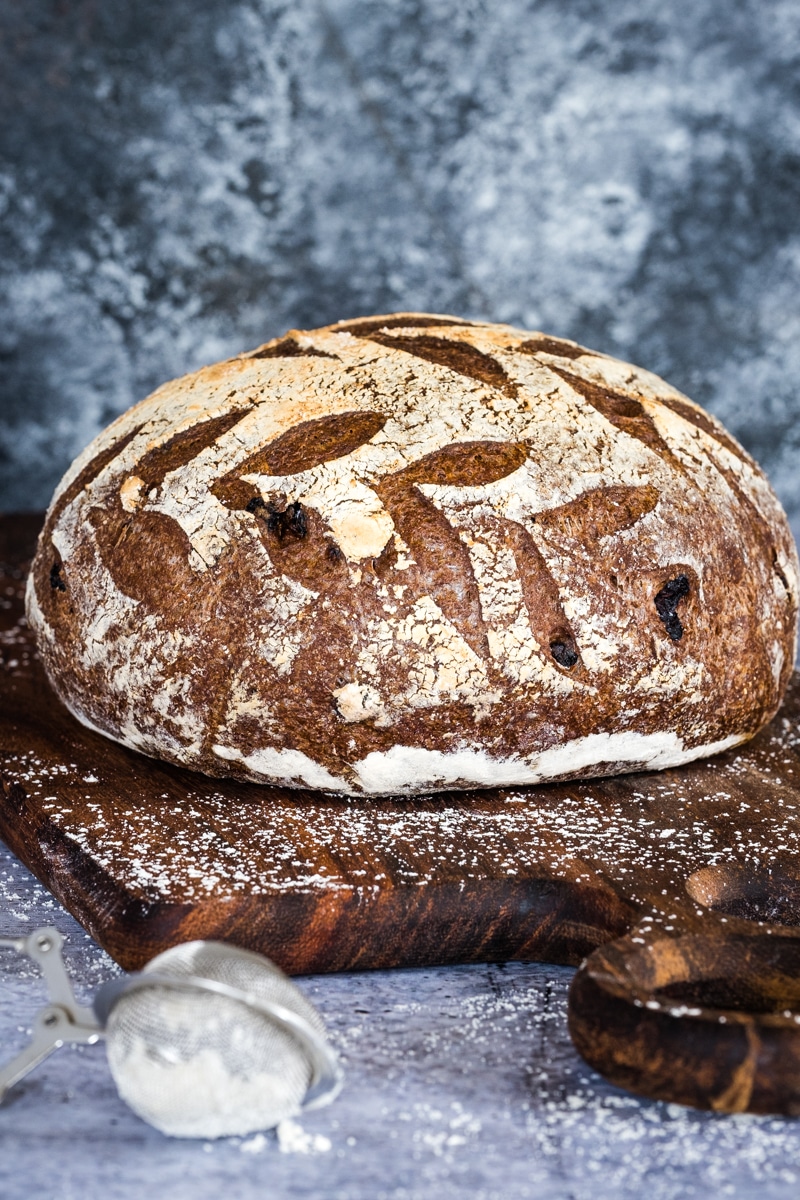
This gluten-free sourdough loaf is made with a mix of teff and chestnut flour, warming spices like cardamom and cinnamon, and a handful of dry, unsweetened berries.
It’s so easy to make, and it has a rich, earthy and nutty flavor. This gluten-free bread is slightly sweet and fruity from the chestnut flour and berries, which makes it your perfect breakfast bread.
Are you new to gluten-free sourdough making?
If you’re just starting your journey into gluten-free and lectin-free sourdough baking, we strongly suggest exploring our Beginner’s Guide to Baking Gluten-Free Sourdough Bread. It provides a thorough introduction to our baking method, ensuring you have all the knowledge needed to embark on this delicious adventure.
This teff sourdough bread is made with our gluten-free starter. If you don’t have the starter already, you can make it in just 6 days. This is just the time it takes to make yeast water, but don’t worry, the hands-on time for this process is only 2 minutes daily.
Check out one of our most popular recipes:
And for more details about what teff is and where to buy it, see this post:
While sourdough making is a skill you need to learn, once you are familiar with the basics, making new types of bread is easy and fun.
The gluten-free flours I use are quite different than what is usually used in making gluten-free sourdough bread. We don’t use buckwheat flour or rice flour (as they are heavy in lectins), but we use a mix of millet flour, sorghum flour, and teff flour (and some tapioca starch), which are all gluten-free and lectin-free.
While the starter is made with these three flours, you can make preferments with any combination of the three flours, or only one, to create new recipes. The possibilities are endless.
This bread is made predominantly with teff flour, with a small amount of chestnut flour.
Tools to make gluten-free sourdough bread
This article, The Ultimate Gluten-Free Sourdough Tool Guide, provides a comprehensive guide to all the tools and equipment you need to make gluten-free sourdough bread.
If you already have our starter and have made our bread before
If you are already familiar with my sourdough method, below is the recipe, some visuals, and a video to help you better visualize the process. This bread is very similar with the other sourdough bread recipes on this website.


Ingredients for making teff sourdough bread
FOR THE PREFERMENT (make the night before, right before you feed the starter):
10 grams starter
30 grams of water (spring, filtered, non-chlorinated)
35 grams teff flour
NOTE on the starter: All our sourdough bread is made with our Gluten-Free Sourdough Starter With Millet, Teff, and Sorghum Flour (Lectin-Free).
THE WET MIX:
17 grams psyllium husk flakes (not powder)
430 grams of non-chlorinated water + 20 grams (total 450 grams)
10 grams organic, raw honey, preferably local
6 grams extra virgin olive oil
75 grams teff preferment (made the night before)
THE DRY MIX:
200 grams teff flour
30 grams chestnut flour
70 grams tapioca flour
6 grams of non-iodized good quality fine salt
NOTE on teff flour: I used dark teff flour, hence the very dark color of the bread. You can also use ivory teff, but the color of the bread will be lighter. From my experience, ivory teff is less absorbent than dark teff, so maybe you will have to slightly decrease the water quantity (with 20 grams or so).
ADD-ONS:
3 tablespoons dry, unsweetened Aronia berries (use any dry, unsweetened berries or cherries you find available, no other ingredients added)
1/4 teaspoon cardamom powder
1/2 teaspoon cinnamon
Optional: other warming spices, like our Holiday Warming Spice Blend.

My baking schedule (you can create your own schedule based on your availability):
- Evening (before sleep): I feed my starter and make a preferment with the flours I plan to use for the bread.
- Morning (shortly after I wake up): Mix the dough ingredients. Start the fermentation process.
- After about 40 minutes of fermentation, I check the dough. If it’s ready, I shape it and transfer it to the proving basket.
- This dough will prove in about 40 minutes, so now I start to preheat the oven with the Dutch oven (and lid) in.
- After 40 minutes, I check the dough, and if it’s ready, I score it and transfer it to the Dutch oven.
- I bake the bread for 40 minutes with the lid on, then I take the lid off and bake for 40 more minutes. The temperature is always set at 250C/480F.
- I take the Dutch oven out carefully so I don’t burn myself. Remove the bread and place it on a cooling rack.
- Wait for at least 5 hours before slicing it.
How to make teff sourdough bread
Make the preferment
- Mix all the ingredients the night before when you feed your starter. Make it as late as possible, right before you go to sleep (you will prepare the dough in the morning).
The mixing method
This will be done in the morning when you wake up. If you delay the process longer, the preferment will get flat, and it won’t have the power you need to make the bread.
Alternatively, you can make the preferment early morning, make the dough about 6, 7 hours after you made the preferment, and after fermentation and proving, bake the bread. The loaf will rest overnight, and you’ll have fresh bread the next morning.
- If the berries are very dry, soak them for 10 minutes in filtered water.
- In a glass or plastic bowl, combine 430g of the water, psyllium husk flakes, honey, and extra virgin olive oil. Mix well and set it on the side. Once the psyllium husks absorb the water, this mixture will have a gel-like texture (it needs about 5 minutes).
- In the meantime, combine all the dry ingredients, plus the cardamom and cinnamon, in a glass bowl.
- Now add the preferment to the psyllium husk gel. Add the remaining 20g of water to the preferment jar, shake and add everything to the gel mixture (this is to make sure you use all the preferment, it is a method I use for all my breads).
- Mix well with a spatula or wooden spoon.
- Add the preferment gel mixture to the dry ingredients bowl, add the berries, incorporate as much as possible with a spatula or wooden spoon, then start mixing with your hand. Mix well until the dough is homogeneous and has no lumps. The dough is soft and sticky.
- Now you can start mixing with the silicone or plastic dough scraper, scraping the dough from the sides of the bowl, and folding it into the center. Rotate the bowl and repeat with the same movement for about 1 minute.
- Cover the bowl with plastic wrap, then wrap it in two extra big plastic bags and tighten the bags. From now on, the fermentation starts. I keep my bowl on the kitchen counter. Ideally, it needs a place where the temperature stays constant throughout the process.


Bulk fermentation
- Let it ferment for 40 minutes, depending on the temperature and humidity in your house. This is the timing for a temperature of about 21 degrees Celcius (71-72 degrees Fahrenheit). Teff, and specifically teff that is very dark, tends to have a very short fermentation time compared to sorghum and millet, so make sure you don’t over-ferment.
Shaping the dough
- The video below will be very helpful here; please watch it before you start. Gently invert the dough on a working surface, dusted with just a tiny bit of flour. Gently lift one-third of the dough (the part away from you) and fold it on top of itself toward you. Then fold it one more time, so now what was on the bottom of the working surface is on top. Gently rotate the dough with your palms, so the bottom part will be sealed by the tension between the dough and the working surface. Everything you do must be gentle (I know, I keep repeating the word), don’t apply pressure on the dough, and treat it like something fragile).
Proving the dough
- Line a Banneton or proving basket with a towel and dust it with flour. Gently transfer the dough to the proving basket with the sealed side facing upward (the smooth face down). Dust the top with flour, wrap it with a towel and cover it with a plastic cover. Because my house is pretty dry, I spray a little bit of water on the towel. Put everything in a plastic bag and tighten it. The proving time will be about the same as the bulk fermentation. At 72F, it will take about 40 minutes or even less. In the refrigerator, it will take about 2h.

Scoring, transferring to the oven, and baking
- When the dough is proven and your oven and cast iron are preheated, gently invert the dough from the basket to the middle of a parchment paper sheet.
- Dust the dough with sorghum flour and gently spread it on the surface of the dough with your palm. Have the razor ready for scoring.
- Now it’s time to carefully remove the cast iron and the lid from the oven, closing the door quickly. This is when you need to work pretty fast but be careful not to burn yourself.
- Make the scoring of your choice using the razor or the scoring blade (please check my suggestions in the post; keep it simple and easy in the beginning). After scoring, the dough must quickly go into the cast iron, covered, and into the oven.
- Lift the dough with the edges of the parchment paper and gently lower it into the cast iron. Spray the dough with water to create steam, cover it with the lid, and put it back in the oven. Alternatively, you can throw an ice cube into the Dutch oven, but not on top of the bread, somewhere next to it, below the paper.
- Bake covered for 40 minutes.
- After 40 minutes, carefully remove the lid and bake for 40 more minutes (leave the lid in the oven, it helps with keeping the temperature).
- Take the Dutch oven out, and carefully remove the bread. You can check the bottom for the hollow sound.
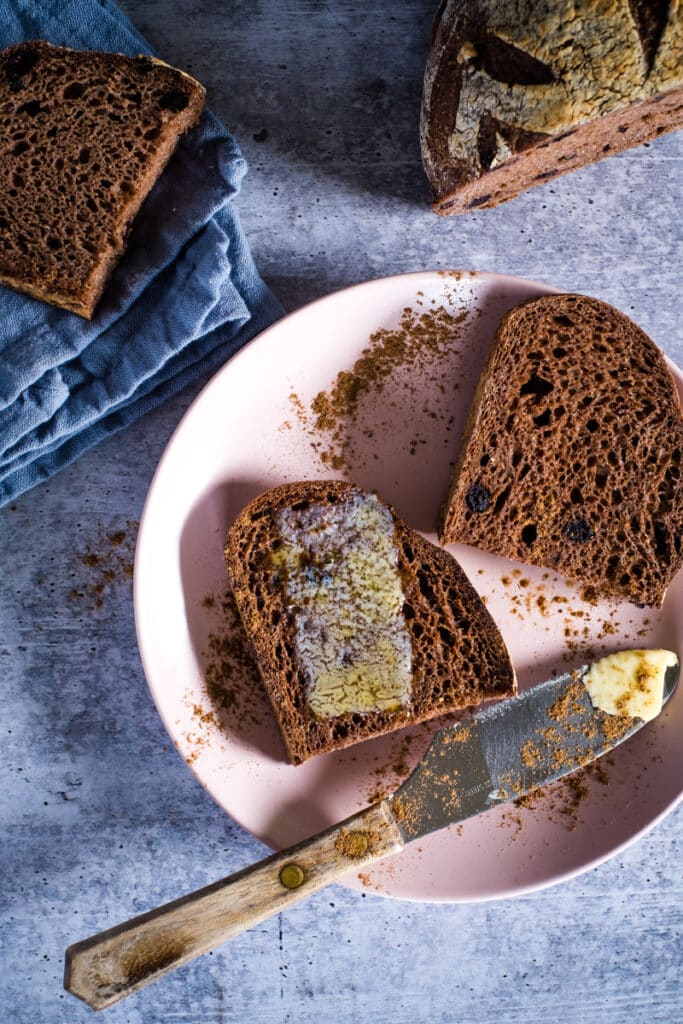
- Let the bread rest on a cooling rack for at least 5 hours. I know it can be tempting, but don’t slice it earlier than 5 hours, as you will ruin the texture. For the best crumb and texture, I recommend allowing it to rest overnight.
- Store the bread for 2 to 3 days at room temperature, wrapped in a cotton towel. The first and second day is great fresh, but from day 3, I prefer toasted. You can also slice it, separate the slices with parchment paper and freeze it.
NOTE on scoring: Check out this scoring video by Foodgeek.dk, my favorite scoring for a boule is Palm Leaf (5:43). I think it is very easy for a beginner and looks great on the baked bread. When you have time, check more of his videos, we can learn a lot from him, even if he only makes gluten bread.

How to serve and store this teff bread
Like most of my sourdough bread, this teff loaf has to rest for at least 5 hours before slicing. In fact, my recommendation is to leave the loaf rest overnight before you slice it. This will give the best crumb possible.
This loaf can be stored on the counter, and wrapped in a cotton towel. It doesn’t dry out, and it’s good even after five days on the counter. I do prefer to toast it before eating.
Alternatively, you can slice the entire loaf, separate the slices with parchment paper and freeze it. When you want to have a slice, defrost it in the toaster, then toast it.
I love this bread in the morning with eggs, avocado, or with butter and honey.
If you keep it on the counter for more days, once it dries out a little bit, you can use it to make French toast.
If you have any questions, please comment below. I’m here to help you in your sourdough journey.
This post contains affiliated links, which means I get a small commission if you choose to purchase something via one of my links, at no extra cost to you.
Print
Teff Sourdough Bread with Cardamom (Gluten-Free)
- Prep Time: 40 minutes
- Cook Time: 80 minutes
- Total Time: 2 hours
- Yield: 1 loaf
- Category: Sourdough
- Method: Baking
- Diet: Gluten-Free
Description
This gluten-free sourdough loaf is made with a mix of teff and chestnut flour, warming spices like cardamom and cinnamon, and a handful of dry, unsweetened berries. It’s so easy to make, and it has a rich, earthy and nutty flavor. The bread is slightly sweet and fruity from the chestnut flour and berries, which makes it your perfect breakfast bread.
Ingredients
FOR THE PREFERMENT (make the night before, right before you feed the starter)
- 10 grams starter
- 30 grams of water (spring, filtered, non-chlorinated)
- 35 grams teff flour
THE WET MIX
- 17 grams psyllium husk flakes (not powder)
- 430 grams of non-chlorinated water + 20 grams (total 450 grams)
- 10 grams organic, raw honey, preferably local
- 6 grams extra virgin olive oil
- 75 grams teff preferment (made the night before)
THE DRY MIX
- 200 grams teff flour
- 30 grams chestnut flour
- 70 grams tapioca flour
- 6 grams of non-iodized good quality fine salt
ADD-ONS
- 3 tablespoons dry, unsweetened Aronia berries (or other dry berries, you can use raisins but they are not plant paradox compliant)
- 1/4 teaspoon cardamom powder
- 1/4 – 1/2 teaspoon cinnamon
Instructions
MAKE THE PREFERMENT
- Mix all the ingredients the night before (you will prepare the dough in the morning)
THE MIXING METHOD
- If the berries are very dry, soak them for 10 minutes in filtered water.
- In a glass or plastic bowl, combine 430g of the water, psyllium husk flakes, honey, and extra virgin olive oil. Mix well and set it on the side. Once the psyllium husks absorb the water, this mixture will have a gel-like texture (it needs about 5 minutes).
- In the meantime, combine all the dry ingredients, plus the cardamom and cinnamon, in a glass bowl.
- Now add the preferment to the psyllium husk gel. Add the remaining 20g of water to the preferment jar, shake and add everything to the gel mixture (this is to make sure you use all the preferment, it is a method I use for all my breads). Mix well with a spatula or wooden spoon.
- Add the preferment gel mixture to the dry ingredients bowl, add the berries, incorporate as much as possible with a spatula or wooden spoon, then start mixing with your hand. Mix well until the dough is homogeneous and has no lumps. The dough is soft and sticky.
- Now you can start mixing with the silicone or plastic dough scraper, scraping the dough from the sides of the bowl, and folding it into the center. Rotate the bowl and repeat with the same movement for about 1 minute.
- Cover the bowl with a plastic cover, then wrap it in two extra big plastic bags and tighten the bags. From now on, the fermentation starts. I keep my bowl on the kitchen counter. Ideally, it needs a place where the temperature stays constant throughout the process.
BULK FERMENTATION
- Let it ferment for 40 minutes, depending on the temperature and humidity in your house. This is the timing for a temperature of about 21 degrees Celcius (71-72 degrees Fahrenheit). Teff, and specifically teff that is very dark, tends to have a very short fermentation time compared to sorghum and millet, so make sure you don’t over-ferment.
SHAPING THE DOUGH
- The video in the post will be very helpful here; please watch it before starting. Gently invert the dough on a working surface, dusted with just a tiny bit of flour. Gently lift one-third of the dough (the part away from you) and fold it on top of itself toward you. Then fold it one more time, so now what was on the bottom of the working surface is on top. Gently rotate the dough with your palms, so the bottom part will be sealed by the tension between the dough and the working surface. Everything you do must be gentle (I know, I keep repeating the word), don’t apply pressure on the dough, and treat it like something fragile).
PROOFING THE DOUGH
- Line a Banneton or proving basket with a towel and dust it with flour. Gently transfer the dough to the prooving basket with the sealed side facing upward (the smooth face down). Dust the top with flour, wrap it with a towel and cover it with a plastic cover. Because my house is pretty dry, I spray a little bit of water on the towel. Put everything in a plastic bag and tighten it. The proofing time will about the same as the bulk fermentation. At 72F, it will take about 40 minutes or even less. In the refrigerator, it will take about 2h.
- After transferring the dough to the proving basket, start preheating the oven with the Dutch oven and lid in it (at 250C/480F).
SCORING, TRANSFERRING TO THE OVEN AND BAKING
- When the dough is proved, and your oven and cast iron are preheated, gently invert the dough from the basket to the middle of a parchment paper sheet.
- Dust the dough with sorghum flour and gently spread it on the surface of the dough with your palm. Have the razor ready for scoring.
- Now it’s time to carefully remove the cast iron and the lid from the oven, closing the door quickly. This is when you need to work pretty fast but be careful not to burn yourself.
- Make the scoring of your choice using the razor or the scoring blade (please check my suggestions in the post; keep it simple and easy in the beginning). After scoring, the dough must quickly go into the cast iron, be covered, and into the oven.
- Lift the dough with the edges of the parchment paper and gently lower it into the cast iron. Spray the dough with water to create steam, cover it with the lid, and put it back in the oven. Alternatively, you can throw an ice cube into the Dutch oven, but not on top of the bread, somewhere next to it, below the paper.
- Bake covered for 40 minutes.
- After 40 minutes, carefully remove the lid and bake for 40 more minutes. If your oven runs hot, check the bread after 30 minutes, and take it out if the crust starts to burn. Alternatively, you can slightly lower the temperature in the second part of the baking.
- Take the Dutch oven out, and carefully remove the bread. You can check the bottom for the hollow sound.
- Let the bread rest on a cooling rack for at least 5 hours. I know it can be tempting, but don’t slice it earlier than 5 hours, as you will ruin the texture. For the best crumb, I recommend allowing it to rest overnight.
- Store the bread for 2 to 3 days at room temperature, in a paper bag, or wrapped in a cotton towel. The first and second day is great fresh, but from day 3, I prefer toasted. You can also slice it, separate the slices with parchment paper and freeze it. I thaw it in the toaster.
10 Comments
Julia Daggs
January 30, 2026 at 10:53 amI love this recipe! I didn’t have chestnut flour, so I substituted tigernut flour, and it worked perfectly.
Claudia
February 2, 2026 at 6:58 amThanks Julia! I’ve never tried using tigernut flour in sourdough bread, but I will! xx -Claudia
Julie Hogg
March 9, 2024 at 2:49 pmOnly 10g of unfed starter?
Most recipes call for 150g. Is this correct?
Claudia
March 10, 2024 at 9:56 amHi Julie! I use 10g of starter to make a preferment (which in the end is 75 grams). Yes, this is my method of making sourdough and have been using it for over 2 years. My loaves look like you see in the pictures and they are delicious. 🙂 -Claudia
Tracey
November 27, 2023 at 2:42 amHi Claudia. I’m new to teff. Your recipe looks delicious and I’m enjoying reading your blog. Very insightful! . I wonder to ask. Is it ok to omit the honey? And is there a possibility to substitute the psyllium husk please? 🙂
Claudia
November 27, 2023 at 4:03 amHi Tracey! Thank you so much for the kind words. While it is ok to omit the honey (if you are vegan you can add a little bit of maple syrup), unfortunately there is no substitution for the psyllium husk. It is what makes gluten-free sourdough bread possible, in the absence of gluten. I hope this helps xx -Claudia
Jazmin
August 7, 2023 at 4:54 amHi. I’d been looking to try to bake a gluten-free sourdough and this recipe is amazing! It makes completely perfect bread. I substituted the tapioca and chestnut for gluten free white flour and almond meal and my bread has a beautiful crumb, depth and bounce. Amazing. Thanks so much
Claudia
August 7, 2023 at 5:38 amHi Jazmin! Thank you so much for your kind words. So happy it worked with your substitutions, that’s good to know! I wish I can see a picture of your bread. If you are on instagram, please don’t hesitate to sent it to me. Or email, or Facebook :)). -Claudia
Bella
February 16, 2023 at 9:32 amI would love to try this recipe, but I can’t have chestnut flour due to nut allergy. What would you suggest I replace it with – tigernut or sorghum?
Claudia
February 16, 2023 at 1:27 pmHi Bella, I would just skip it, and add the equivalent in teff flour. Eventually, for something with more flavor (a bit similar to chestnut), you can try using carob powder. I’ve made bread with carob before, and it’s great, but I haven’t tied this specific recipe. I hope it works out! xx