Making artisan lectin-free and gluten-free sourdough bread has been one of the most exciting and rewarding projects in my past five years of food blogging and healthy cooking and eating.
Making sourdough bread is not rocket science, as I used to believe, and it is my mission to demystify the process and show you that anyone can do it.
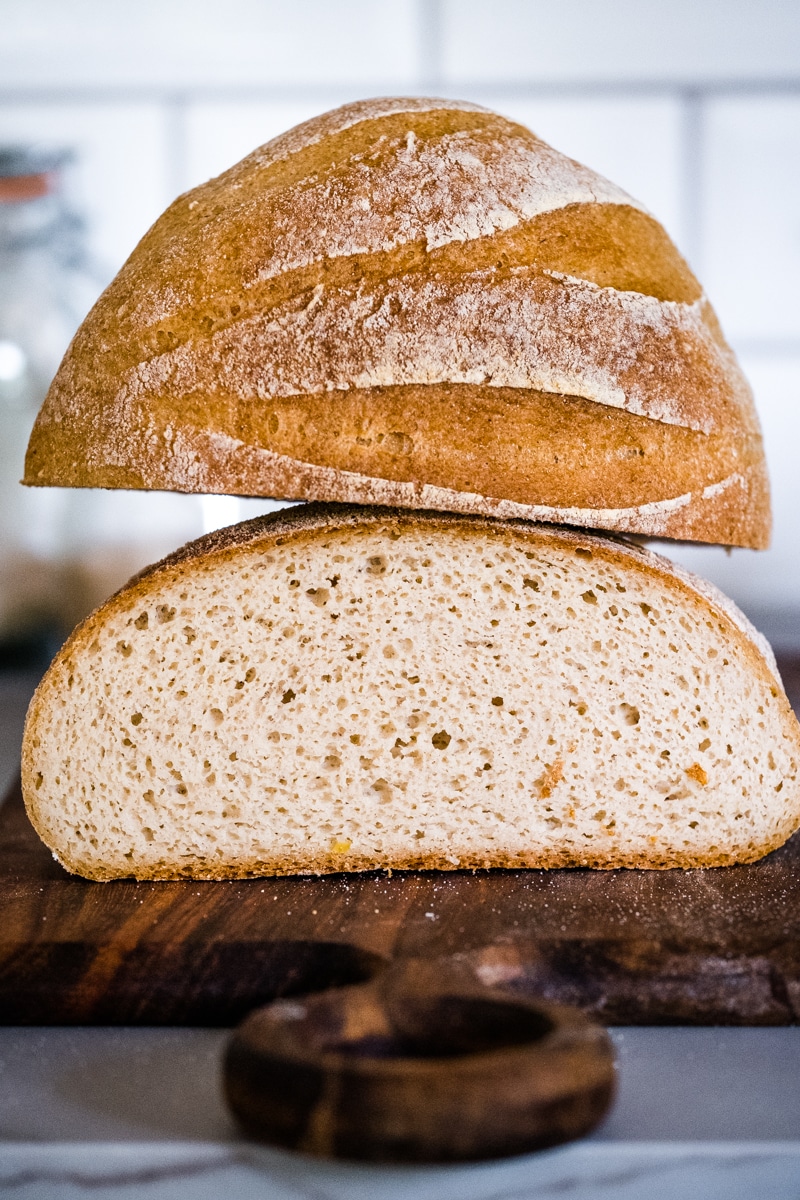
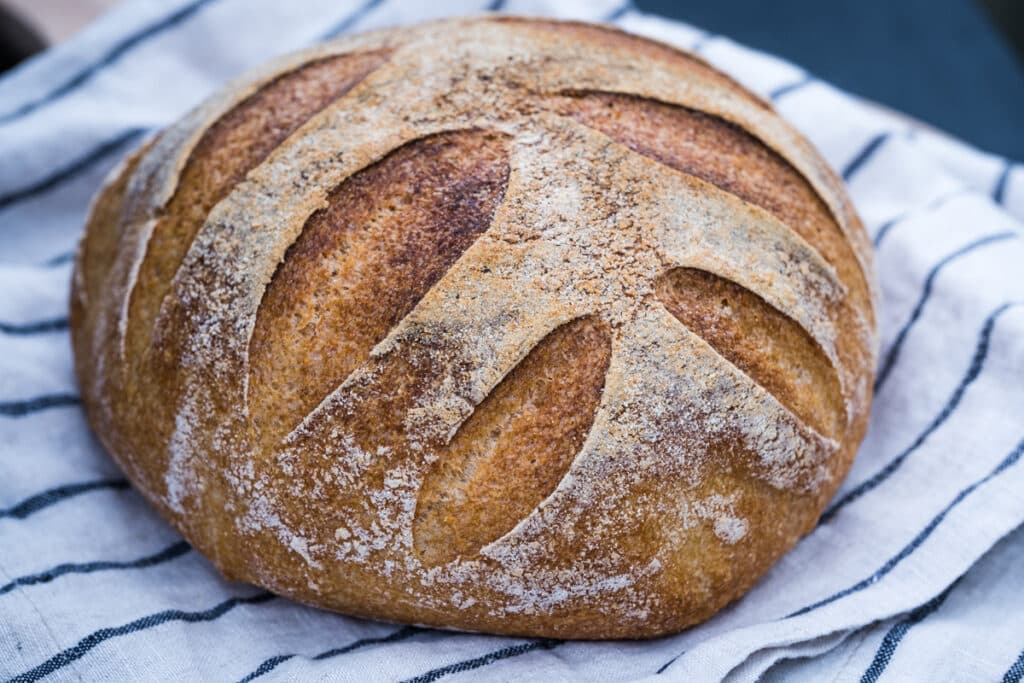
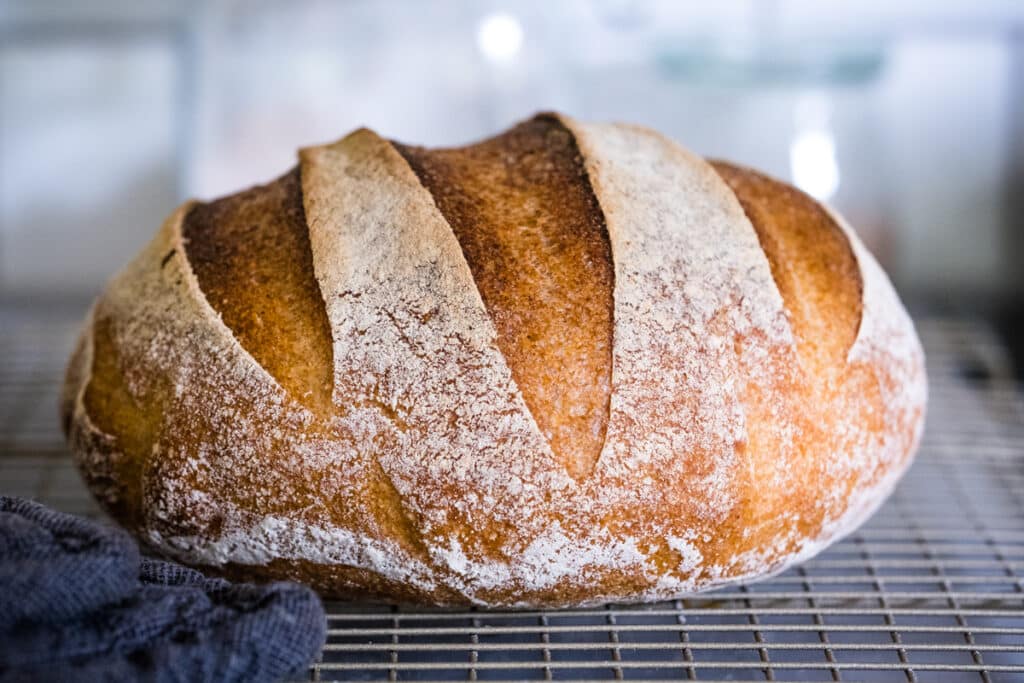
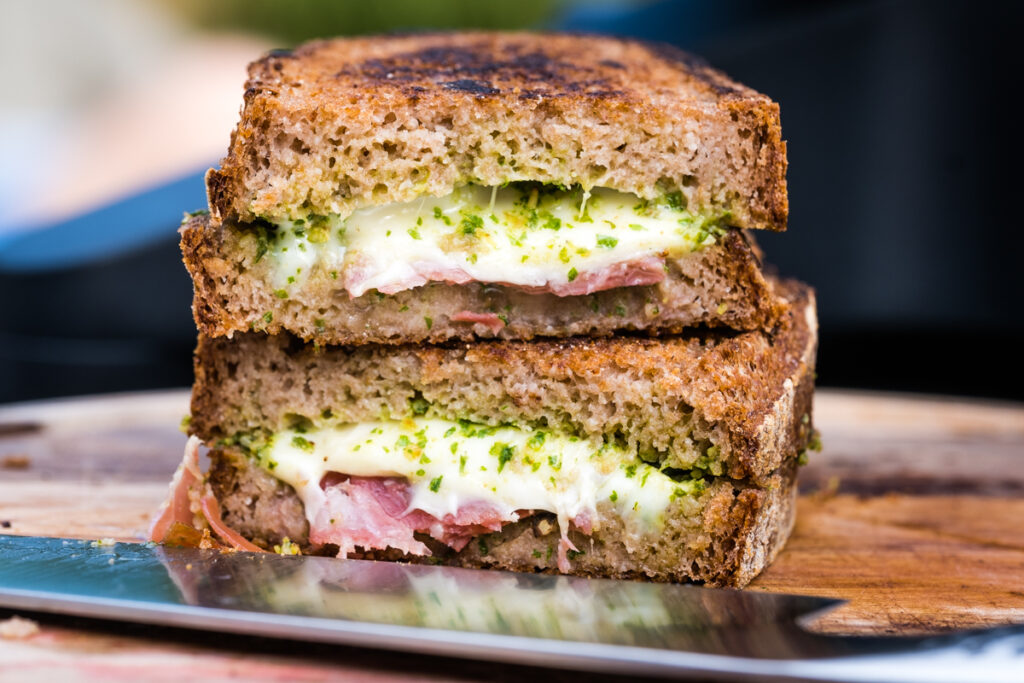
This millet and sorghum sourdough loaf is our master recipe. Once you learn how to make this bread, the possibilities for creating other types of bread are endless.
A Bread You Will Love
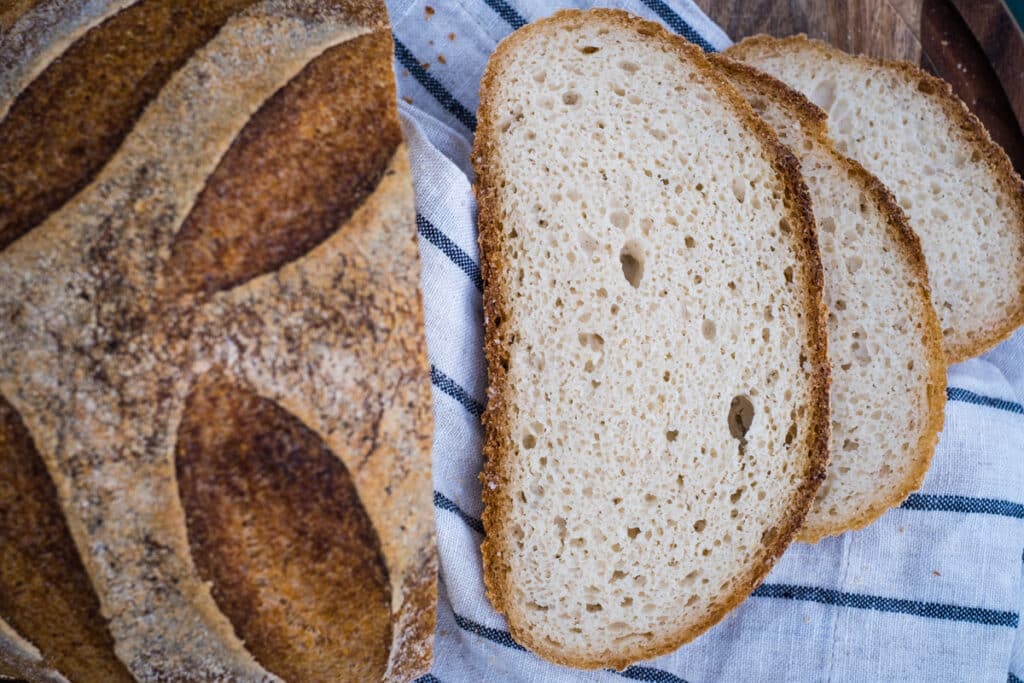
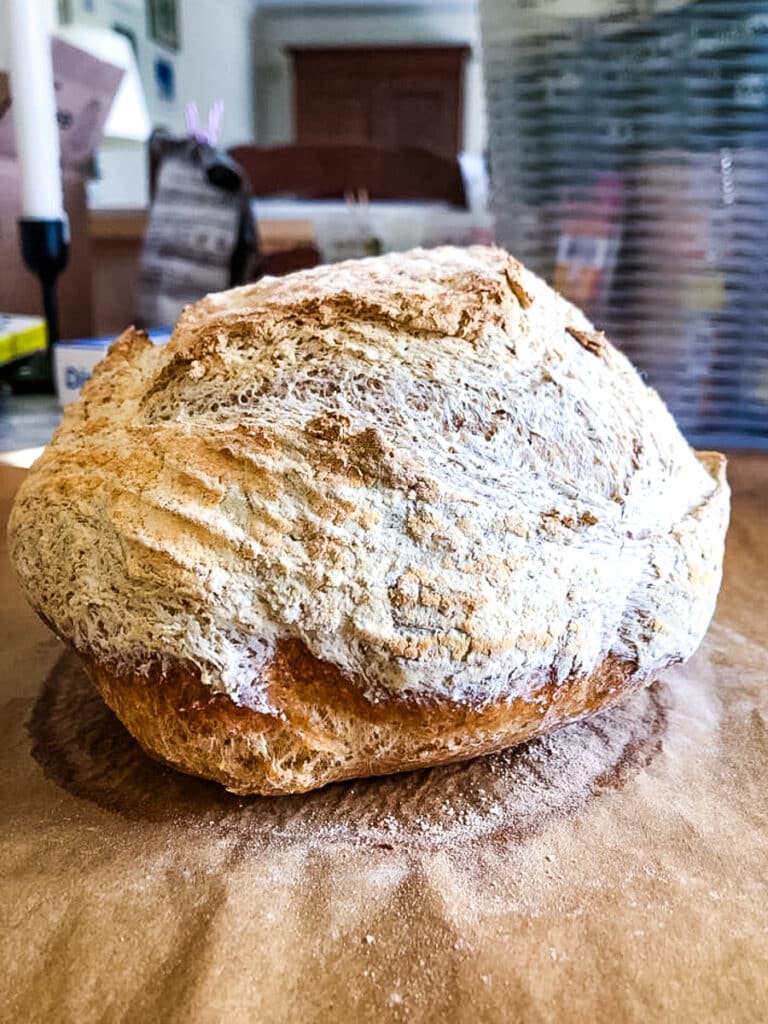
Even in the absence of gluten, this bread looks and tastes like real bread. My dad, a big bread lover, who was raised with real bread made with freshly milled grains, said this was the best bread he’s ever had. Like all Danish people, my husband loves his bread, and even to my surprise, he is a convert.
My friend in Dallas, Kristi, who has been my sourdough buddy, is now making bread for her family and friends. Everyone loves it. Like myself, Kristi has never made sourdough bread in her life before. We want to assure you that if we did it, you can too.
If you have celiac disease, ensure the ingredients you buy to make this bread are certified gluten-free, as sometimes cross-contamination might occur.
Are You New To Baking Gluten-Free Sourdough?
If you are new to this process like we were, I compiled a Beginner’s Guide to Baking Gluten-Free Sourdough with everything you need to know before you start, including visual guides, videos, step by step instructions and links to relevant articles and recipes.
If you just want to go ahead and make your starter, you find all the details and recipe for our starter here:
Sourdough Equipment & Tools
If you are just starting, we put together The Ultimate Gluten-Free Sourdough Tool Guide where you will find details all the tools you need to start baking sourdough bread.
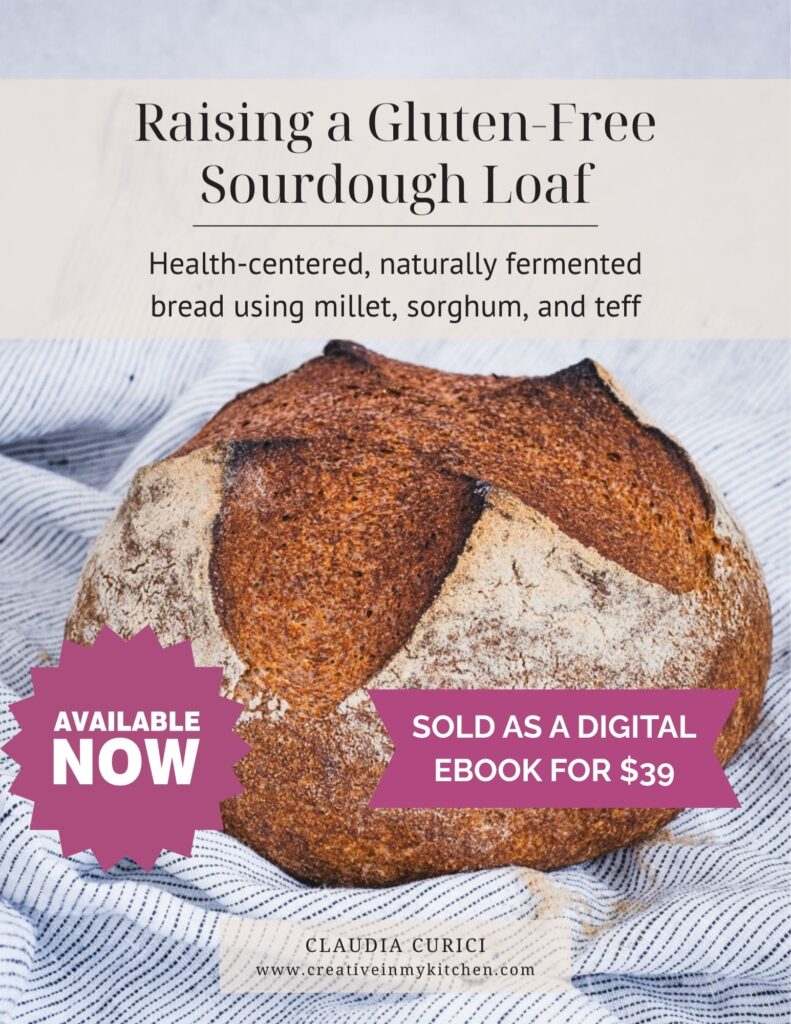
Gluten-Free Sourdough Ebook
If you’d like to master gluten-free sourdough with clarity and confidence, my ebook Raising a Gluten-Free Sourdough Loaf brings the entire method together in one structured, cohesive guide.
While many of the elements are shared across my website, this book organizes everything into a clear progression — from building a strong, resilient starter to mastering the core method you can apply to artisan loaves, sandwich bread, bagels, pizza, and more. No searching between posts — just one complete roadmap supported by original visuals and 15 thoughtfully sequenced recipes across 130+ pages.
Does Sourdough Bread Have Lectins?
The short answer is yes; regular sourdough bread, made with wheat flour or rye flour, has lectins.
However, out of all the types of bread you can have, if you want to avoid pesky lectins as much as possible but are not ready to give up bread, you can occasionally eat real sourdough bread made with organic white wheat flour.
The fermentation process helps neutralize some of the anti-nutrients in grains and enhances the absorption of minerals. However, there are still many people who will react to wheat (especially those with autoimmune diseases and gut issues), no matter how it is prepared.
Also, besides gluten and lectins, let’s not forget the Wheat Germ Agglutinin (WGA), a type of very small protein found in whole grains like wheat and rye, more specifically in the bran. So, when eating whole-grain bread, we are not only exposed to gluten and other bigger lectins but also to WGA, which can pass the mucosal barrier of your gut even if your gut is not compromised.
That’s why I developed this method to make sourdough bread with flour that is naturally gluten-free, lectin-free, and WGA-free.
A Quick Overview of My Sourdough Method
Artisan sourdough bread is usually made with just flour and water, wild yeast, and salt. For a gluten-free and lectin-free sourdough bread, we need a few more ingredients to compensate for the lack of gluten.
Buckwheat flour and rice flour are common ingredients in a gluten-free flour blend, but we are taking this bread one step further. We are only using ingredients that are not only gluten-free but also lectin-free.
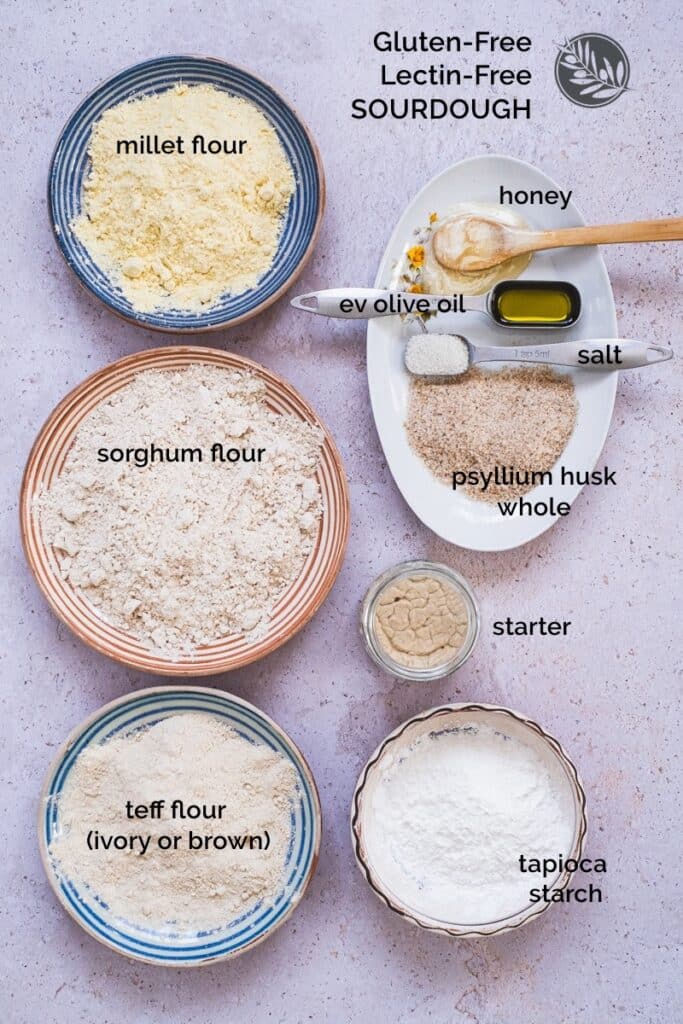
Our lectin-free and gluten-free flour blend is made of millet, sorghum, teff flour, and a little bit of tapioca starch and psyllium husk.
Many gluten-free sourdough bread recipes require xanthan gum or flour pre-mixes that contain xanthan gum. We don’t use any gums or commercial yeast in my recipes.
Fermentation is key to health. All grains need to be fermented. Sourdough culture is this mixed ecosystem of bacteria and yeast slowly breaking down the carbohydrates and gluten and releasing the nutrients in the grain.
Richard Bourdon
Teff, Millet, and Sorghum Flour: The choice of flour significantly impacts the bread’s flavor and texture. Opt for fresh, organic varieties if available from reputable suppliers to ensure the best results, especially for feeding your starter. These flours can be used in any combination, allowing for customization based on preference and availability. For this specific bread recipe, you only need millet and sorghum.
Tapioca flour: While I try to reduce unnecessary starch used in baking, in the absence of gluten, this bread needs a little boost. Compared to other gluten-free sourdough bread recipes, which are heavy in starches, the quantity of tapioca flour used for one loaf is 70 grams. Sometimes I also use 50 grams, but 70g is a sweet spot I’m happy with.
Psyllium husk: An essential ingredient for gluten-free bread. In the absence of gluten, psyllium husk is the sticky agent that will bind everything together (what the gluten network does in the case of gluten bread). Always use flakes, not powder. Psyllium husk is full of fiber and is a much better, healthier option for bread than xanthan gum, in my opinion.
Water: I think I will repeat this many times during the article. It’s crucial never to use chlorinated water or reverse osmosis water at any stage of making sourdough, from washing the fruits to creating the yeast water to making the bread. Use spring, filtered, or bottled water.
Salt: In the case of gluten-free sourdough, salt is mainly used for taste. I’m not exactly sure how much salt influences fermentation in our case. Always use a good quality fine sea salt, non-iodized.
Extra virgin olive oil: Oil will help with the texture of gluten-free bread. You can use between 5-12 grams, but I settle at 6 grams. More than this, I feel it makes the texture gooey and moist, which I am not a fan of. I’ve made bread with zero oil, and they were quite good; not much change in the texture but a little drier, which is not necessarily bad with gluten-free bread, which tends to be moist and sticky. But, since I love olive oil so much, and I think adding oil lowers the glycemic index of carbs, I’ll always add a little bit.
Honey: The best quality honey you can get is local, raw, and organic from a trusted producer. Honey will give the preferment a boost as the bacteria will feed with the sugar in honey. You can skip the honey if you are vegan.
Add-ons: Later, after we perfect a basic bread, we can play with additions such as lectin-free seeds, olives, herbs, and spices.
Step-by-Step Recipe for Sorghum & Millet Sourdough Bread (Gluten-Free, Lectin-Free)
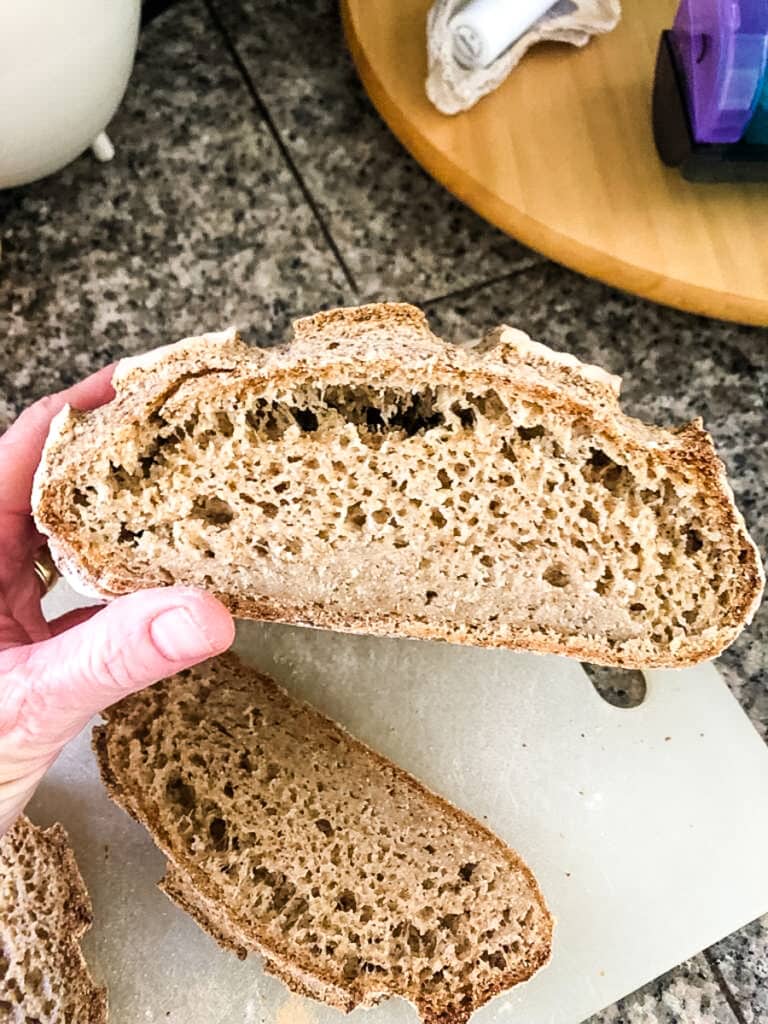
This was the first ever sourdough recipe I shared. This bread is made with an equal mix of sorghum and millet flour.
However, know that you can follow the same steps to make bread with a mix of millet, sorghum, and teff. Just use the three flour mix to make the preferment, and to add to the dry ingredients. Depending on what type of teff flour you are using, the bread can change its color. Dark teff will always lend a brown color to any bread.
The First Step: Make the Preferment
Any bread starts with a preferment. The preferment, at least in our case, is made the same way as if you would feed the starter.
Please consider feeding your starter first and make sure you know which one it is (if you use similar jars). Only after you fed your starter can you proceed to make the preferment.
You will make one preferment for each loaf you are planning to bake.
Usually, if you feed your starter twice a day, in the morning and evening, you will make the preferment in the evening, when you also feed your starter.
To make the preferment for a loaf of bread, use the following quantities:
- 10 grams active starter (before you feed it)
- 30 grams filtered / spring water
- 35 grams of flour (the flour that you will be using to make the bread, in this case, equal quantities of sorghum + millet)
The difference between feeding the starter and the preferment:
- They both use the same quantities; however, the starter will always be fed with the three flour mix, while the preferment will always be fed with the flour or mix you are using for the bread. In case you make a loaf of bread using equal quantities of teff + sorghum + millet, the preferment will be the same as the starter.
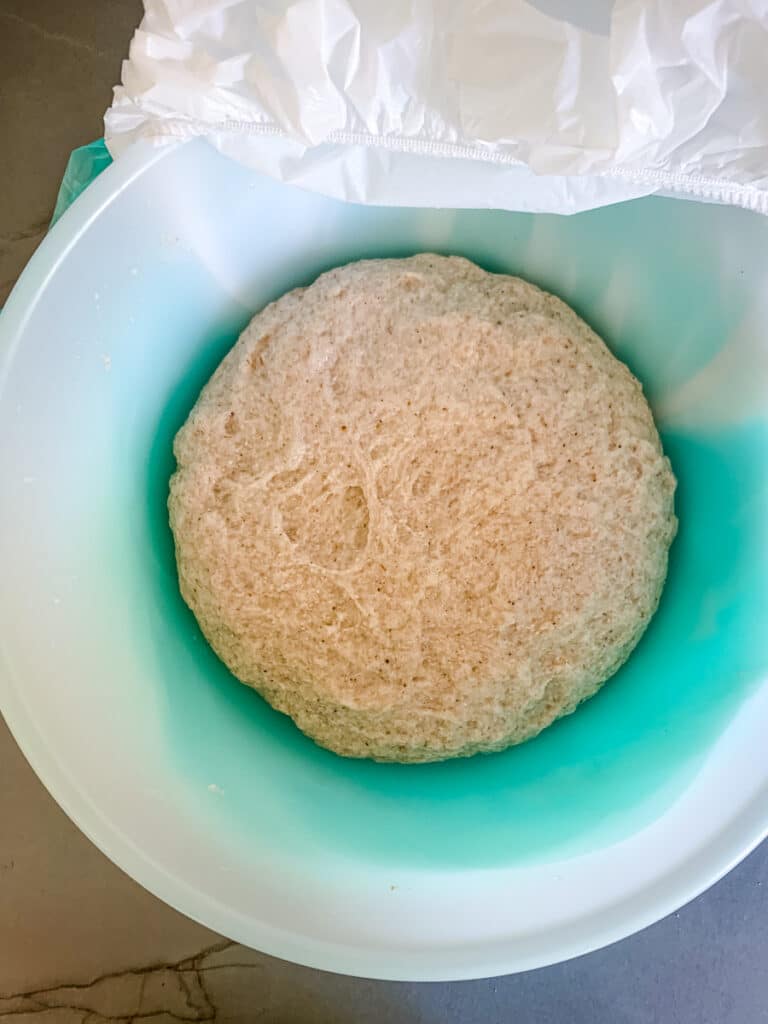
The preferment will almost double in size, but even if it doesn’t, it doesn’t mean is not good. The visual cue for a good preferment is the change in texture, which will become airy inside. At its peak activity, the preferment will have a dome, and the top will be cracked. On the side of the bowl, you will see bubbles.
MY BAKING SCHEDULE (you can create your own schedule based on your availability):
- Evening (before sleep): I feed my starter and make a preferment with the flours I plan to use for the bread.
- Morning (shortly after I wake up): I feed my starter and mix the dough ingredients. Start the fermentation process.
- After about 1h of fermentation, I check the dough. If it’s ready, I shape it and transfer it to the proofing basket.
- Usually, my dough proofs in about 1h, so now I start to preheat the oven with the Dutch oven in.
- After one more hour, I check the dough and if it’s ready, I score it and transfer it to the Dutch oven.
- I bake the bread for 40 minutes with the lid on, then I take the lid off and bake for 40 more minutes. The temperature is always set at 250C/480F.
- I take the Dutch oven out carefully so I don’t burn myself. Remove the bread and place it on a cooling rack.
- Wait for at least 5 hours before slicing it.
Ingredients for making lectin-free and gluten-free sourdough bread
While it might not show in the ingredient list, AIR is the most important ingredient in sourdough bread. Luckly, air is democratically available and free. We just have to acquire the skills to incorporate it into our bread.
There is something very magical about cooking with air.
Michael Pollan, COOKED
The wet mix:
- 17 grams psyllium husk flakes (not powder)
- 420 grams of room temperature water (spring, filtered, bottled, no chlorine, no tap, and don’t use reverse osmosis water)
- 10 grams organic, raw honey, preferably local (skip if vegan)
- 6 grams extra virgin olive oil
- 75 grams sorghum + millet preferment (made the night before)
The dry mix:
- 230 grams flour (115g sorghum + 115 millet)
- 70 grams starch (tapioca flour)
- 6 grams non-iodized good quality fine salt
NOTE: generally speaking, you can use any mix of the three flours you want, or just one flour, but if you are using teff, you might need to adjust the quantity of water, as some brands of teff flour absorb more water. In this case, start with the initial quantities, and when you mix the dough with your hands, if you feel it’s too dry, add 10-20 more grams of water. Also, in my experience, teff tends to ferment faster, so you will have to consider this.
Mixing method
- In a glass or plastic bowl, combine the water, psyllium husk flakes, honey, and extra virgin olive oil. Mix well and set it on the side. Once the psyllium husks absorb the water, this mixture will have a gel-like texture (it needs about 5 minutes).
- In the meantime, mix all the dry ingredients in a glass bowl.
- Now add the preferment to the psyllium husk gel. Mix well with a spatula or wooden spoon.
- Add the preferment gel mixture to the dry ingredients bowl, incorporate as much as possible with a spatula or wooden spoon, then start mixing with your hand. Mix well until the dough is homogeneous and has no lumps. The dough is soft and sticky.
- Now you can start mixing with the silicone or plastic dough scraper, scraping the dough from the sides of the bowl, and folding it into the center. Rotate the bowl and repeat with the same movement for about 1 minute. Please watch the video below for a visual guide.
- Cover the bowl with a plastic cover, then wrap it in two extra big plastic bags and tighten the bags. From now on the fermentation starts. I keep my bowl on the kitchen counter. Ideally, it needs a place where the temperature stays constant throughout the process.
Bulk fermentation
Let it ferment for 1 to 2 hours, depending on the temperature and humidity in your house. At about 20 degrees Celcius (68 degrees Fahrenheit), it can take 2 hours. If it’s hotter than that, the time will decrease. At about 72-74 degrees Fahrenheit, my bulk fermentation takes about 1 hour.
Make sure your bowl is covered with a plastic wrap, with additional plastic wrapped around it (I used two big plastic bags and tight them well).
Shaping the dough
The videos above will be the most helpful here. Gently invert the dough on a working surface, dusted with just a tiny bit of flour. Gently lift one-third of the dough and fold it on top of itself. Then fold it one more time, so now what was on the bottom on the working surface is on the top. The following step is to shape the dough and seal the bottom part. Please watch the video, Part 1.
Proofing the dough
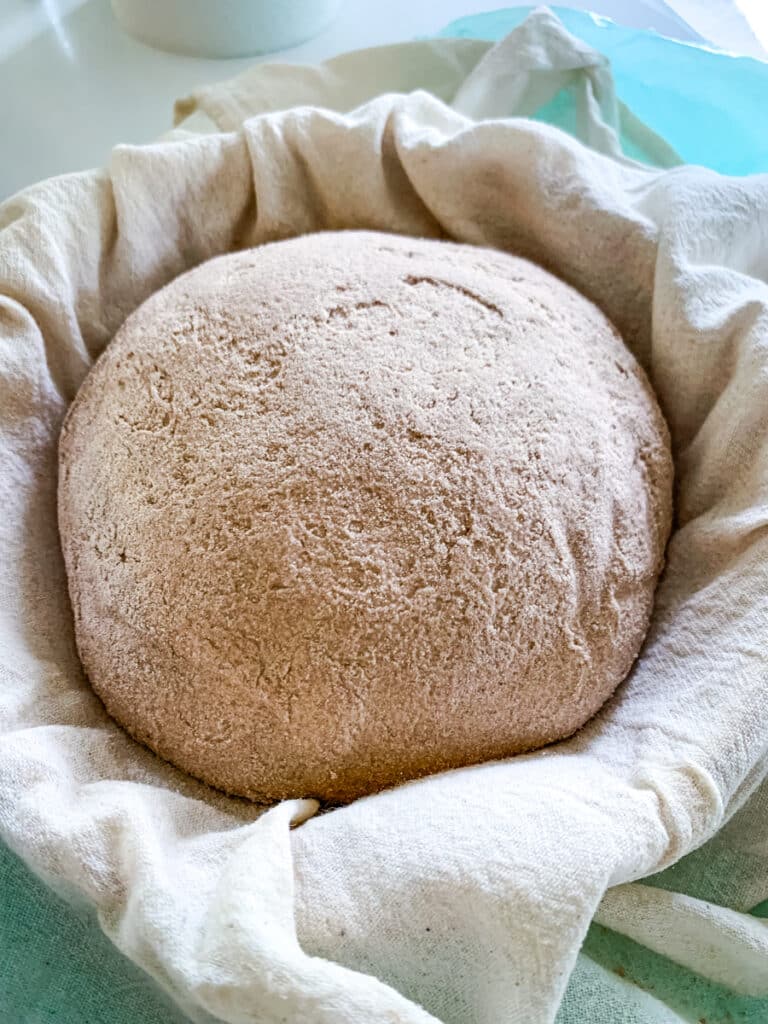
Ensure the lining of your Banneton or proofing basket (or a towel if it doesn’t have a liner) is dusted with flour.
Now that the dough is sealed and shaped, gently transfer it to the proofing basket with the sealed side up. This is the Part 2 Video. Dust the top with flour, and cover with a plastic wrap or wrap it in a towel.
Because my house is pretty dry, I spray a little bit of water on the towel. I cover it in the plastic wrap, and then in two plastic bags that I tighten very well. Again, you might not need these extra steps in your house, but since I moved to Denmark, I needed this extra step to help with a healthy proofing of my dough.
Scoring and transferring to the oven
So many new terms to learn if you are new to baking sourdough bread! Scoring refers to the process of cutting a slash into the surface of the dough before baking. This is best done with a razor. Check my list of tools above for a suggestion. A simple razor will work, but having a handle makes the process easier and safer.
The reason for scoring is to let some air out when your dough will rise in the oven (what is called ‘oven spring’).
An extra tool you will need for this step, is a spray bottle with filtered water. You will spray the dough on top before you cover it.
There are the steps:
- When the dough is proofed and your oven and cast iron are preheated, gently invert the dough from the basket to the middle of a parchment paper sheet.
- Dust the dough with flour (any of the flours you are using, I prefer sorghum or millet) and gently spread it on the surface of the dough with your palm. Have the razor ready for scoring.
- Now it’s time to carefully remove the cast iron and the lid from the oven, closing the door quickly. This is when you need to work pretty fast but be careful not to burn yourself.
- Make the scoring of your choice (I’ll post a link below with one of my favorite scoring and also an easy one to make). From this point on, the dough needs to quickly go into the cast iron, covered, and into the oven.
- Lift the dough with the edges of the parchment paper and gently lower it into the cast iron. Spray the dough with water to create steam, cover it with the lid, and put it back in the oven.
- Bake covered for 40 minutes.
- After 40 minutes, carefully remove the lid and bake for 40 more minutes.
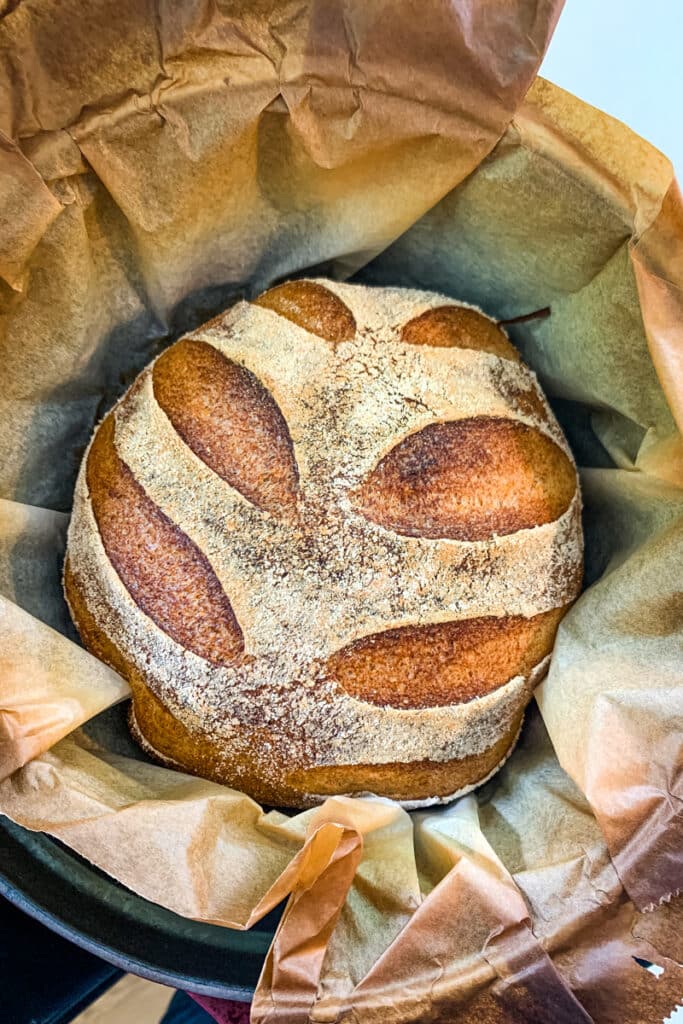
Check out this scoring video by Foodgeek.dk, my favorite scoring for a boule is Palm Leaf (5:43). I think is very easy for a beginner and looks great on the baked bread. When you have time check more of his videos, we can learn a lot from him, even if he only makes gluten bread.
Baking
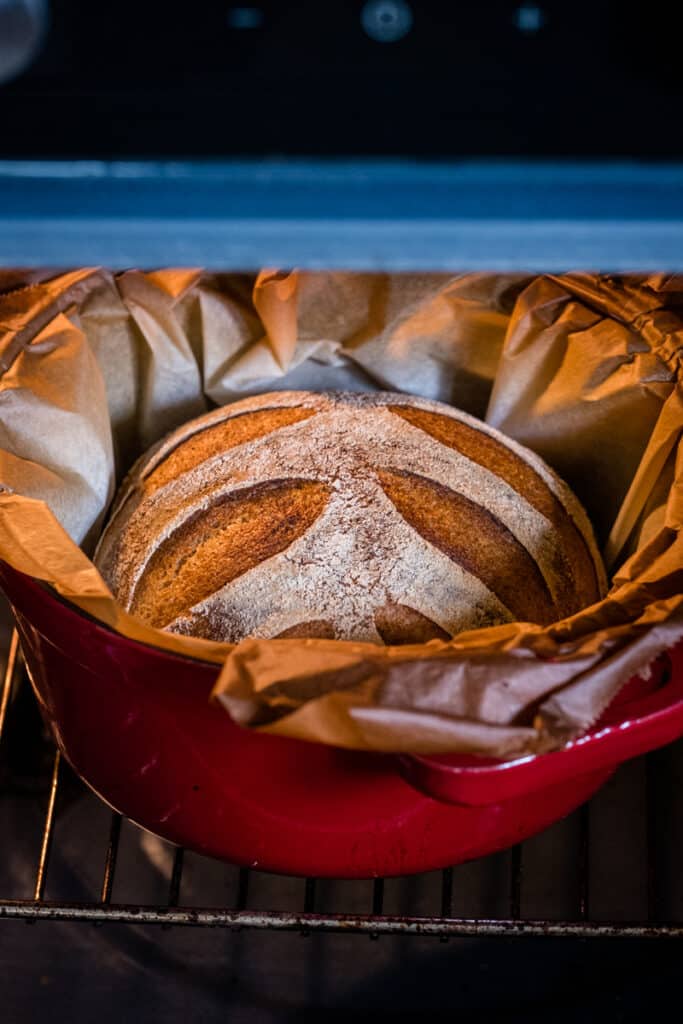
You need to preheat the oven to 250C / 480F for one hour before baking, with the pot and the lid in. I usually start the oven when I start the proofing (because my proofing at the moment lasts between 1h and 1h 20mins).
You will bake the bread for 40 minutes with the lid on, then remove the lid, but keep it in the oven so there isn’t a sudden drop in temperature.
Please ensure your Dutch oven can stand this high heat and that the cover has a heatproof handle. At first, I was a little worried my pretty red cocotte from Staub would not take such a high temperature, but it is doing just fine.
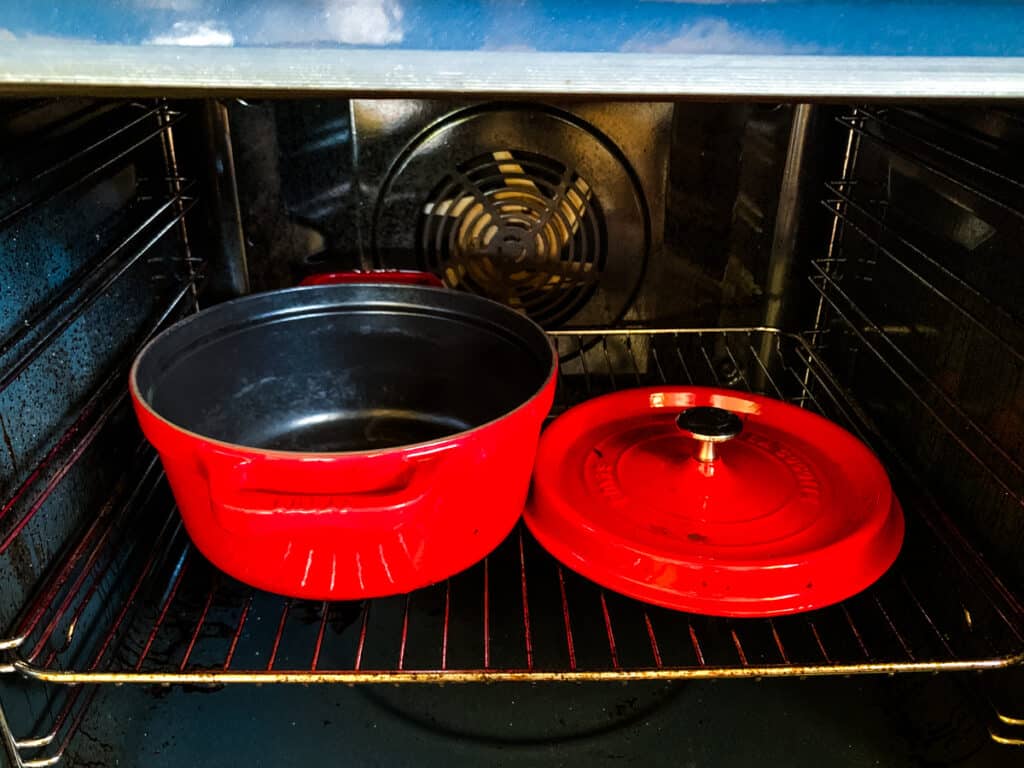
Alternatively, you can get a cast iron made for baking sourdough bread (check the list of tools above).
You can also bake the bread on a pizza stone or directly on the oven tray. The Duch oven and cast iron methods give a better crust, that is why I prefer them, but you can make an excellent bread with other methods.
Making gluten-free sourdough bread: The fermentation process
The yeast consumes the sugars during fermentation, causing the dough to form air pockets and rise.
With fluctuating weather, changes of seasons, or changing countries like in my case, it can be hard to control the temperature and humidity of your dough and the fermentation times. That’s why, in my experience, the most challenging part of making sourdough bread is knowing if your dough is under-proofed, proofed just right, or over-proofed.
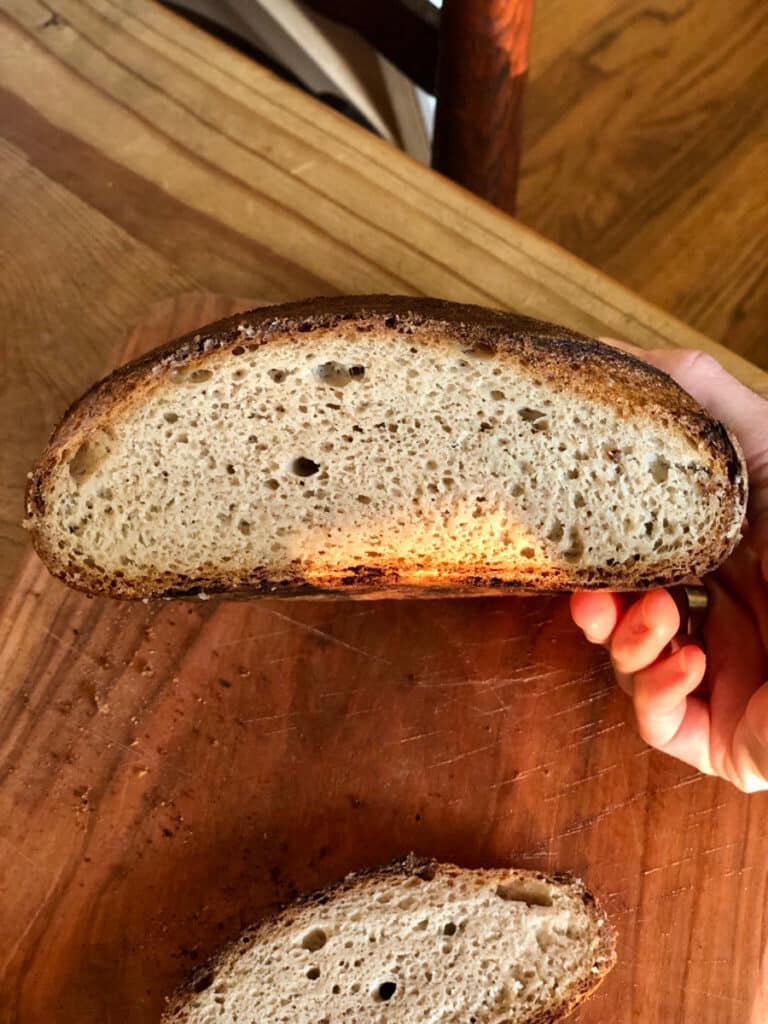
While it might be tempting to want a big rise, when the dough looks big and round and feels very light and jiggly, is usually over-proofed. It is under-proofed when the dough doesn’t look like it has changed much in size and still feels heavy.
A perfect rise is not bigger than double compared to how you started (before the first fermentation). The dough feels airy but not too light and has a slight jiggle to it.
We tried the poke test, but we concluded it is not very useful for lectin-free, gluten-free sourdough bread.
The process of fermentation of the dough is split into two parts:
- Bulk fermentation occurs when the dough ferments in the bowl you mix it in. This will take somewhere between 1 hour and 2 hours. The bulk fermentation is complete when you observe boules on the bottom and sides of the glass bowl, and the dough has risen about 30% in size. When I started in the winter in Romania, my first fermentation time was 2 hours. When I’m writing this in Denmark, it takes about 1 hour. As a rough estimation, if the room temperature is 20C/68F, it will take about 2 hours; if it’s 22C/72F, it will take about 1 hour.
- Proofing is the part of the fermentation that occurs after you shape the bread and place it in the banneton or proofing basket. This will also take somewhere between 1 hour and 2 hours. As a rough estimation, if the room temperature is 20C/68F it will take about 2 hours, if it’s 22C/72F, it will take about 1 hour.

In each phase, I check after one hour to see what the dough looks like. If I feel it needs a little more, I add extra 10 minutes, then check again. Sometimes, in my weather conditions in Denmark, I do about 1h or 1h 10 mins in the first phase and 1h or up to 1h 20mins for the second phase. It happened to me to overproof the dough when it was hotter outside.
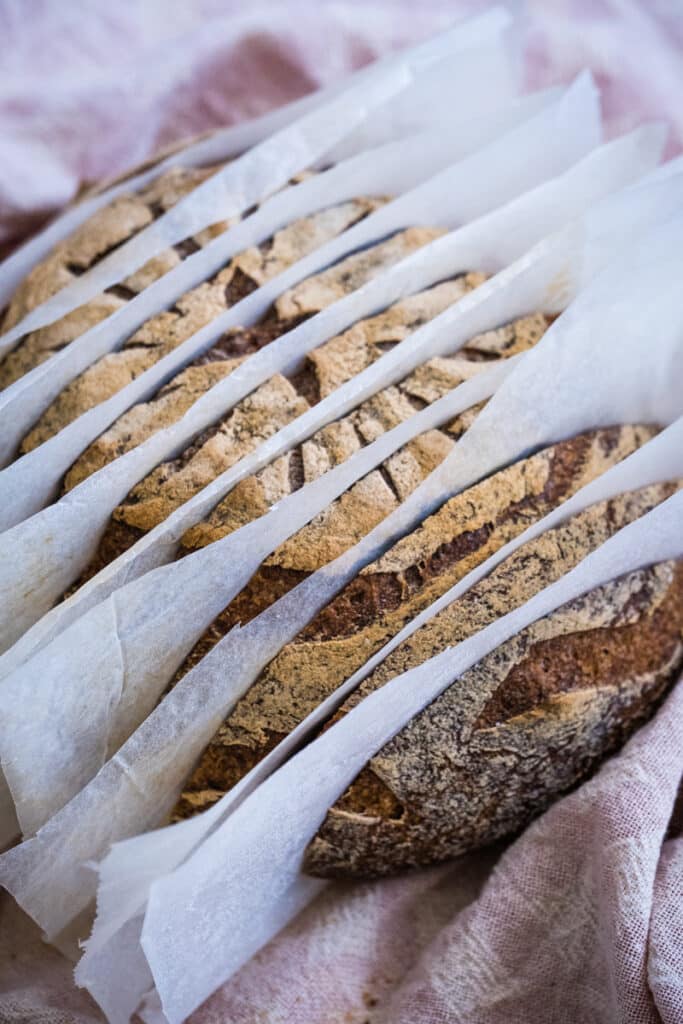
NOTE: Fermentation and proofing can be done at any temperature, including in the refrigerator. Lower temperatures will delay the process, so if you make the dough and don’t have time for it right now, you can put it in the fridge. Fermentation and proofing will happen in the fridge at a slower rate, so you can also over-ferment dough in the fridge. The image you see above (the 3rd picture from the left, with the over-proofed dough) is a dough I tried to proof overnight in the fridge. Obviously, 12 hours was too much.
Frequently asked questions:
Is all sourdough bread gluten-free?
Only sourdough bread made with certified gluten-free flours in a gluten-free facility are truly gluten-free. So, if you have severe allergies to gluten or are diagnosed as celiac, you will have to ensure the flours you used are not contaminated. However, many people who have a sensitivity to gluten, will be able to tolerate any sourdough bread, even the one made with gluten flour.
Is all lectin-free sourdough bread also gluten-free?
Yes! All sourdough bread made with lectin-free flours is also gluten-free, provided the ingredients used are certified gluten-free and there is no cross-contamination. Naturally, gluten is a lectin, so anything that is lectin-free is also gluten-free.
I want to make this bread. Where do I start?
Start by making your own starter. The process is explained in detail here: Gluten-Free Sourdough Starter With Millet, Teff and Sorghum Flour (Lectin-Free).
I want to make sourdough bread, but I’m so intimidated by the process
I understand! I was for many years. I always thought is the hardest thing to make and require qualities I don’t have. But once I started, I fell in love with the process.
Preparing your own sourdough bread is the most exciting and rewarding cooking experience you can have.
I’m scared I won’t be able to keep my starter alive
Making sourdough bread is like any long-term project, hobby, passion, or even having a pet. You have to dedicate it a little bit of time and attention to nourishing it.
But there are ways to put it on hold if, let’s say, you are not home for a while. You can put your starter in the fridge without having to feed it. You can dry your starter, travel with it, and reactivate it.
You can also make a bread schedule that will fit your lifestyle. You can make bread only in the weekends. You can make more than one bread at a time. And you can slice it and store it in the freezer.
I will travel, or I won’t have time to take care of my starter. What can I do?
If you travel or want to put making bread on hold for a while, this is what you need to do. Feed the starter as per the schedule, let it sit at room temperature for about an hour, then put it in the fridge (with the lid on, but not air-tight).
It can stay in the fridge without being fed for one, two weeks, even more if necessary. But I do recommend, if you can, refeeding it again after two weeks, and you can put it back in the fridge.
When you start to refeed it and want to make bread, take it out of the fridge, let it sit at room temperature for about an hour, then feed it as per the usual schedule, morning and evening. Feed it twice, at least, before you make a preferment.
I made the dough, but I have to leave the house. What do I do?
You can put the dough in the fridge at any stage of the fermentation process. Just keep in mind that it will continue to ferment in the fridge, just at a slower pace.
Can you freeze sourdough bread?
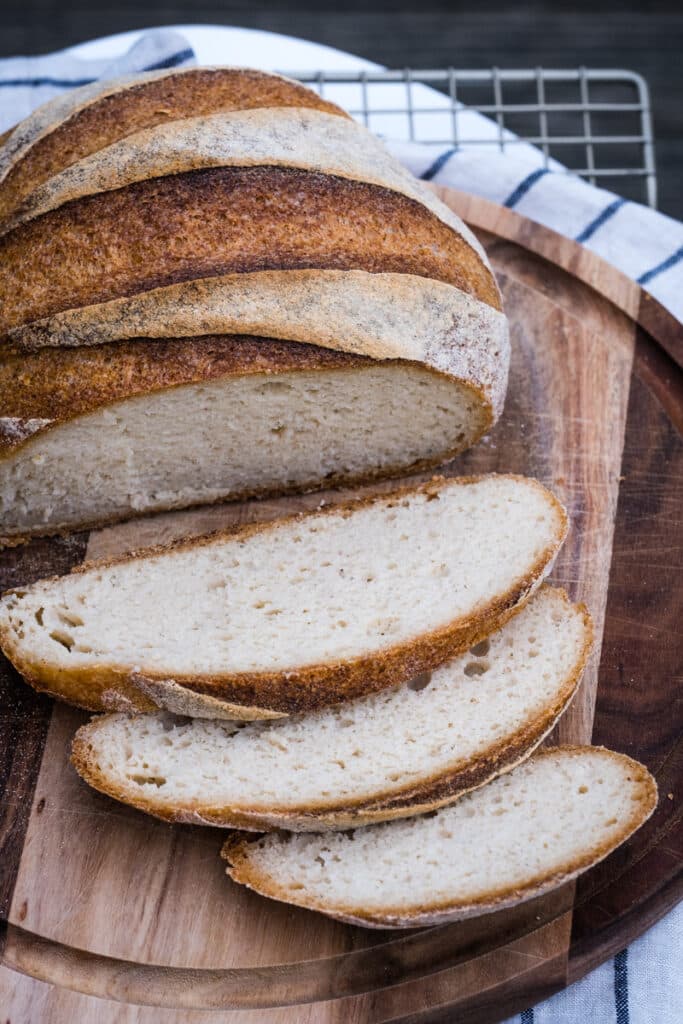
Yes, you can. I don’t have time to make bread every day, so whenever I can, I make a loaf of bread even if I don’t need it that day. Then I slice it, separate the slices with parchment paper and freeze it. When I want to eat it I defrost it in my toaster and then toast it.
Do I really have to wait for 5 hours before I slice the bread?
There is no way around it. You have to wait and let the loaf cool completely. And I even recommend letting it sit overnight before slicing it. This way all the moisture from the bread has time to come out. You will ruin your bread if you slice it before.
With smaller breads, like the demi-baguettes and bread rolls, 2 to 3 hours are enough. Focaccia can be served straight away.
I don’t have a Duch oven. Can I bake the bread without one?
Yes, you certainly can. I actually do sometimes bake bread directly on the oven tray, but I like the Dutch oven because it makes the crust more crispy and thick, how I prefer it.
If you bake it directly on the oven tray, preheat the oven to 250C (480F), drop it to 230C (450F) when putting the bread in (on a piece of parchment paper), and add a tray with a small quantity of hot water in (about 150ml), and bake it with steam for 20 minutes. Take the water tray out, turn the oven down to 220C (430F) and bake it for about 40 more minutes, or until the bread sounds hollow when tapped on the bottom.
Depending on your oven, you might have to experiment with different times and temperatures.
I made a dough but will not have enough time to bake it before it over-proofs. Can I save this dough?
Yes you can. Leave the dough in the fridge until you are ready. Then take it out, split it into 8 balls, then flatten each one using your hands, a rolling pin, and a lot of flour until you get a very thin sheet of dough. Brush it with olive oil and herbs, sprinkle with sea salt flakes and make flatbread (bake for about 12-15 minutes at 240C/460F). Or, use it to make a pizza crust, but don’t roll it so thin. This is the recipe for gluten-free, lectin-free sourdough flatbread.
Can I save an over-proofed bread?
I actually cut any good parts of the bread into cubes and freeze it. Then I use it to make croutons or bread crumbs.
My bread looks moist and gummy. Is that normal?
Gluten-free bread tends to have a moister texture than regular bread. But if it’s too moist or sticky, there are a few things you can do. Give it more time before you slice it, a few extra hours will make a difference. Next time bake it longer. And let it rest overnight before you slice it. Toasting it after slicing will also remove the moisture.
Can I make another shape of bread?
Yes, you can also make a battard (the long, oval shape). There are now proofing baskets in all kinds of shapes, including triangles. You can use any of those; just make sure it is the right size for this bread (not bigger than 1kg).
Is it expensive to make this bread?
I was curious to see how much it would cost me to make a loaf of bread, so I calculated the costs. Of course, there will be differences depending on the flour your purchase, the country you live in, etc… But for an average cost of ingredients, it costs less than $3 to make one loaf of bread.
Have more questions? Need help with troubleshooting your lectin-free and gluten-free sourdough bread?
Join our Facebook Private Group – Creative In My Kitchen, and we will find a way to fix your problem or answer your questions. Or comment below.
Resources and inspiration:
- Ana A. Negru – Artisan baker in Romania, with whom I took a paid workshop and made my first ever lectin-free and gluten-free sourdough loaves. You find her on Instagram @sourdough_storytelling. She is a great teacher, so you can book workshops with her if interested.
- Michael Pollan – I am so fascinated by his view on food in general and making sourdough bread in particular. I recommend you watch COOKED on Netflix.
- GeorgeEats.com
- The Guardian: From starter to loaf: how to make gluten-free sourdough bread from scratch
- Foodgeek.dk, especially the videos about scoring, but in general, watching him making sourdough is entertaining and educational.
- And so much more… I read everything I find on this topic and learn and experiment with new things daily. Instagram is a great source of inspiration.
I’m very grateful for all the free resources about making sourdough bread, and especially those aproaching troubleshooting. I probably read them all while I was trying to figure out why, after I moved to Denmark, I wasn’t able to make good bread like I was making in Romania.
I am beyond grateful for my friend Kristi, from Dallas, who joined me in this challenge. I don’t think this article would be possible without her. We hope everything we learned during this time is reflected in this article, and you will not have to go through the same issues we did.
And we won’t stop here. We have pizza, focaccia, flatbread, and more to share with you in the future.
More gluten-free, lectin-free sourdough recipes:
If you prefer a soft bread, you will find a recipe for lectin-free sourdough focaccia:
And a recipe for bread rolls:
Or maybe you’d like an easy flatbread recipe:
And when you feel like pizza:
If you are up for a challenge:
*This post contains affiliated links, which means I get a small commission if you choose to purchase something via one of my links, at no extra cost to you.
Print
Gluten-Free Sourdough Bread Recipe With Sorghum and Millet (Lectin-Free)
- Prep Time: 30 minutes
- Additional Time: 2 hours 10 minutes
- Cook Time: 1 hour 20 minutes
- Total Time: 4 hours
- Yield: 1 loaf
- Category: Sourdough
- Method: Baking
- Diet: Gluten-Free
Description
Learn the magical skill of making lectin-free and gluten-free sourdough bread and bring healthy and delicious bread back to your table. This millet and sorghum sourdough loaf is our master recipe. Once you learn how to make this bread, the possibilities for creating other types of bread are endless.
Ingredients
FOR THE PREFERMENT (make the night before, right before you feed the starter)
- 10 grams starter
- 30 grams of water (spring, filtered, non-chlorinated)
- 35 grams of flour mix (for this bread, equal quantities of sorghum and millet)
THE WET MIX
- 17 grams psyllium husk flakes (not powder)
- 420 grams of water (spring, filtered, bottled, no chlorine, no tap, and don’t use reverse osmosis water)
- 10 grams organic, raw honey, preferably local
- 6 grams extra virgin olive oil
- 75 grams sorghum + millet preferment (made the night before)
THE DRY MIX
- 230 grams flour (115g sorghum + 115 millet)
- 70 grams starch (tapioca flour)
- 6 grams non-iodized good quality fine salt
Instructions
MAKE THE PREFERMENT
- Mix all the ingredients the night before (you will prepare the dough in the morning)
THE MIXING METHOD
- In a glass or plastic bowl, combine the water, psyllium husk flakes, honey, and extra virgin olive oil. Mix well and set it on the side. Once the psyllium husks absorb the water, this mixture will have a gel-like texture (it needs about 5 minutes).
- In the meantime, combine all the dry ingredients in a glass bowl.
- Now add the preferment to the psyllium husk gel. Mix well with a spatula or wooden spoon.
- Add the preferment gel mixture to the dry ingredients bowl, incorporate as much as possible with a spatula or wooden spoon, then start mixing with your hand. Mix well until the dough is homogeneous and has no lumps. The dough is soft and sticky.
- Now you can start mixing with the silicone or plastic dough scraper, scraping the dough from the sides of the bowl, and folding it into the center. Rotate the bowl and repeat with the same movement, for about 1 minute. Please watch the video in the post above for a visual guide.
- Cover the bowl with a plastic cover, then wrap in two extra big plastic bags and tighten the bags. From now on the fermentation starts. I keep my bowl on the kitchen counter. Ideally, it needs a place where the temperature stays constant throughout the process.
BULK FERMENTATION
- Let it ferment for 1 to 2 hours, depending on the temperature and humidity in your house. At about 20 degrees Celcius (68 degrees Fahrenheit), it can take 2 hours. If it’s hotter than that, the time will decrease. At about 72-74 degrees Fahrenheit, my bulk fermentation takes about 1 hour.
SHAPING THE DOUGH
- The videos will be the most helpful here, please watch them. Gently invert the dough on a working surface, dusted with just a tiny bit of flour. Gently lift one-third of the dough and fold it on top of itself. Then fold it one more time, so now what was on the bottom on the working surface is on the top. The following step is to shape the dough and seal the bottom part (please watch the second video to see how sealing and transferring to the proofing basket is done).
PROOFING THE DOUGH
- Dust the lining of the Banneton or the towel with flour. Now that the dough is sealed and shaped, gently transfer it to the proofing basket with the sealed side facing upward (the smooth face down), as shown in Part 2 Video. Dust the top with flour, and cover with plastic wrap or wrap it in a towel. Because my house is pretty dry, I spray a little bit of water on the towel. I cover it in the plastic wrap, and then in two plastic bags that I tight very well. Again, you might not need these extra steps in your house. The proofing time will about the same as the bulk fermentation. At 72F it might be 1h or a little more. Whenever I use teff flour in my bread, fermentation time, in general, tends to lower (read more about my fermentation times and experience in the post above).
- OVEN: You need to preheat the oven to 250C / 480F for one hour before baking, with the Dutch oven inside (both pot and lid).
SCORING AND TRANSFERRING TO THE OVEN
- When the dough is proofed and your oven and cast iron are preheated, gently invert the dough from the basket to the middle of a parchment paper sheet.
- Dust the dough with flour (any of the flours you are using, I prefer sorghum or millet) and gently spread it on the surface of the dough with your palm. Have the razor ready for scoring.
- Now it’s time to carefully remove the cast iron and the lid from the oven, closing the door quickly. This is when you need to work pretty fast but be careful not to burn yourself.
- Make the scoring of your choice using the razor or the scoring blade (please check my suggestions in the post; keep it simple and easy in the beginning). After scoring, the dough needs to quickly go into the cast iron, covered, and into the oven.
- Lift the dough with the edges of the parchment paper and gently lower it into the cast iron. Spray the dough with water to create steam, cover it with the lid, and put it back in the oven. Alternatively, you can throw an ice cube into the pan, but not on top of the bread, somewhere next to it, below the paper.
- Bake covered for 40 minutes.
- After 40 minutes, carefully remove the lid (placing it back into the oven, so there is no sudden drop in temperature), and bake for 40 more minutes. Some ovens run hotter than others, so keep an eye on the bread after 30 minutes. If you feel like your bread gets a little dark, next time drop the temperature to 230C/446F for the last 40 minutes of baking.
- Take the pot out, and carefully remove the bread. You can check the bottom for the hollow sound.
- Let the bread rest on a cooling rack for at least 5 hours. I know it can be tempting, but don’t slice it earlier than 5 hours, as you will ruin the texture. For the best crumb, I recommend leaving it to rest overnight.
- Store the bread for 2 to 3 days at room temperature, in a paper bag, or wrapped in a cotton towel. The first and second day is great fresh, but from day 3, I prefer it toasted. You can also slice it, separate the slices with parchment paper and freeze it. I thaw it in the toaster.

149 Comments
Kerrie Knapp
March 9, 2026 at 7:58 pmAm I able to just use the Millet + Sorghum flour omitting the teff flour?
Claudia
March 10, 2026 at 2:43 amHi Kerrie, this recipe is made only with sorghum and millet, so I’m not sure I understand your question? Are you maybe referring to another recipe, or the starter? – Claudia
Ella D
February 16, 2026 at 2:21 pmHello, Claudia! What banneton size do you recommend for this bread? And for the dutch oven: would a 2.5qt be too small? Another option is a 4.5qt. Thanks!
Claudia
February 18, 2026 at 2:16 amHi Ella! I use 8-inch Bannetons for all my breads, and don’t recommend anything bigger for this size of dough (although you can use a slightly smaller one). A 4.5Qt DO is a good size for baking bread. xx -Claudia
Cynthia Meadows
January 21, 2026 at 10:23 pmHi Claudia! I’m so excited to try this recipe! I’ve made gluten free bread for my celiac husband and son for about 2 years, but sourdough has always scared me. I do have one question though. Would I be able to modify this recipe to be made in a loaf pan, rather than a Dutch oven? My family prefers a softer uniform sandwich bread, rather than a crusty boule. Would this recipe work with proofing and shaping, but then just throwing it into a loaf pan and baking the way you would a normal loaf of bread?
Claudia
January 22, 2026 at 12:10 pmHi Cynthia! Yes, you can surely make these loaves into a pan. I’m not sure what your method for pan baking is, but there are a few things that you need to consider: temperature (it’s 210C / 410F), steam in the first 20 minutes, bottom heat (you need something really hot / preheated to place your loaf pan on), and timing. I recommend you have a look at my Sturdy Gluten-Free Sourdough Sandwich Loaf – all these details are there, although this recipe is slightly different, in the sense that requires more preferment / levain. But generally speaking, if you adapt those variable, any dough could be also baked in a loaf pan. I hope this helps xx -Claudia
Amal
March 9, 2025 at 5:39 pmHello Claudia,
I wanted to clarify under making the Preferment you have 35 grams of flour (the flour that you will be using to make the bread, in this case, equal quantities of sorghum + millet). Under Wet Mix, you have 75 grams of Sorghum and Millet made the night before. Wouldn’t that be 70 grams because we had our Preferment of Soghum and Millet 35 grams each for a total of 70 grams? Thank you for all of your amazing recipes.