
Tiramisu has always been my all-time favorite dessert. When I began my health journey years ago, it was one of the indulgences I missed the most. So I set out to recreate it — using a homemade cake and a few simple, wholesome substitutions. The result was so good that I knew I had to share it with fellow tiramisu lovers who avoid gluten and refined sugar. This sugar-free, gluten-free tiramisu in a jar is every bit as creamy, soft, and decadent as the classic — just made with ingredients that love you back.
How to make a gluten-free tiramisu?
The ingredients in this Italian dessert that have gluten are the ladyfingers. Also called Savoiardi, they are sweet sponge cake biscuits made of eggs, sugar, and flour. This is the signature ingredient of the traditional tiramisu cake (along with the mascarpone cream) and, unfortunately, not an option for anyone on a gluten-free or sugar-free diet.
Recently there have been gluten-free options on the market, but they are still made with sugar, and they are certainly not lectin-free.
Tiramisu is an easy dessert to make if you use store-bought ladyfingers. But making a cake to replace ladyfingers is not that difficult either.
When I created this Green Banana and Chocolate Cake, I immediately felt I could pair it with classic mascarpone cream and transform it into a delicious tiramisu. It’s made of green bananas, eggs, and a mix of tigernut flour and tapioca flour, with a few add-ins and flavors creating layers of texture and flavors.
Due to the bananas I used to make the cake, this is not a keto tiramisu, but it is lower in carbs than a regular tiramisu.
Authentic tiramisu, a question of taste
Before I started my gluten-free, lectin-free, and sugar-free diet, I was the person who would make a tiramisu dessert for all festive occasions. I’ve also had the chance to eat many authentic tiramisu cakes, so I know what to look for in a tiramisu cake.
Like anything, tastes are different, so we might like different things. For example, I always preferred the mascarpone cream on the thicker side, with less egg content. Some chefs (especially Italian) like to make the cream super runny and add many eggs.
I also like a good ratio of cake to cream: about half-half, maybe slightly less cake than cream. And while I love a classic tiramisu, adding a few fresh raspberries between layers makes it perfect for me. Raspberries are optional, though; feel free not to use them if you don’t feel like it.
If you think of it, the Marsala wine used to make authentic tiramisu gives a slightly fruity, both tart and sweet flavor, which raspberries can bring in.
Start by making the cake
When making a tiramisu, you have to plan. The cake has to be made one or two days prior, so the first step is to bake the cake. Also, once the tiramisu is assembled, it needs to rest overnight in the fridge before serving.
This is where you find the recipe to make the gluten-free and sugar-free Green Banana and Chocolate Cake. Once done, store it in the fridge for a day or two before using it.


Make the mascarpone cream
Making the mascarpone cream for tiramisu is easy. You need authentic Italian mascarpone cheese, pasture-raised eggs, sweetener, and some natural flavors.
It’s important you choose an Italian imported mascarpone, as it is made with Italian milk, which is A2 casein milk.
The eggs will be raw, so get the freshest, best-quality pasture-raised eggs you can.
For sweetener, I use inulin powder with a very small amount of erythritol, but any plant paradox approved natural sweetener can be used (not liquid though). For options on sweeteners please check my Lectin-Free and Plant Paradox approved store.
I love to add orange zest or natural orange flavor for an extra layer and more depth of taste and vanilla.
You will start by separating the yolks from the whites and beating the whites until stiff. You can use a hand or electric mixer. The following step is to mix the egg yolks with the flavors, pinch of salt, and sweetener until creamy. Add the mascarpone cream and mix with an electric mixer until it thickens, but don’t overmix. It will take a few minutes.


When the cream is thicker, add the stiff egg white and gently incorporate them with a rubber spatula or a hand mixer, but don’t beat them. That’s it; at this point, the cream is done. You can store it in the fridge until you have the rest of the elements ready.
Some recipes use whipping cream, and I used to do that, too in the past. But I think it is an unnecessary extra step. The mascarpone cream is already supper fluffy and flavorful.
This keto-friendly mascarpone cream can be used for other desserts if you want to get creative.


Prepare the cake
You start by making one espresso, or excellent quality, strong black coffee. You need about 1/2 cup or even less. Add the pure coffee extract to the coffee and let it reach room temperature before using.
Take the cake out of the fridge and cut it into about 1-inch cubes. Place them on a large platter.

When the coffee is cold, take coffee with a teaspoon and pour over the cake squares, a few drops on each. Ladyfingers are very dry; that’s why they need the coffee soaking. But this cake already has a lot of flavors and is pretty moist. You need to give it that coffee flavor and slightly more moisture.

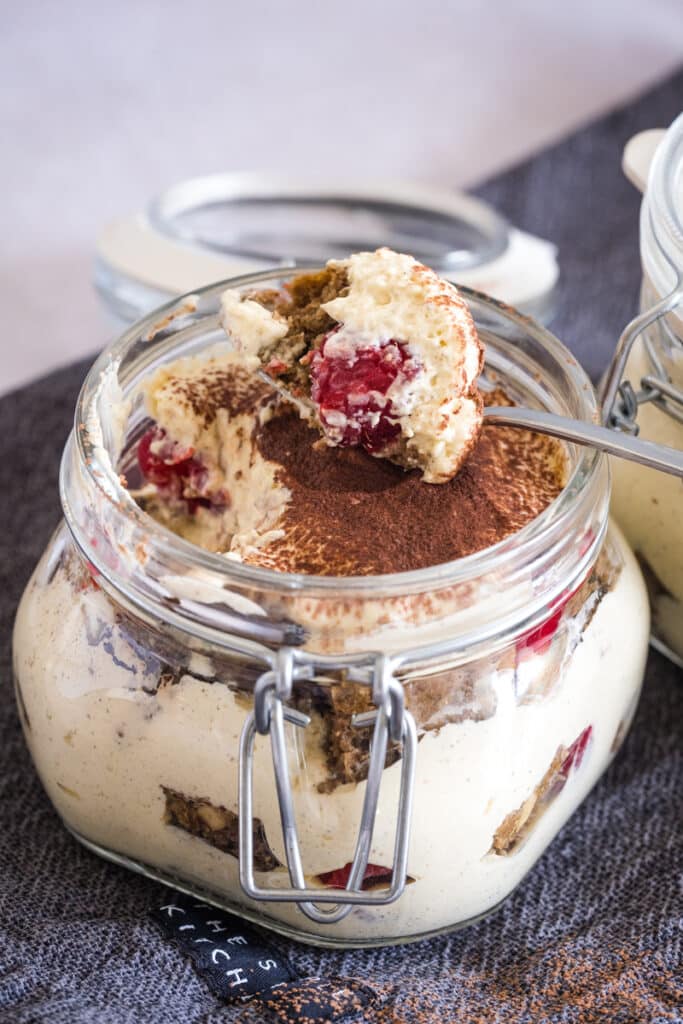
Jars for personal servings
I love to make tiramisu in jars. This quantity will make two big jars, but each jar is a ginormous portion. It’s more like two decent servings per jar, so four portions in total.
These jars are 1/5 liter (16oz) each. These are sold as mason jars with airtight lids. They are perfect as they can be used for so many things. I found these on Amazon:
I really like the 8oz ones, but I couldn’t find any here in Denmark (where I am now). If you want smaller portions (single servings), I would use the 8oz and follow the same steps.
Even if you use another type of jars, it’s great if they have lids, as you will store the tiramisu cake overnight in the fridge. It makes things easier. If you don’t have them and use normal glasses, you can cover them with plastic foil or aluminum foil.

How to assemble sugar-free tiramisu in a jar
Now that you have all the ingredients ready, you can assemble your cake.
Start with a layer of cream on the bottom of the jar. Add a layer of scattered cake pieces (don’t forget first to add the coffee to the cake) and a few raspberries. Add a generous layer of cream, continue with another layer of cake and a few strawberries, and finish with a layer of cream.
Dust everything with raw cacao powder (not cocoa powder!)
Close the lids and store them for at least six hours in the fridge, preferably overnight.
Enjoy, and please let me know if you make this sugar-free tiramisu!
This recipe is part of our round-up Top 15+ Lectin-Free Desserts You Must Try. Check it out for more delicious, lectin-free dessert ideas.
*This post contains affiliated links, which means I get a small commission if you choose to purchase something via one of my links, at no extra cost to you.
Print
Sugar-Free Tiramisu in a Jar (Gluten-Free, Lectin-Free)
- Prep Time: 30 minutes
- Total Time: 30 minutes
- Yield: 4
- Category: Dessert
- Method: No-Bake
- Cuisine: Italian
- Diet: Gluten-Free
Description
Tiramisu has always been my all-time favorite dessert. When I began my health journey years ago, it was one of the indulgences I missed the most. So I set out to recreate it — using a homemade cake and a few simple, wholesome substitutions. The result was so good that I knew I had to share it with fellow tiramisu lovers who avoid gluten and refined sugar. This sugar-free, gluten-free tiramisu in a jar is every bit as creamy, soft, and decadent as the classic — just made with ingredients that love you back.
Ingredients
- About 16–20 fresh raspberries, washed and dried (don’t use frozen fruits)
- 4 pasture-raised, very fresh eggs
- 2 tablespoons powder or granulated sweetener, or to taste (I used inulin, you can use monk fruit, Swerve etc)
- 1/2 teaspoon orange extract OR zest of one organic orange
- 1–2 teaspoons vanilla extract / 1 teaspoon vanilla powder
- pinch of salt
- 350 grams of Italian mascarpone cream (imported from Italy)
- 6–7 cake squares (see post for recipe)
- 1 espresso or a strong, quality coffee (about 1/2 cup)
- 1 teaspoon pure coffee extract
- 1 teaspoon raw cacao powder
Instructions
- Make sure you wash and dry the raspberries before starting.
- You will start by separating the yolks from the whites, and beat the whites until stiff. You can use a hand or electric mixer.
- The following step is to mix the egg yolks with the flavors, pinch of salt, and sweetener until creamy. Add the mascarpone cream and mix with an electric mixer until it starts to thicken, but don’t overmix. It will take a few minutes.
- When the cream is thicker, add the stiff egg white and gently incorporate them with a spatula or a hand mixer, but don’t beat them. That’s it, at this point, the cream is done. You can store it in the fridge until you have the rest of the elements ready.
- Make one espresso, or very good quality, strong black coffee. You need about 1/2 cup or even less. Add the pure coffee extract to the coffee and let it cool before using.
- Take the cake out of the fridge and cut it into about 1-inch cubes. Place them on a large platter. When the coffee is cool, take coffee with a teaspoon and pour over the cake squares, a few drops on each. Ladyfingers are very dry, that’s why they need to be soaked in coffee. But this cake has already a lot of flavors and is pretty moist. You just need to give it that coffee flavor and slightly more moisture.
- Now that you have all the ingredients ready, you can assemble your cake. Start with a layer of cream on the bottom of the jar. Add a layer of scattered cake pieces (don’t forget to first add the coffee to the cake) and a few raspberries. Add a generous layer of cream, continue with another layer of cake and a few strawberries, and finish with a layer of cream. Dust everything with raw cacao powder.
- Close the lids and store them for at least six hours in the fridge, preferably overnight.
Notes
I recommend reading the entire post above for details before starting.
7 Comments
Sue
February 15, 2025 at 4:21 pmI love the cake itself and the Tiramisu is delicious. The Tiramisu recipe was easy to cut in half. I made several 4 ounce jar servings, that’s the perfect size for me. I couldn’t find coffee extract in time for Valentine’s Day so I just used strong decaf French roast and it was delicious. I added a bit of extra orange peel and vanilla and might even add a bit more next time. Great recipe Claudia!
Claudia
February 16, 2025 at 5:27 amThank you so much, Sue! I’m so happy you loved this recipe. Nothing compares with a good Tiramisu, especially on Valentine’s Day :)). xx -Claudia
Annette
December 29, 2023 at 7:10 pmOh my… we have a new holiday tradition with this recipe! Wow! What a treat! Thank-you Claudia 🙂
Kathleen
February 14, 2023 at 5:49 pmMade this today for Valentine’s Day and it was so good! Creamy and decadent. I never would have thought the green banana cake would be so delicious in it but it was. Definitely making this again. Thank you for the recipe!
Claudia
February 15, 2023 at 1:49 amHi Kathleen, so happy you loved it! And yes, somehow, it works. I made one in the weekend, and it was so good 😊 .
Meredith Garner
April 27, 2022 at 10:35 pmCannot wait to make this! Thank you so much for creating and sharing, Claudia!
Claudia
April 28, 2022 at 1:08 amHi Meredith, please let me know how it comes out. love and hugs, Claudia