This gluten-free pumpkin sourdough bread is a festive, cozy loaf that brings the flavors of fall to your table. Gently sweet and aromatic from pumpkin and warm spices, it’s made with a gluten-free sourdough starter and just a few wholesome ingredients — no gums, commercial yeast, or chemical leavening agents. The result is a nourishing, tender bread with a rustic pumpkin shape that’s perfect for autumn and holiday gatherings or simply toasted with salted butter on a crisp morning.
Important Notes Before You Start
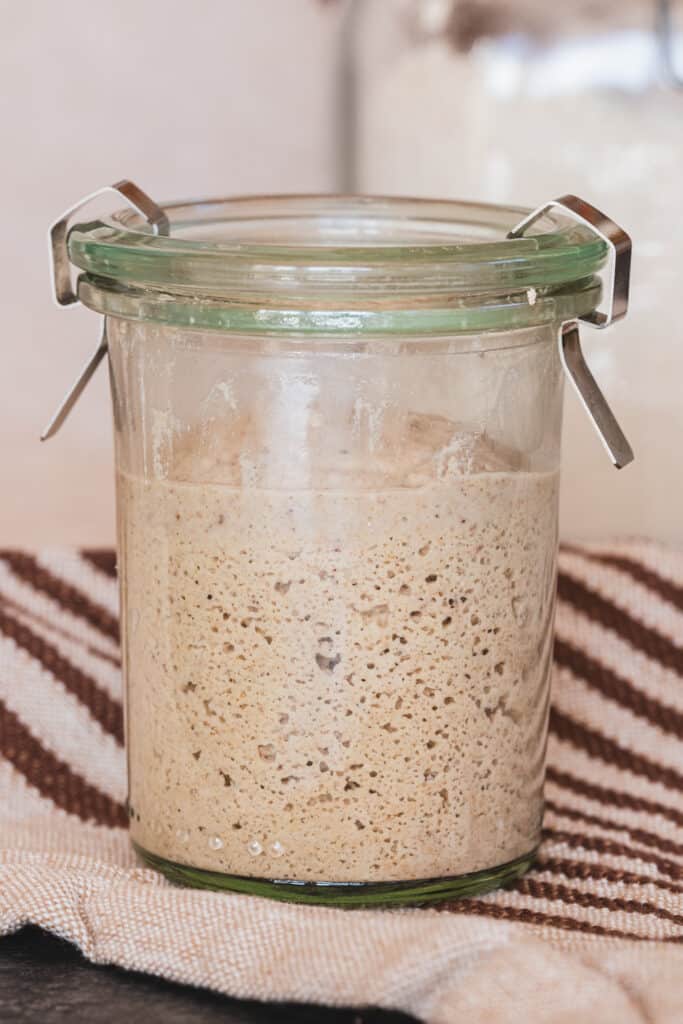
Starter & Preferment: My gluten-free sourdough starter is a blend of teff, millet, and sorghum flour. For all my sourdough recipes, I use a preferment (also called levain) — a small culture made with a bit of starter and the same flour mix used in the dough. If you maintain a larger starter and prefer to use it directly, you can skip the preferment and use 75 g of active starter instead.
For more details on my sourdough method and recipes, check out my Beginner’s Guide to Baking Gluten-Free Sourdough.
Gluten-Free Flour Mix: My feeding mix (and the mix used in this recipe) includes teff, sorghum, and millet flours. You can use the same combination or experiment with your own gluten-free mix. Keep in mind that different flours absorb water differently, so hydration may vary slightly.
Pumpkin Purée: The amount of water needed in the dough may vary depending on the pumpkin purée you use. I used a purée made from baked pumpkin, which tends to be drier than canned versions. If using canned pumpkin, you may need slightly less water.
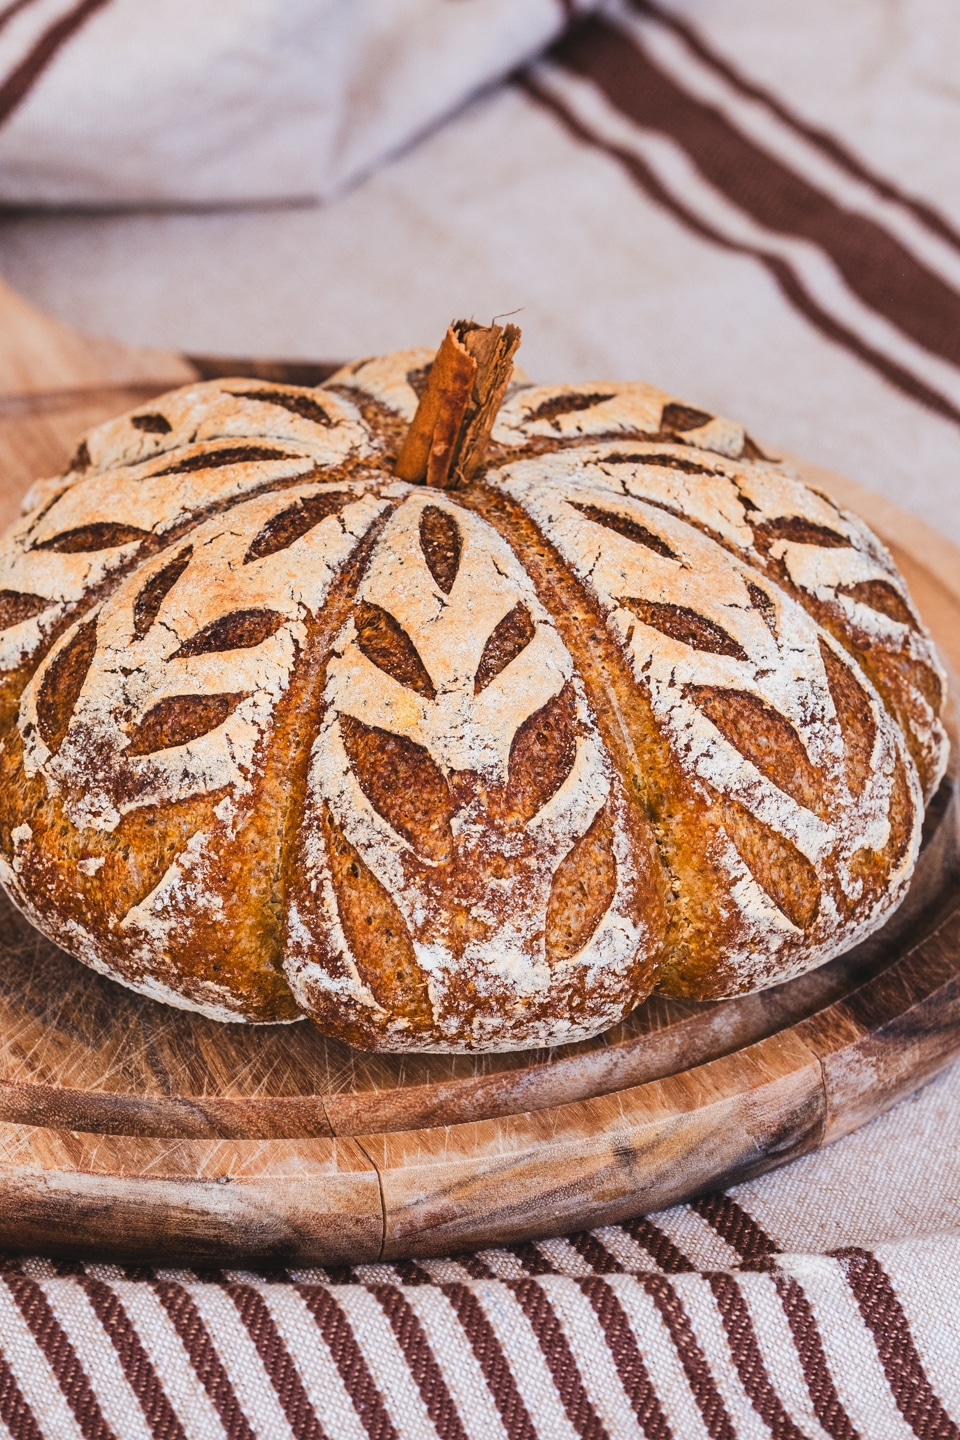
Pumpkin Shaping: The pumpkin shaping technique can be applied to any gluten-free sourdough loaf, no matter the recipe — it’s a fun way to make your bread festive and seasonal.
Overnight Cold Fermentation: My Schedule
For this particular recipe, I recommend an overnight cold proof. While you can do the proofing at room temperature, my tests consistently produced better results with cold fermentation, which enhances both flavor and structure. Here’s an example of my schedule:
- Noon: Mix the preferment and let it ferment at room temperature until it reaches peak activity (about 6–8 hours). It’s best used within 10 hours.
- Evening (usually before I go to sleep): Mix the dough, rest it for 15 minutes on the counter, shape, and place it in the refrigerator’s coldest spot to proof overnight (no longer than 9 hours).
- Next Morning: Preheat the oven, shape the loaf into the pumpkin form, and bake. After baking, it needs 5 hours to cool down before slicing and serving.
Step-by-Step Instructions: How to Make Gluten-Free Pumpkin Sourdough Bread
Step 1: Prepare the Preferment
(Start about 6–8 hours before mixing the dough — around noon works well)
Ingredients
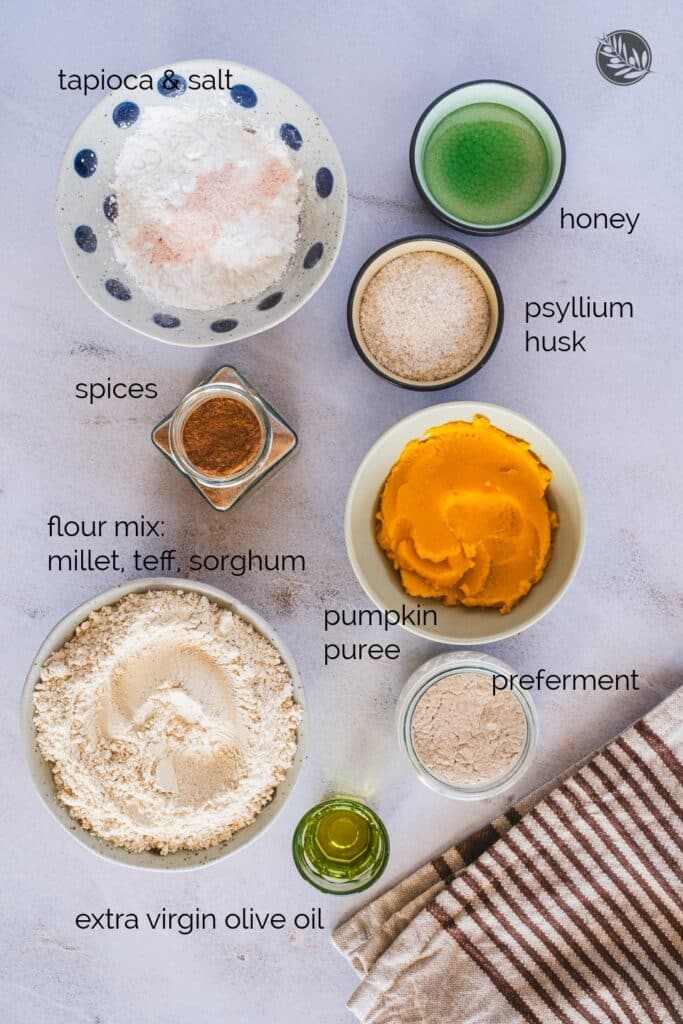
- 10 g active sourdough starter
- 35 g filtered water
- 35 g flour (I use a mix of millet, teff, and sorghum)
Instructions
In a small clean jar, mix all ingredients thoroughly until no dry flour remains.
Cover and let ferment at room temperature (21–23 °C / 70–74 °F) for 6–8 hours, or until bubbly, almost doubled, and cracked on top, with a pleasant aroma.
To speed up fermentation (to about 3 hours), place the jar on a heating pad or in a turned-off warm oven.
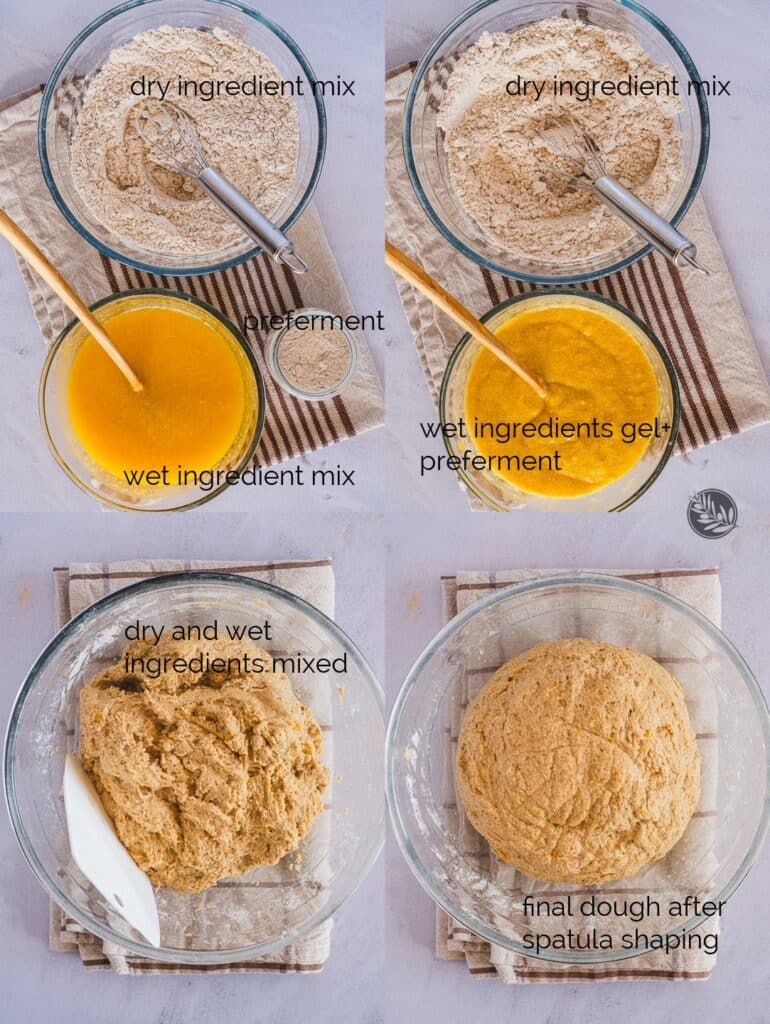
Step 2: Mix the Wet Ingredients (Evening)
Ingredients
- 17 g whole psyllium husk flakes
- 365 g filtered water, divided (350 g + 15 g)
- 20 g raw honey (substitute maple syrup if vegan)
- 10 g extra-virgin olive oil
- 100 g pumpkin purée
- All of the preferment
Instructions
In a medium bowl, combine psyllium flakes, honey, olive oil, pumpkin purée, and 350 g of water. Stir until well mixed.
Let it sit for 3–5 minutes to form a thick gel.
Add the preferment, using the remaining 15 g of water to rinse the jar so none is wasted.
Mix until smooth and uniform.
Step 3: Mix the Dry Ingredients
Ingredients
- 230 g gluten-free flour mix (110 g millet + 60 g sorghum + 60 g teff)
- 70 g tapioca flour
- 6 g fine sea salt (non-iodized)
- 1 tsp pumpkin pie spice
- ¼ tsp cinnamon
- ¼ tsp cardamom
Instructions
In a large bowl, whisk all ingredients together until evenly combined.
Step 4: Combine Wet and Dry Mixtures
Add the wet gel mixture to the bowl of dry ingredients.
Start mixing with a spatula, then switch to clean hands and knead lightly until a homogeneous dough forms (about 1–2 minutes). If the dough feels too dry, add extra water, 5 g at a time.
Scrape down the sides of the bowl and fold the dough toward the center, using the spatula, rotating as you go — about 20 folds in total. The dough should be thick, soft, and slightly sticky.
Cover and let rest 10–15 minutes in a draft-free spot.
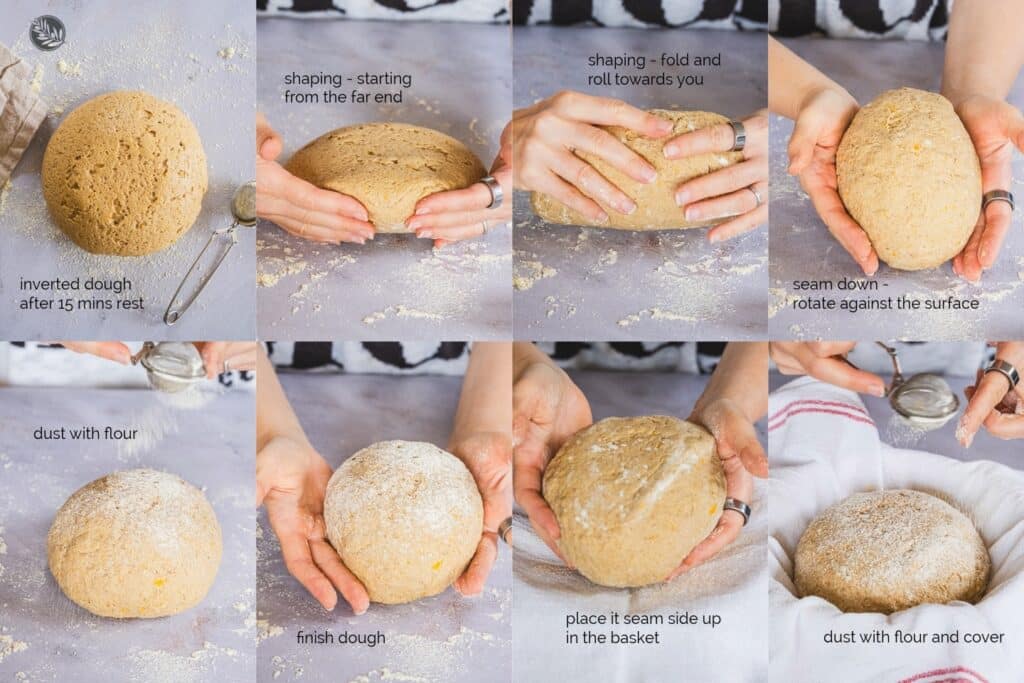
Step 5: Shape the Dough (Just Before Bed)
Lightly flour a clean surface and gently invert the dough onto it.
Fold: Grasp the far edge of the dough and fold it to the center. Then roll it toward yourself one more time.
Tighten: With the seam now on the bottom, cup your hands around the dough and gently rotate it against the surface to build tension and form a smooth, round ball. Make sure the seam (facing the surface) is sealed.
Prepare for Proofing: Lightly dust the top with flour. Place the dough, seam-side up, into a lightly floured, cloth-lined banneton.
Dust again with flour, cover with a cloth, then a plastic cover to prevent drying.
Step 6: Overnight Fermentation
Refrigerate overnight in the coldest part of the fridge, usually the bottom shelf, in the back (ideally no longer than 9 hours). Make sure the temperature of your fridge is set to 2°C (36°F).
Gluten-free doughs don’t show the same proofing cues as wheat breads, so rely on feel (and experience): look for about 20–30 % rise, a slightly puffy surface, and a gentle jiggle when moved. If the dough has nearly doubled, it’s likely over-proofed.
Step 7: Preheat the Oven & Create the Pumpkin Shape
Place your Dutch oven (with the lid) inside your oven and preheat to 250°C / 480°F for 30–40 minutes to ensure it’s thoroughly hot.
Prepare the Pumpkin Shape & Score
- Cut four pieces of kitchen twine, each about 28 inches / 70 cm long.
- Place a sheet of parchment paper on your work surface (I cut mine so it’s easy to fit into the Dutch oven — see pictures below).
- Arrange the four strings on the paper so that they all intersect in the center, dividing the paper into eight equal triangular sections:
- Start with one string running vertically (top to bottom).
- Lay the second string horizontally (side to side) across it, forming a cross.
- Position the third and fourth strings diagonally, one from top-left to bottom-right, and the other from top-right to bottom-left. The result should look like a star or an eight-pointed wheel, with all strings meeting in the middle.
- Lightly dust the top of the dough with flour, then gently invert it (seam-side down) onto the center of the parchment — directly over where the strings cross.
- Dust the dough’s top and sides again with flour so the strings don’t stick while baking.
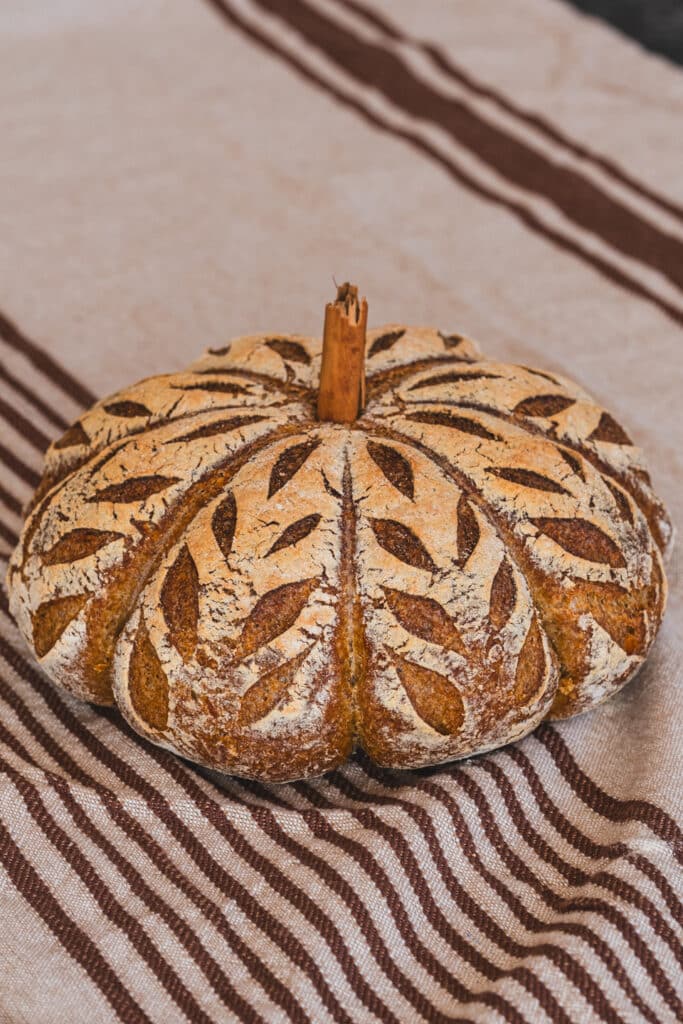
- Working with one string at a time, bring the two ends together across the top of the dough and tie a loose knot in the center. Repeat with the other three strings, spacing them evenly to define eight pumpkin-like sections. The strings should be snug but not tight — they’ll create those lovely pumpkin ridges as the dough expands.
- Trim off the excess string ends.
- Score as seen in the picture below. (See photos for visual guidance.)

Step 8: Bake
Using oven mitts, carefully transfer the hot Dutch oven from the oven. Lift the dough by the parchment paper and lower it into the pot.
Bake covered for 40 minutes, then uncover and continue baking 35–40 minutes (monitor closely if your oven runs hot) until the crust is deeply golden-brown.

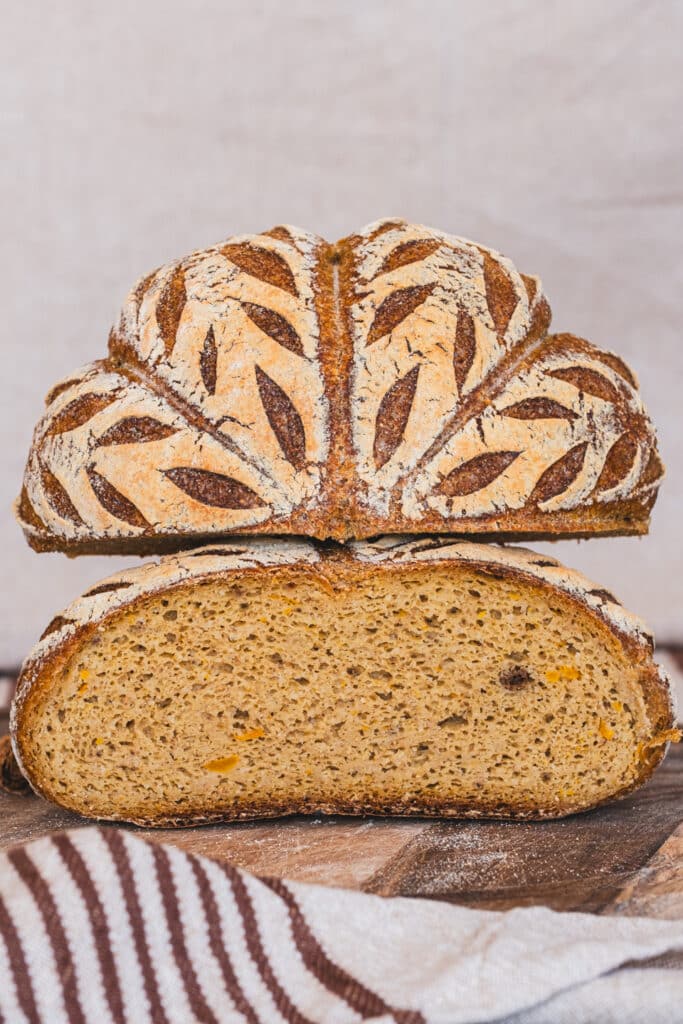
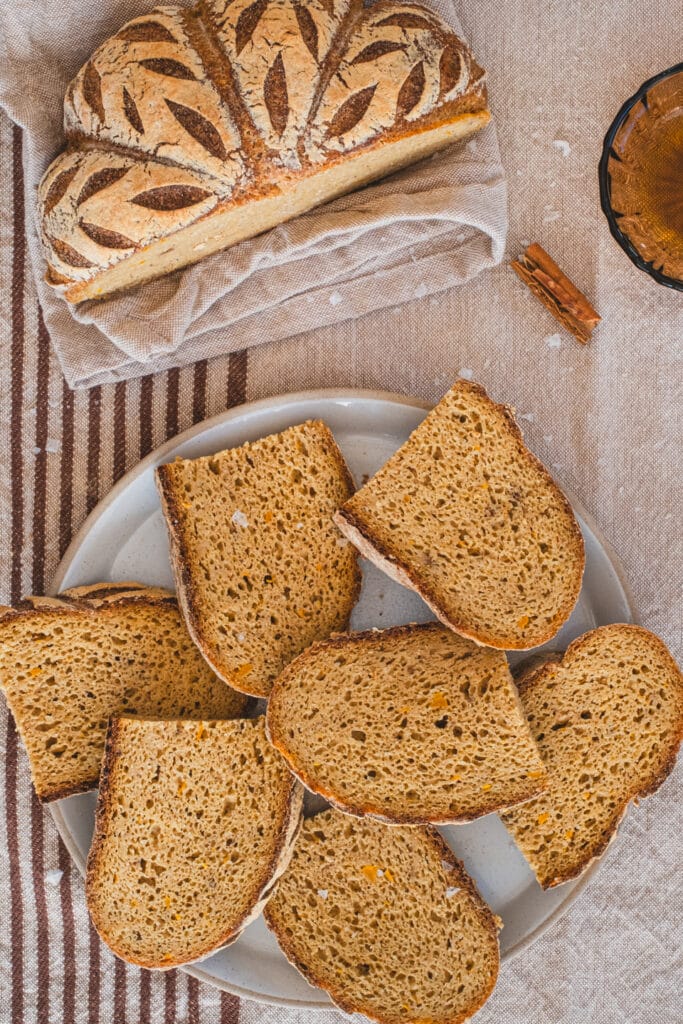
Remove the loaf and transfer it to a cooling rack. Let cool at least 5 hours before slicing — this allows the crumb to fully set and prevents gumminess.
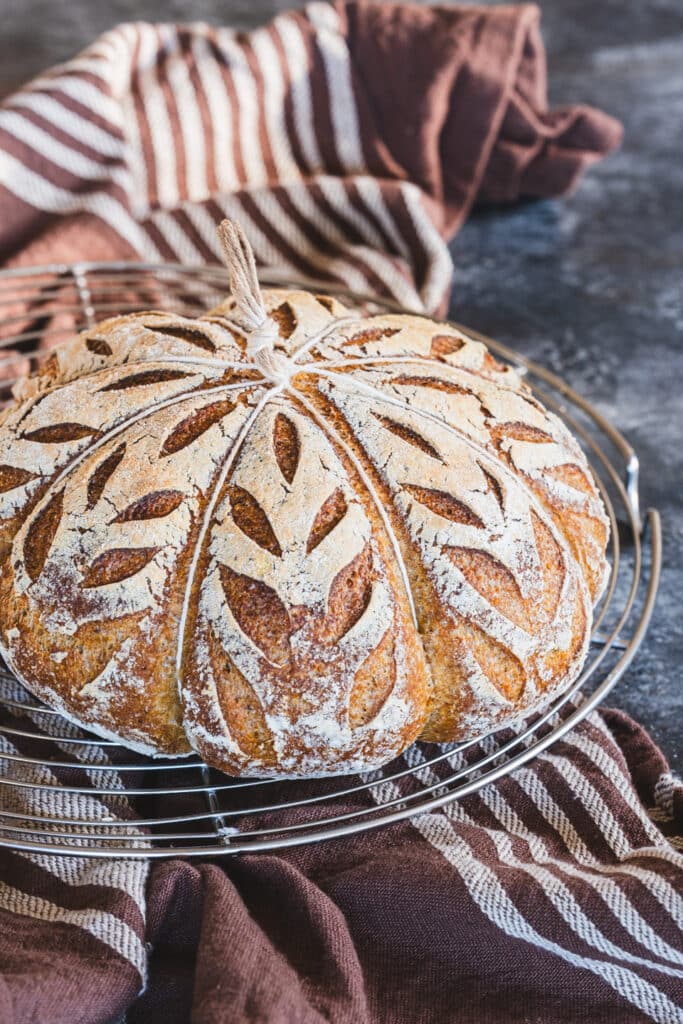
When completely cool, cut and remove the strings. For decoration, insert a 1-inch cinnamon stick into the center as a stem.
Slice and Enjoy
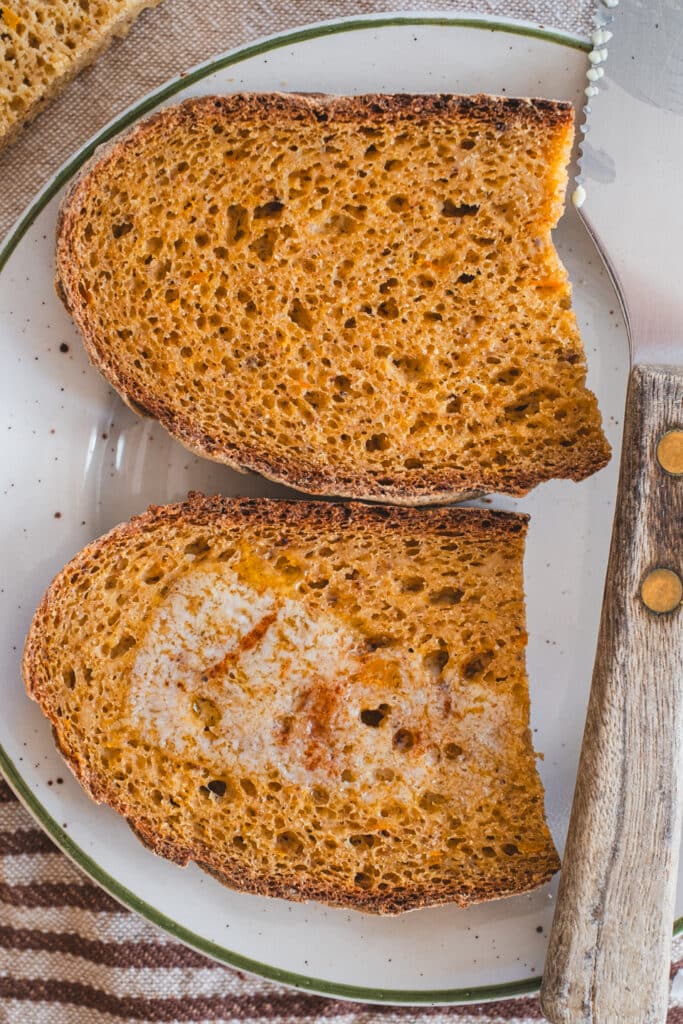
This beautiful, festive bread is gently sweet and wonderfully aromatic, with the earthy, sweet flavor of pumpkin and warm seasonal spices. It’s best enjoyed toasted and slathered with salted butter — a simple yet irresistible treat.
For the best presentation (and texture), slice the loaf in half first. Place each half cut-side down on a cutting board and cut into thin slices. Toast until golden, then transfer the slices to a cooling rack to prevent steam from softening the crumb. Serve warm with salted French or Italian butter — it’s pure delight!
Why Toast Gluten-Free Sourdough Bread?
Gluten-free sourdough naturally retains more moisture than regular bread, so the crumb may appear slightly sticky, especially right after slicing. Once you cut the loaf in half, let it breathe for a while — uncovered or loosely covered with a kitchen towel — to allow excess moisture to escape. Still, the best way to enhance the crumb, flavor, and overall experience of gluten-free bread is simple: toast it.

More Festive Sourdough Recipes (Gluten-Free)
If you are in the mood for more cozy and festive sourdough creations that are gluten-free, lectin-free, and made with wholesome, nutritious ingredients, check out my seasonal favorites:
- Guten-Free Sourdough Focaccia (Lectin-Free)
- Rustic Sourdough Rolls With Teff, Millet, and Sorghum
- Walnut Cranberry Sourdough Bread
- Teff Sourdough Bread With Cardamom
- Soft and Cheesy Sourdough Breadsticks
- Gluten-Free Sourdough Croissants
- Gluten-Free Sourdough Muffins with Halloumi Cheese
- Gluten-Free Sourdough Cinnamon Rolls (Chai-Infused)
- Soft Gluten-Free Sourdough Rolls
*This post contains affiliated links, which means I get a small commission if you choose to purchase something via one of my links, at no extra cost to you.
Print
Gluten-Free Pumpkin Sourdough Bread
- Prep Time: 30 minutes
- Cold fermentation: 8 hours
- Cook Time: 80 minutes
- Total Time: 9 hours 50 minutes
- Yield: 10 servings
Description
This gluten-free pumpkin sourdough bread is a festive, cozy loaf that brings the flavors of fall to your table. Gently sweet and aromatic from pumpkin and warm spices, it’s made with a gluten-free sourdough starter and just a few wholesome ingredients — no gums, yeast, or chemical leavening agents. The result is a nourishing, tender bread with a rustic pumpkin shape that’s perfect for autumn and holiday gatherings or simply toasted with butter on a crisp morning.
Ingredients
FOR THE PREFERMENT
- 10 g active sourdough starter
- 35 g filtered water
- 35 g flour (I use an equal mix of millet, teff, and sorghum)
THE WET INGREDIENTS
- 17 g whole psyllium husk flakes
- 365 g filtered water, divided (350 g + 15 g)
- 20 g raw honey (substitute maple syrup if vegan)
- 10 g extra-virgin olive oil
- 100 g pumpkin purée
- All of the preferment
THE DRY INGREDIENTS
- 230 g gluten-free flour mix (110 g millet + 60 g sorghum + 60 g teff)
- 70 g tapioca flour
- 6 g fine sea salt (non-iodized)
- 1 tsp pumpkin pie spice
- ¼ tsp cinnamon
- ¼ tsp cardamom
Instructions
- Prepare the Preferment: In a small clean jar, mix all preferment ingredients until no dry flour remains. Cover and let ferment at room temperature (21–23 °C / 70–74 °F) for 6–8 hours, or until bubbly, almost doubled, and cracked on top with a pleasant aroma.
- Mix the Wet Ingredients: In a medium bowl, combine psyllium flakes, honey, olive oil, pumpkin purée, and 350 g water. Stir well and let sit 3–5 minutes to form a thick gel. Add the preferment, using the remaining 15 g water to rinse the jar, and mix until smooth and uniform.
- Mix the Dry Ingredients: In a large bowl, whisk together all dry ingredients until evenly combined.
- Combine Wet and Dry Mixtures: Add the wet gel to the dry ingredients. Mix with a spatula, then with clean hands until a homogeneous dough forms (1–2 minutes). If too dry, add more water, 5 g at a time. Scrape down the bowl with the plastic scraper, then fold the dough toward the center using the scraper, rotating the bowl, about 20 times. Cover and rest for 10–15 minutes. The dough should be thick, soft, and slightly sticky, well hydrated but holding its shape.
- Shape the Loaf: Lightly flour a surface and gently invert the dough onto it. Fold the far edge to the center, then roll it toward you, until it’s shaped like a log with the seam facing the surface. With the seam down, cup your hands around the dough and rotate to tighten it into a smooth round ball. Lightly dust with flour and place seam-side up in a floured, cloth-lined bowl. Dust again, cover with a cloth, then a plastic wrap or cover.
- Overnight Fermentation: Refrigerate overnight in the coldest part of the fridge, usually the bottom shelf, in the back (ideally no longer than 9 hours). Make sure the temperature of your fridge is set to 2°C (36°F).
- Preheat, Create the Pumpkin Shape, and Score: Preheat a Dutch oven (with lid) at 250 °C / 480 °F for 30–40 minutes. Cut four 28-inch (70 cm) pieces of kitchen twine and arrange them on a sheet of parchment so they intersect in the center, forming eight equal sections (like an eight-pointed star). Dust the dough with flour, then invert it onto the parchment where the strings cross. Dust again so the strings don’t stick. Tie each string loosely over the top to form eight pumpkin-like sections — snug but not tight. Tie them all together, then trim excess string. Score each section as shown in the pictures above.
- Bake: Using oven mitts, remove the hot Dutch oven from the oven and remove the lid. Lift the dough by the parchment and lower it into the pot. Bake covered for 40 minutes, then uncovered 35–40 minutes, until the crust is deeply golden-brown. Remove the parchment paper and cool on a rack at least 5 hours before removing the strings and slicing. Cut and remove strings, and insert a 1-inch cinnamon stick in the center for decoration.
- Slice, Toast & Enjoy: Slice the loaf in half, then place each half cut-side down and slice thinly. Toast before serving for the best texture and flavor, and enjoy with salted butter.
- Storage: For short-term storage, wrap the cooled loaf in a clean cotton towel or place it in a paper bag. It keeps well at room temperature for up to 3 days. If it starts to dry out, toasting will bring back the moisture. For long-term storage, slice and freeze with parchment paper between slices. You can toast directly from frozen or let it thaw at room temperature and toast.
Notes
- The post above the recipe card includes a suggested baking schedule, a detailed pumpkin-shaping tutorial, and plenty of visual guidance to help you through each step. I recommend checking it before you start.

No Comments