

These homemade gluten-free graham crackers are inspired by classic graham crackers and European digestive biscuits, but made with a carefully balanced blend of naturally gluten-free flours instead of traditional graham flour. Lightly sweetened with just a touch of honey (or your preferred sweetener), they’re hearty, subtly spiced with cinnamon, and perfect for snacking, pairing with cheese or nut butter, packing for picnics, or making homemade s’mores.
‘Graham’ Crackers Without the Wheat
Finding a good gluten-free graham cracker has always been surprisingly difficult. Even when I lived in the United States, where healthy specialty products were much easier to find, I never found one that matched what I was looking for. After moving to Denmark, the options became even more limited, so I finally decided to create my own.
These crackers aren’t made with traditional graham flour — which is a coarse whole wheat flour — but with a blend of naturally gluten-free whole grain and nut flours chosen to recreate the same rustic flavor, lightly sweet taste, and satisfying texture. The result is something that sits somewhere between an American graham cracker and a European digestive biscuit.
Over the years, this has become one of my most reliable baking recipes. I’ve made countless batches, and many readers have too, often sharing photos of their beautiful results with me. They’re one of my favorite snacks to pack for road trips, hikes, picnics, or simply to enjoy with a cup of coffee or tea at home.
A Gluten-Free Flour Blend That Works
Replacing graham flour was the biggest challenge when developing this recipe. Traditional graham crackers get much of their character from coarse whole wheat flour, so creating a gluten-free version meant building that flavor and texture from several different ingredients, each with its own purpose.
Sorghum flour forms the hearty whole-grain base, while tigernut and chestnut flours contribute a gentle natural sweetness that keeps the added sweetener to a minimum. Almond flour adds tenderness, coconut flour helps absorb moisture, and psyllium husk provides the structure that gluten would normally create.
If you don’t have chestnut flour, simply replace it with more tigernut flour. The flavor will still be delicious.

Because coconut flour absorbs considerably more liquid than most gluten-free flours, keep in mind that it can’t be substituted cup for cup. If you replace it, use roughly four times the amount of another gluten-free flour.
Lightly Sweetened, Naturally Flavorful
One of the things I love most about these crackers is that they don’t rely on a lot of sweetness. The naturally sweet chestnut and tigernut flours already contribute wonderful flavor, so I only use a small amount of honey in the dough.
If you prefer, you can easily substitute maple syrup, yacon syrup, monk fruit syrup, or another sweetener that works well in baking.
Over the years my palate has changed considerably, and I genuinely enjoy recipes that let the ingredients shine instead of relying on lots of added sugar. These crackers are a perfect example—they’re just sweet enough to feel like a treat while remaining wonderfully versatile for both sweet and savory toppings.


The Warm Flavor of Cinnamon
One ingredient that gives these crackers their familiar graham cracker character is cinnamon. I keep the amount fairly modest, but if you’re a cinnamon lover, feel free to increase it slightly.
My husband says these biscuits taste like Christmas, and I have to admit there’s something wonderfully cozy about them fresh from the oven.
A Few Tips for Success
This is a simple recipe, but a few small details make all the difference.
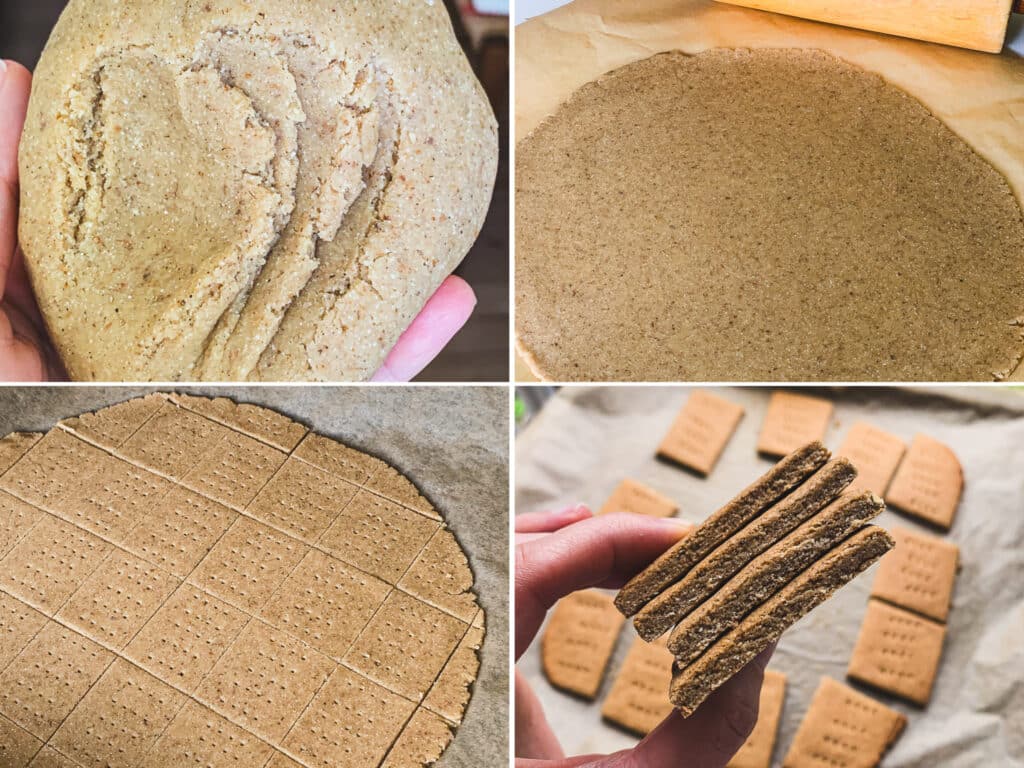
After mixing the dough, roll it between two sheets of parchment paper until it’s just under ¼ inch (6 mm) thick. Keeping the thickness as even as possible helps the crackers bake uniformly. I like to cut them into classic rectangles and prick them with a fork before baking, but cookie cutters are just as fun if you’re making them for holidays or special occasions.
Bake them low and slow. A lower oven temperature dries the crackers gently instead of browning them too quickly. About halfway through baking, separate the crackers slightly so the hot air can circulate around them more evenly. If the edge pieces are done first, simply remove them and continue baking the rest.
When the baking time is up, I switch off the oven, crack the oven door open, and leave the crackers inside for another five to ten minutes. This little extra drying time gives them their characteristic texture without overbaking.
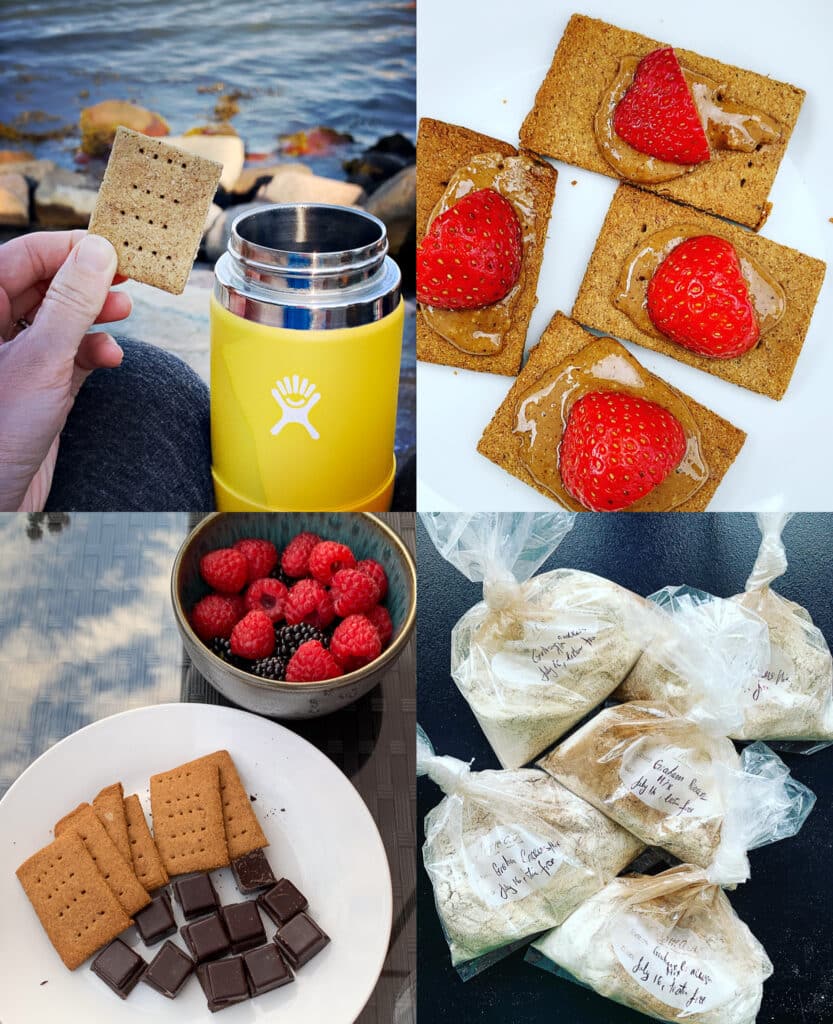
One of my favorite memories connected to this recipe is preparing a jar with all the dry ingredients for my sister-in-law in Copenhagen. She wasn’t familiar with many of the gluten-free flours, so having everything pre-measured made the process easy, and she was thrilled with how well the crackers turned out.
Ways to Enjoy Them
These crackers have become one of my favorite staples because they’re incredibly versatile.
Enjoy them on their own, spread with almond butter or another nut butter, topped with cheese, served alongside fresh berries, dipped into coffee or tea, or used for healthier homemade s’mores. They also make a wonderful addition to a picnic basket or travel snack box since they keep well and are easy to pack.
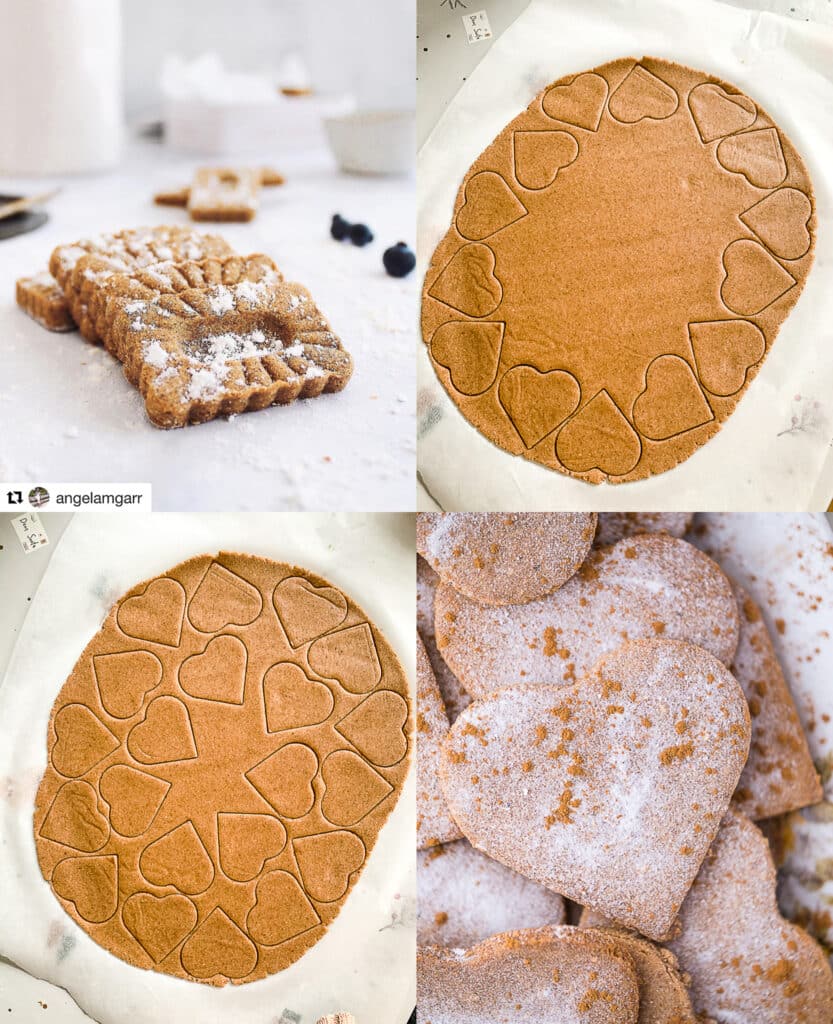
If you’re feeling creative, use cookie cutters to make festive shapes. I especially love making heart-shaped crackers for Valentine’s Day—they’re every bit as delicious and make a thoughtful homemade treat.
Storage & Variations
Store the crackers in an airtight glass container or reusable silicone bag at room temperature for several days. They also freeze beautifully, making them a great make-ahead snack whenever you need something wholesome ready to grab.
This simple yet versatile recipe can be shaped in countless ways to create beautiful crackers for any occasion. I like using a heart-shaped cookie cutter for Valentine’s Day, while my friend Angela (@angelamgarr on Instagram) created these stunning graham crackers with a decorative cookie stamp. She has a wonderful eye for presentation, and every time she makes one of my recipes, she turns it into something truly beautiful.
For another great crackers recipe, you should try my Flax Seed Crackers with Zaatar Spices (Vegan, Keto) or try these Cinnamon-Flavored Sorghum Crackers.
*This post contains affiliated links, which means I get a small commission if you choose to purchase something via one of my links, at no extra cost to you.
Print
Homemade Gluten-Free Graham Crackers
- Prep Time: 20 minutes
- Cook Time: 35 minutes
- Total Time: 55 minutes
- Yield: 22 crackers
- Category: Snack
- Method: Baking
- Cuisine: American
- Diet: Gluten-Free
Description
These homemade gluten-free graham crackers are made with a blend of naturally gluten-free whole-grain and nut flours, creating a rustic cracker inspired by classic graham crackers and European digestive biscuits. Lightly sweetened and flavored with cinnamon, they’re perfect for snacking, tea time, cheese boards, or homemade s’mores.
Ingredients
- 1 pastured egg
- 2 teaspoons honey, maple syrup, yacon or monk fruit syrup
- 1 teaspoon vanilla extract
- 4 tablespoons extra virgin olive oil
- 4 tablespoons coconut milk, or milk of choice
- 3 tablespoons tigernut flour
- 1 tablespoon psyllium husk flakes
- 1 tablespoon chestnut flour, or extra tigernut flour
- 1 tablespoon almond flour
- 1 tablespoon coconut flour
- 6 tablespoons sorghum flour
- 1/2 teaspoon baking powder
- 1/8 teaspoon salt
- 1 teaspoon cinnamon, or more for a stronger flavor
Instructions
- Preheat the oven to 300°F (150°C). Prepare two sheets of parchment paper and a rolling pin.
- In a medium mixing bowl, combine the tigernut flour, psyllium husk flakes, chestnut flour, almond flour, coconut flour, sorghum flour, baking powder, salt, and cinnamon. Mix well.
- In a smaller bowl, beat the egg with the honey, vanilla extract, olive oil, and coconut milk.
- Add the wet ingredients to the dry ingredients and mix first with a spatula, then with your hands, until a dough forms. If the dough is too wet, add a little more sorghum flour. If it is too dry, add a little more milk.
- Place the dough on one sheet of parchment paper and flatten it with your hands, shaping it into a rectangle as much as possible. Place the second sheet of parchment paper on top and roll the dough to a little less than 1/4 inch (6 mm) thick.
- Remove the top sheet of parchment paper. Using the bottom sheet, transfer the rolled dough to a baking sheet. Cut into small rectangles, or any shape you like, and poke holes with a fork.
- Bake for about 30 minutes, keeping an eye on the crackers. If the edges brown faster, remove those pieces from the pan. After about 15 minutes, separate the crackers slightly so they bake more evenly.
- At the end of the baking time, turn off the oven, open the oven door, and leave the crackers inside for another 5 to 10 minutes to dry further.
- Remove from the oven and let cool completely. Serve as a snack, with nut butter, cheese, or fruit, use them for s’mores, or enjoy them as tea biscuits.
Notes
Chestnut flour can be replaced with additional tigernut flour.
Honey can be replaced with maple syrup, yacon syrup, monk fruit syrup, or your preferred sweetener.
If the dough feels too dry, add a splash more milk. If it feels too sticky, add a little more sorghum flour.
Coconut flour is highly absorbent. If replacing it, remember that approximately 1 part coconut flour equals 4 parts of many other gluten-free flours.
Baking time will vary slightly depending on the thickness of your dough.
These crackers are meant to have the crumbly texture of a digestive biscuit rather than the crisp snap of a thin cracker.

12 Comments
Monica Tompkins Riley
March 30, 2026 at 10:36 amHi Claudia!
My crackers aren ‘t crunchy!
Kay
August 28, 2025 at 12:46 amDigestive biscuit (cookies) and Graham cracker cookies have a different texture and flavor from each other even though both are crunchy and mildly sweet.
I’m sure it’s tasty whichever it is though.
Trish
January 12, 2021 at 5:27 pmHi Claudia! I’m allergic to almonds…is there something I can use in place of the almond flour?
Claudia
January 13, 2021 at 9:14 amHi Trish, try another nut flour: hazelnut, pecan, walnut…
Tracey H Johnson
July 5, 2020 at 1:04 pmCan you use All Purpose (Namaste) Flour instead of the mixture of what you have listed….different flours are hard to find or very expensive….
Claudia
July 7, 2020 at 5:52 amHi Tracey, I am not familiar with what Namaste flour is but after a quick research I noticed is not lectin free (unless they have a lectin free version?). You can try but I can’t guarantee the same result.
Deepa Maria
June 19, 2020 at 2:39 pmThis looks SO good Claudia! What would you suggest to be the best vegan option for the egg?
Thank you,
Claudia
June 22, 2020 at 2:58 amHi Deepa, I wish I knew. You can try flax but I can’t promise it will work.
Ann
August 18, 2025 at 4:17 pmAfter some exploration, I’ve come up with an egg-free version that works well for me. These are my favorite cookies… thanks Claudia! I travel a lot and take these along as a favorite snack or dessert. So when I found out through an IGg test that I shouldn’t be eating egg whites, I was very motivated to find a solution! I guess I could use egg yolks, but I find it’s a hassle to separate the eggs and so I make these egg-free.
Here’s my recipe: I use 2 tablespoons of arrowroot powder to replace the binding quality eggs give, and one tea spoon of tapioca flour to give a bit more structural strength to the cookies. I usually have to add a tablespoon or more of water when it comes to kneading the dough.
Also, I find that I need to flip them over after baking and leave them in the oven for a few hours at 170F, and then without opening the oven, I leave them in the turned off oven over night to achieve total dryness. They come out crisp, crunchy and completely dry. I vacuum seal them for month-long trips and have never had any problems.
I hope that helps other egg-free eaters!
Claudia
August 20, 2025 at 5:17 amThat’s perfect! Thanks for sharing your egg-free version, Ann! I’m happy you enjoy this recipe. Vacuum sealing is a great idea! -Claudia
Ann
August 21, 2025 at 12:05 pmJust a quick note Claudia on the 4 star rating: I wanted to leave a 5 star rating because these cookies are fabulous, but wasn’t able to get the 5th star to react. There was some sort of bug… can you change my rating from your end? Today it worked though. In my view, your whole Website deserves 5 stars!!! Your recipes are at the heart of how I eat now. Thank-you so much! 🙂
Claudia
August 21, 2025 at 1:29 pmHi Ann! Thank you so much for your kind words! It seems like this time you gave the 5-star review, which I think cancels the previous one. Either way, I’m very grateful for your beautiful messages. -Claudia