
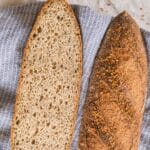
These gluten-free sourdough baguettes are a rustic, wholesome take on a classic, made with a blend of sorghum, millet, and teff flours, plus nutrient-dense hemp flour for added protein and fiber. Using a simple demi-baguette technique, the dough is shaped into two baguettes with ease, making this recipe especially approachable for gluten-free baking. The result is a crusty, golden exterior and a light, airy crumb — slightly darker in color, richer in flavor, and perfect for everyday slicing, toasting, or serving alongside a nourishing meal.
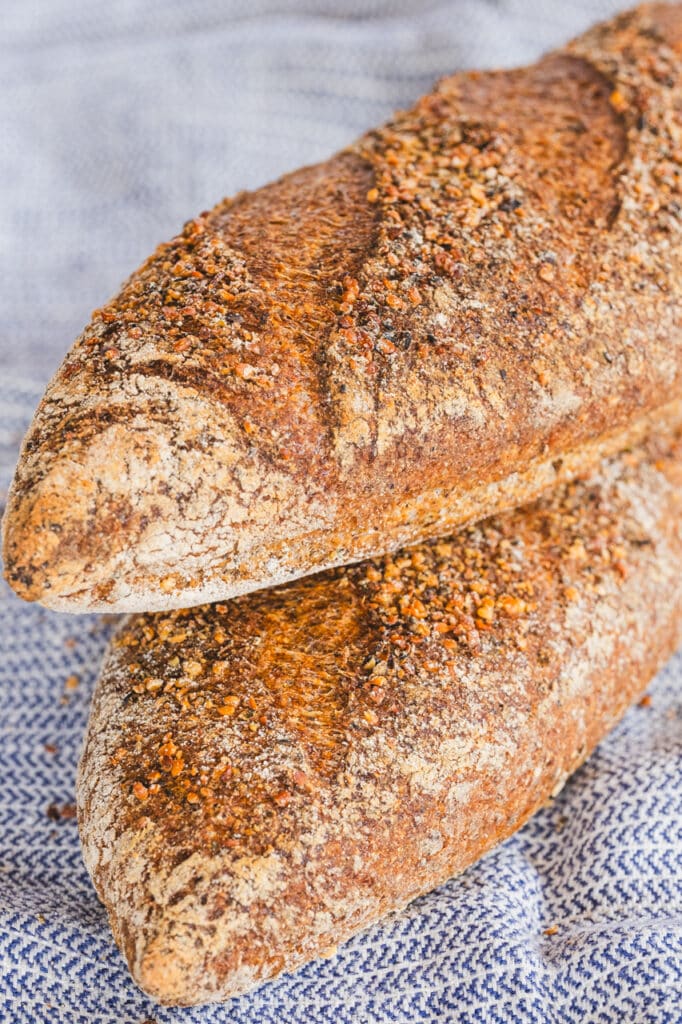
There is something deeply satisfying about a rustic baguette — a darker crust, a more complex flavor, and a crumb that feels both airy and nourishing at the same time. This version reflects exactly that. Made with a blend of whole, gluten-free and lectin-free flours — sorghum, millet, and teff — and enriched with hemp flour for extra protein and fiber, these baguettes are wholesome without feeling heavy.
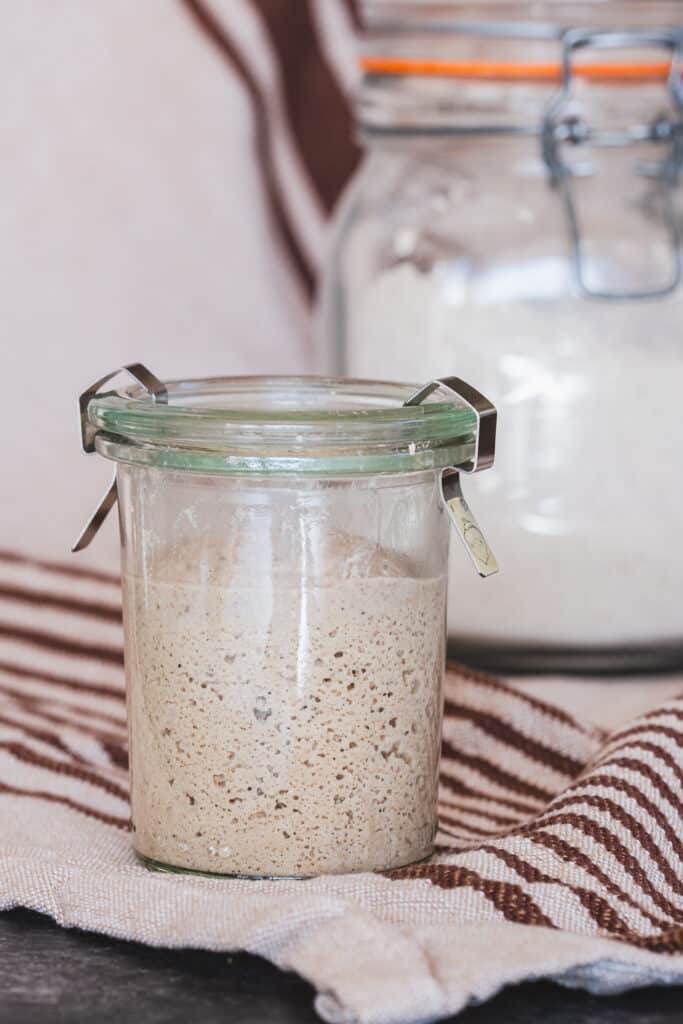
If you’ve been following my sourdough journey, you know that everything starts with a strong and resilient gluten-free starter, built with my favorite gluten-free and lectin-free flours — sorghum, millet, and teff — and maintained in a simple, sustainable way.
This is the foundation of all my breads, and the same approach I share in detail in my Gluten-Free Sourdough Guide for Beginners on the website, as well as in my 130-page ebook, Raising a Gluten-Free Sourdough Bread, where I walk you through the full process step by step — from building your starter to baking confident, beautiful loaves at home.
The Demi-Baguette Technique
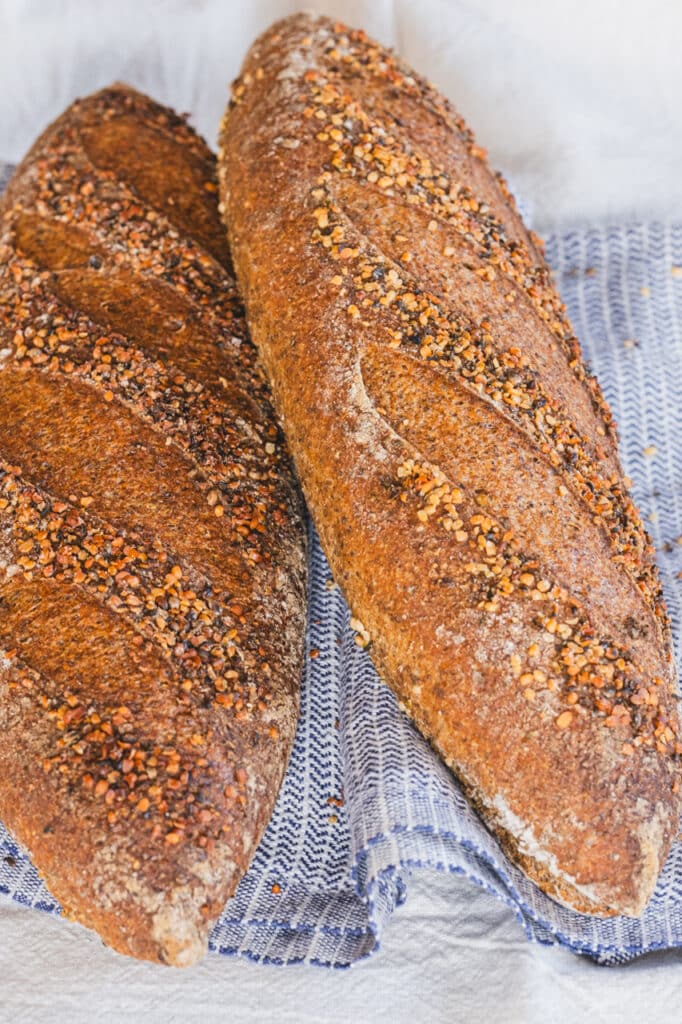
What makes this recipe especially approachable is what’s called the demi-baguette technique — a simple, practical way to shape baguettes without the usual complexity, that works really well for gluten-free sourdough. Instead of dividing and shaping multiple individual pieces, you work with one larger dough, then section it lengthwise, seal it, and gently shape it into two baguettes just before baking.
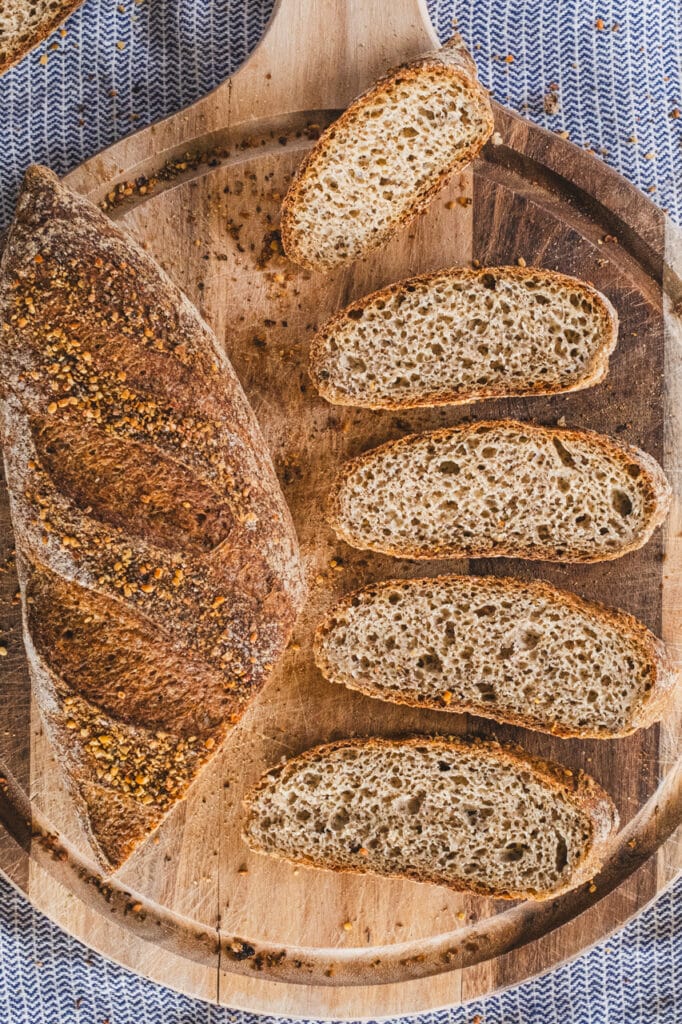
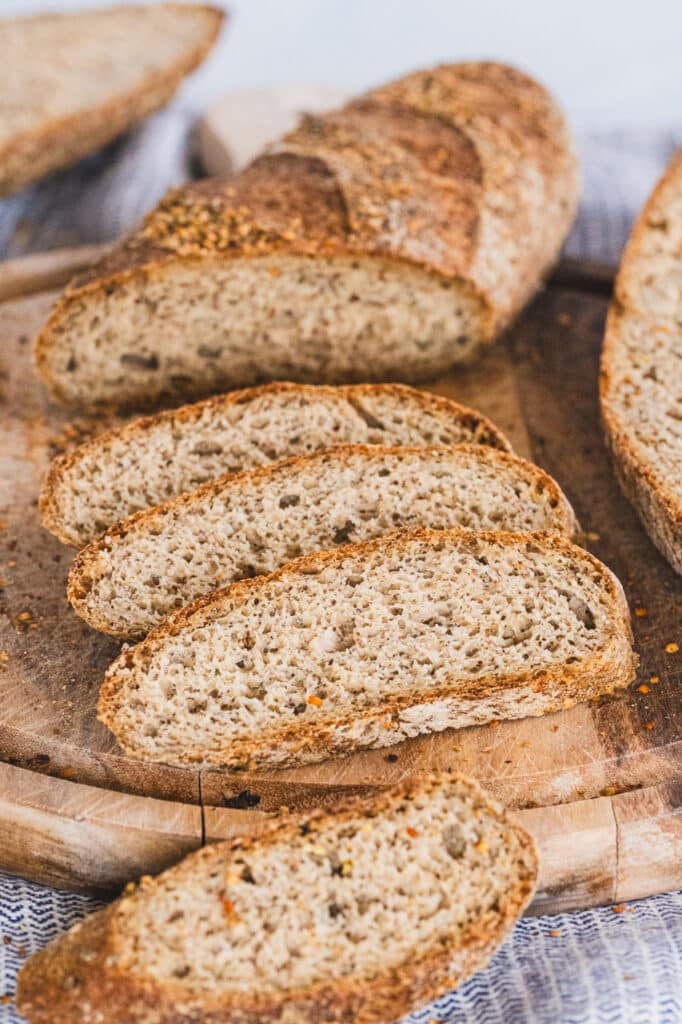
The result is a beautifully balanced loaf: a crusty, well-developed exterior with a light, open crumb — the kind that holds together yet feels delicate when you bite into it. Slightly darker in color and richer in flavor than a classic white baguette, these are the kind of breads you make when you want something both rustic and deeply nourishing.
Perfect for slicing, toasting, or simply enjoying warm with good olive oil — a reminder that gluten-free sourdough bread can be both simple and exceptional.
Ingredients
Preferment
10 g active gluten-free sourdough starter
33 g water
35 g flour mix (equal parts sorghum, millet, and teff)
Wet mix
17 g psyllium husk flakes
420 g water (400 + 20)
10 g honey
8 g extra virgin olive oil
75 g sorghum, millet & teff preferment
Dry mix
200 g flour (75 g sorghum flour + 75 g millet flour + 50 g teff flour)
30 g whole hemp flour
70 g tapioca starch
6 g salt
Extra: hemp seeds for topping

How to Make Gluten-Free Sourdough Baguettes
Make the preferment — The evening before baking (or 6–8 hours before mixing the dough, in case you prefer to make it in the morning), mix all preferment ingredients in a small jar. Cover and leave at room temperature overnight (or the 6-8 hours needed to get to peak activity).
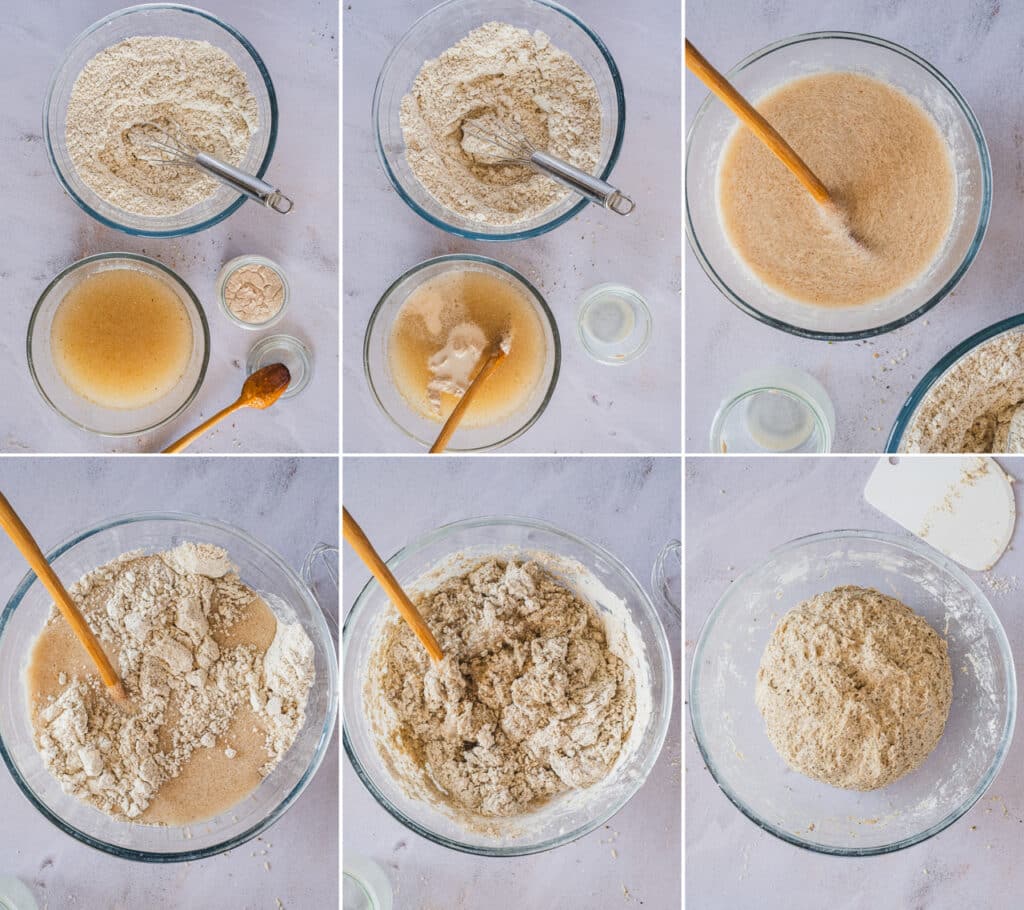
Make the psyllium gel (the wet mix) — When the preferment is ready, in a large glass or plastic bowl, combine 400 g water, psyllium husk flakes, honey, and olive oil. Mix well and set aside for about 5 minutes, until a thick gel forms.
Mix the dough — In a separate bowl, thoroughly mix all dry ingredients. Add the preferment to the psyllium gel (to make sure you use all the preferment, clean the jar using the remaining 20 g water) and stir to combine, then transfer this mixture to the bowl with the dry ingredients. Mix first with a spatula or wooden spoon, then use your hands to fully incorporate the dough until homogeneous, soft, and sticky, with no visible lumps.
Kneading — Using a silicone or plastic dough scraper, scrape the dough from the sides of the bowl and fold it toward the center. Rotate the bowl and repeat this motion about 20 times. Cover the bowl and keep it at room temperature to begin fermentation.
Bulk fermentation — Let the dough ferment for 1–2 hours, depending on ambient temperature. For a temperature around 22 °C / 72 °F, ferment for about 1 hour 10 minutes. Increase if colder, reduce if warmer. The dough should appear slightly puffed and jiggly.
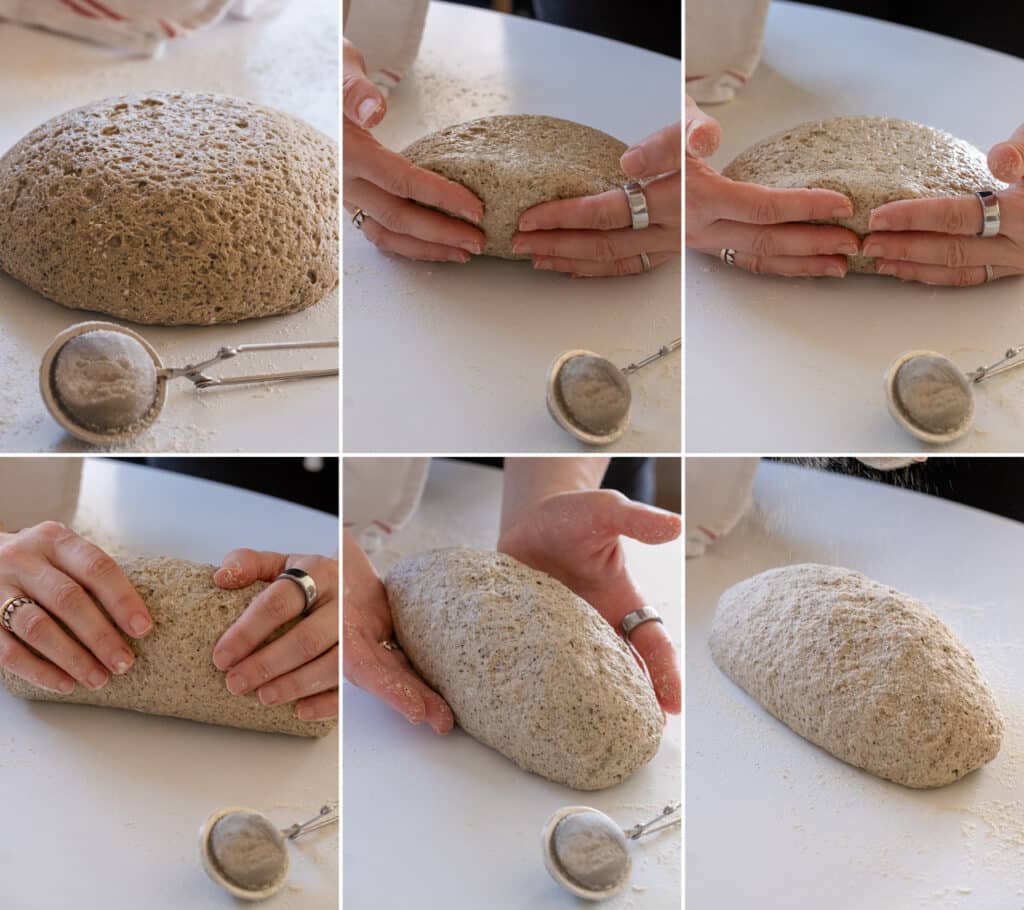
First shaping — Lightly dust a work surface with flour. Gently invert the dough onto the surface. Lift one-third of the dough from the side furthest from you and fold it over itself toward you, then fold once more so the underside becomes the top. Gently but firmly shape the dough into a log and seal the bottom by moving it gently from side to side to create a slight tension with the surface.
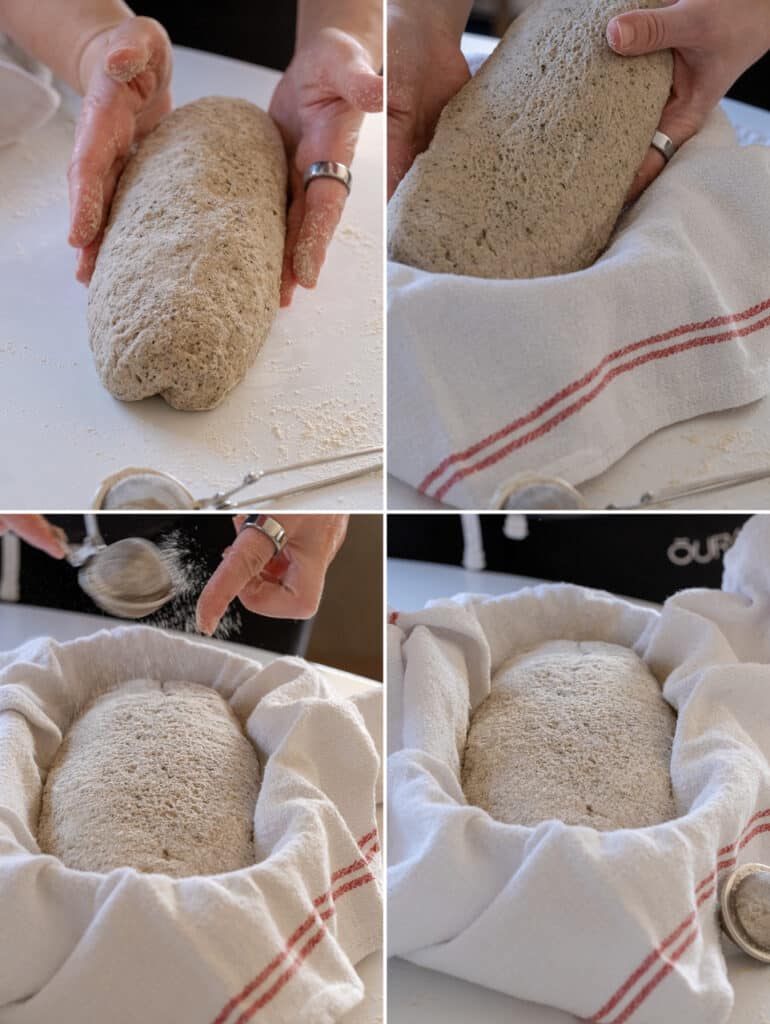
Proofing — Dust a 10-inch oval banneton lined with a towel and dusted with flour. Transfer the dough with the sealed side facing up and the smooth side down. Lightly dust the surface with flour and cover with the towel and another towel or plastic cap. Proof at room temperature for approximately the same length of time as the bulk fermentation.
Oven preparation — Forty-five minutes before baking, preheat the oven to 250 °C / 480 °F, with a heavy-duty stainless steel baking tray inside, on the middle rack. Below, place a smaller tray with a few cups of cold water (the water should be steaming once the bread gets into the oven).
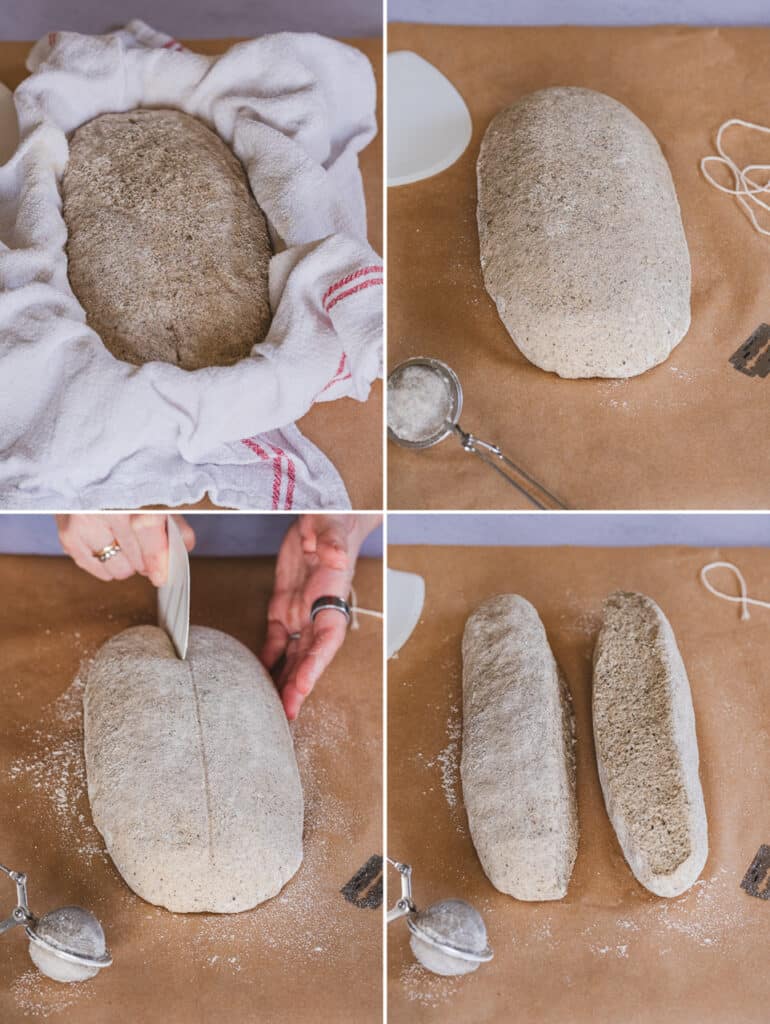
Shaping the baguettes (using the demi-baguette technique) — Gently invert the proofed dough onto a sheet of parchment paper. Lightly dust the surface with flour and gently spread the flour with your palm. Using a piece of kitchen twine as a guide, mark the center line lengthwise, then divide the dough into two equal pieces with a plastic scraper. Turn each piece so the cut side faces up.
Starting along the cut edge, gently pinch the dough together with your fingers to seal it. Lightly dust with flour, then place each piece seam-side down on the parchment. Repeat with the second piece. To finish shaping, gently elongate each baguette and lightly pinch the ends to create pointed tips.
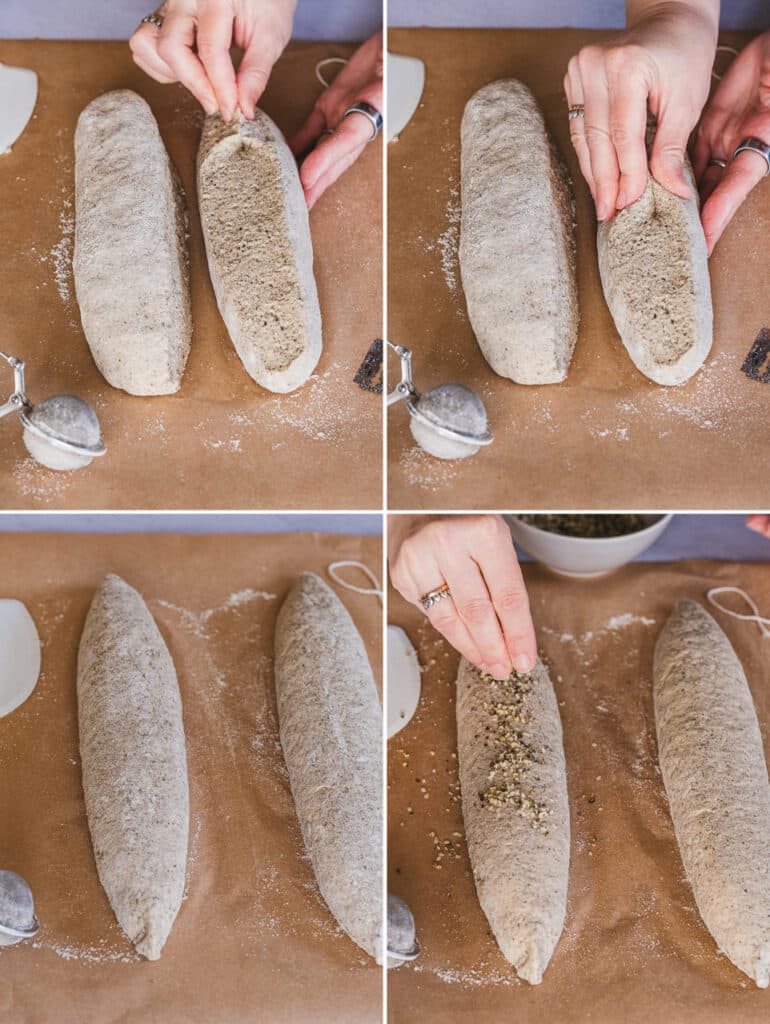
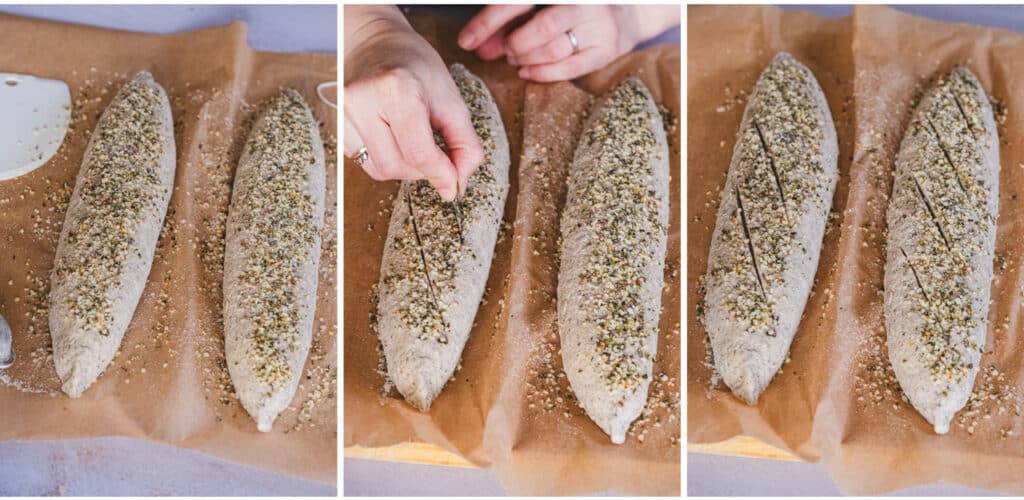
Topping — Spray the surface lightly with water using a spray bottle, then sprinkle the hemp seeds on top and distribute them on top of the dough. Lightly dust with flour.
Scoring — Score using a razor or scoring blade, firmly cut 4 oblique lines on top of each baguette (about 1/2 cm deep).
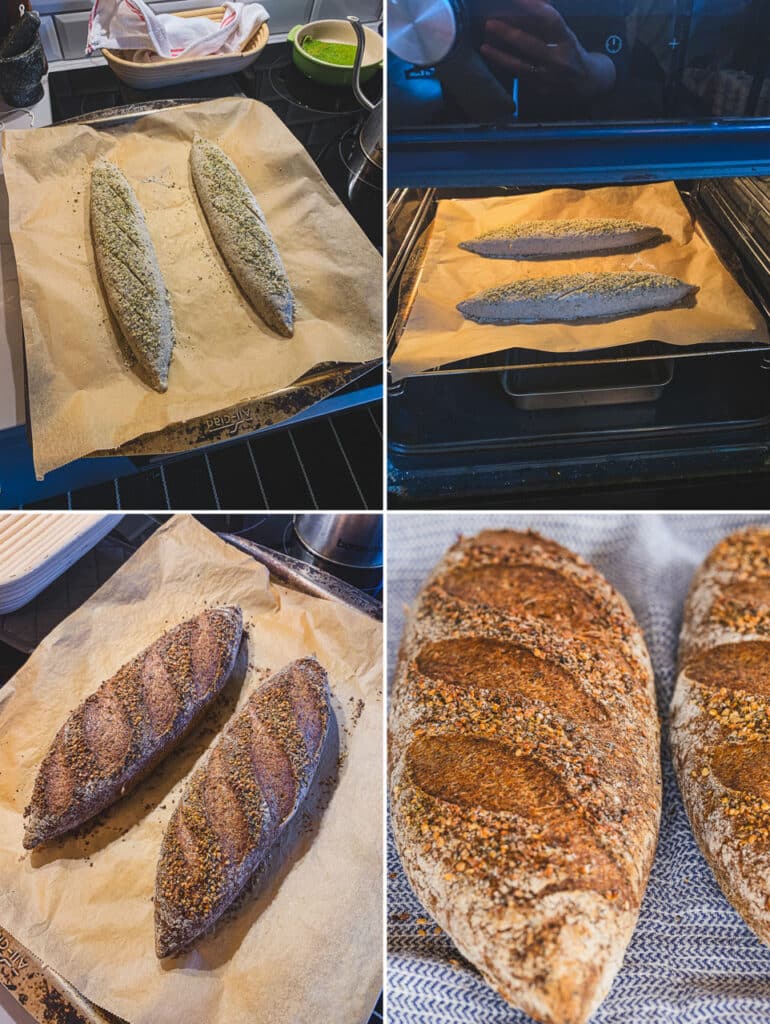
Baking with steam — Carefully remove the hot baking tray from the oven (handle with gloves). Slide the dough onto the hot tray, using the parchment paper. Return to the oven, and bake for 10 minutes, then reduce the temperature to 235 °C / 455 °F and bake for 10 more minutes (20 minutes in total with steam).
Finish baking (no steam) — Remove the water tray from the oven, and continue baking for about 30 minutes, until the crust hardens and the bottom of the bread sounds hollow.
Cooling — Remove the bread from the oven and cool on a wire rack for at least 3 hours before slicing.
Storage and Serving
Store at room temperature for 2–3 days in a paper bag or wrapped in a cotton towel. For longer storage, slice the loaf into small, regular slices or lengthwise halves, separate with parchment paper, and freeze.
Thaw at room temperature and toast or reheat directly in the toaster or oven. For lengthwise halves, I start the oven at 200 °C / 400 °F, place the frozen halves, cut face up, directly on the oven rack (use a tray below to catch the crumbs/hemp seeds), and heat for about 10-12 minutes, or until the bread is warm. It will be soft, light, and crusty.
If kept at room temperature, the bread will slightly stiffen on the second and third day, but it will regain moisture and softness once gently toasted in a toaster or an oven.

You May Also Like
If you like a rustic gluten-free bread, you can also try my Rustic Sourdough Rolls With Teff, Millet, and Sorghum. It uses a similar, easy technique to make perfect breakfast rolls, with a soft, airy crumb and a rustic crust.
This sturdy gluten-free sourdough sandwich bread is easy to make, perfectly sliceable, and sturdy enough to hold all your favorite fillings without crumbling or getting soggy. Light yet satisfying, it’s baked in a loaf pan with a handful of wholesome ingredients, minimal starches, and no dairy or eggs — a healthy, homemade alternative to store-bought gluten-free bread.
*This post contains affiliated links, which means I get a small commission if you choose to purchase something via one of my links, at no extra cost to you.
Print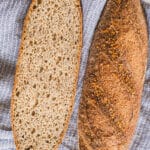
Gluten-Free Rustic Sourdough Baguettes
- Prep Time: 30 minutes
- Proofing: 2 hours 20 minutes
- Cook Time: 50 minutes
- Total Time: 3 hours 40 minutes
- Yield: 8 servings
- Category: Sourdough
- Method: Baking
- Diet: Gluten-Free
Description
These gluten-free sourdough baguettes are a rustic, wholesome take on a classic, made with a blend of sorghum, millet, and teff flours, plus nutrient-dense hemp flour for added protein and fiber. Using a simple demi-baguette technique, the dough is shaped into two baguettes with ease, making this recipe especially approachable for gluten-free baking. The result is a crusty, golden exterior and a light, airy crumb — slightly darker in color, richer in flavor, and perfect for everyday slicing, toasting, or serving alongside a nourishing meal.
Ingredients
PREFERMENT
- 10 g active gluten-free sourdough starter
- 33 g water
- 35 g flour mix (equal parts sorghum, millet, and teff)
WET MIX (PSYLLIUM GEL)
- 17 g psyllium husk flakes
- 420 g water (400 + 20)
- 10 g honey
- 8 g extra virgin olive oil
- 75 g sorghum, millet & teff preferment
DRY MIX
- 200 g flour (75 g sorghum flour + 75 g millet flour + 50 g teff flour)
- 30 g whole hemp flour
- 70 g tapioca starch
- 6 g salt
EXTRA
- hemp seeds for topping
Instructions
- Preferment — The evening before baking (or 6–8 hours before mixing the dough, in case you prefer to make it in the morning), mix all preferment ingredients in a small jar. Cover and leave at room temperature overnight (or the 6-8 hours needed to get to peak activity).
- Psyllium gel (the wet mix) — When the preferment is ready, in a large glass or plastic bowl, combine 400 g water, psyllium husk flakes, honey, and olive oil. Mix well and set aside for about 5 minutes, until a thick gel forms.
- Mixing the dough — In a separate bowl, thoroughly mix all dry ingredients. Add the preferment to the psyllium gel (to make sure you use all the preferment, clean the jar using the remaining 20 g water) and stir to combine, then transfer this mixture to the bowl with the dry ingredients. Mix first with a spatula or wooden spoon, then use your hands to fully incorporate the dough until homogeneous, soft, and sticky, with no visible lumps.
- Kneading — Using a silicone or plastic dough scraper, scrape the dough from the sides of the bowl and fold it toward the center. Rotate the bowl and repeat this motion about 20 times. Cover the bowl and keep it at room temperature to begin fermentation.
- Bulk fermentation — Let the dough ferment for 1–2 hours, depending on ambient temperature. For a temperature around 22 °C / 72 °F, ferment for about 1 hour 10 minutes. Increase if colder, reduce if warmer. The dough should appear slightly puffed and jiggly.
- First shaping — Lightly dust a work surface with flour. Gently invert the dough onto the surface. Lift one-third of the dough from the side furthest from you and fold it over itself toward you, then fold once more so the underside becomes the top. Gently but firmly shape the dough into a log and seal the bottom by moving it gently from side to side to create a slight tension with the surface.
- Proofing — Dust a 10-inch oval banneton lined with a towel and dusted with flour. Transfer the dough with the sealed side facing up and the smooth side down. Lightly dust the surface with flour and cover with the towel and another towel or plastic cap. Proof at room temperature for approximately the same length of time as the bulk fermentation.
- Oven preparation — Forty-five minutes before baking, preheat the oven to 250 °C / 480 °F, with a heavy duty stainless steel baking tray inside, on the middle rack. Below, place a smaller tray with a few cups of cold water (the water should be steaming once the bread gets into the oven).
- Shaping the baguettes — Gently invert the proofed dough onto a sheet of parchment paper. Lightly dust the surface with flour and gently spread the flour with your palm. Using a piece of kitchen twine as a guide, mark the center line lengthwise, then divide the dough into two equal pieces with a plastic scraper. Turn each piece so the cut side faces up. Starting along the cut edge, gently pinch the dough together with your fingers to seal it. Lightly dust with flour, then place each piece seam-side down on the parchment. Repeat with the second piece. To finish shaping, gently elongate each baguette and lightly pinch the ends to create pointed tips.
- Topping — Spray the surface lightly with water using a spray bottle, then sprinkle the hemp seeds on top and distribute them on top of the dough. Lightly dust with flour.
- Scoring — Score using a razor or scoring blade, firmly cut 4 oblique lines on top of each baguette (about 1/2 cm deep).
- Baking with steam — Carefully remove the hot baking tray from the oven (handle with gloves). Slide the dough onto the hot tray, using the parchment paper. Return to the oven, and bake for 10 minutes, then reduce the temperature to 235 °C / 455 °F and bake for 10 more minutes (20 minutes in total with steam).
- Finish baking (no steam) — Remove the water tray from the oven, and continue baking for about 30 minutes, until the crust hardens and the bottom of the bread sounds hollow.
- Cooling — Remove the bread from the oven and cool on a wire rack for at least 3 hours before slicing.
- Storage — Store at room temperature for 2–3 days in a paper bag or wrapped in a cotton towel. For longer storage, slice the loaf into small, regular slices or lengthwise halves, separate with parchment paper, and freeze. Thaw at room temperature and toast or reheat directly in the toaster or oven.
Notes
Best serving experience: the bread will slightly stiffen on the second and third day, but it will regain moisture and softness once gently toasted in a toaster or an oven.
5 Comments
Pooja Raval
May 1, 2026 at 10:10 amWhat can be teff and hemp flour substitute? I live in Uganda and many flours are not available here
Claudia
May 2, 2026 at 3:35 amHi Pooja! Just use sorghum and millet. -Claudia
Becca
April 14, 2026 at 7:11 pmHi there! These look amazing! Forgive me if I missed it, but is it acceptable to swap out the honey with pure maple syrup? I can’t do honey at all 🙁 it’s a weird allergy for me. But your website makes me incredibly excited to start baking my own sourdough! I hope to make a sorghum starter and attempt these!
Also, trying to do the stars on my phone is a little weird, I apologize for the weird star rating :/
Claudia
April 15, 2026 at 6:09 amHi Becca! Yes, you can use maple syrup with confidence. Any honey in my sourdough recipes can be replaced by maple syrup (even sugar if that’s not a problem for you – it gets eaten by the bacteria anyway!). I hope this helps. xx _ Claudia
Becca
April 16, 2026 at 3:25 pmThank you, Claudia!