
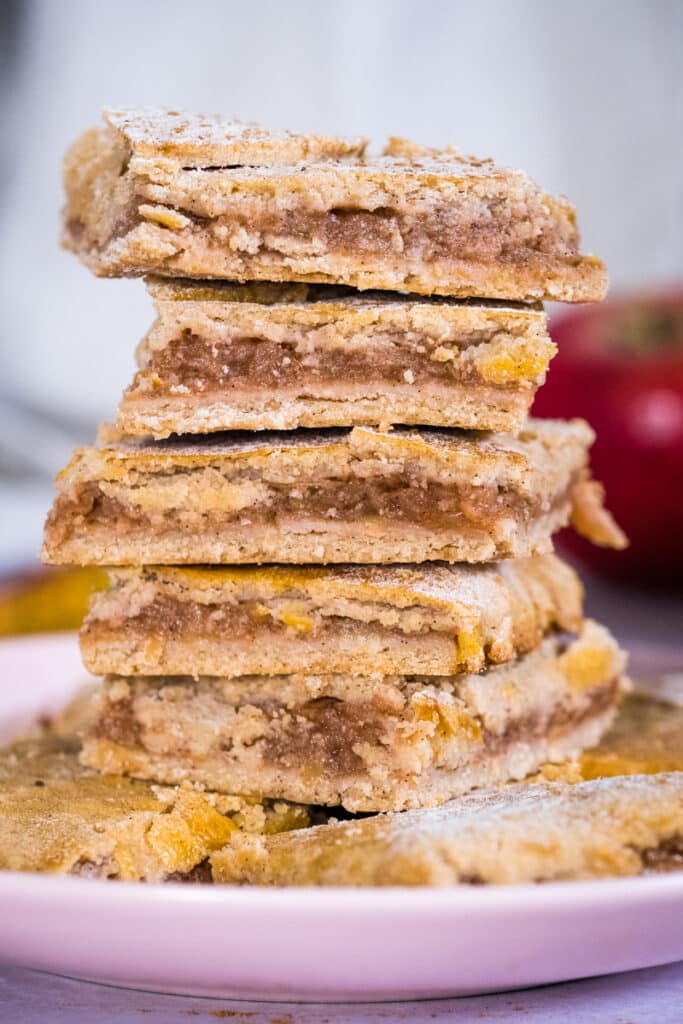
You would not believe these 3-layer apple pie bars are sugar-free, gluten-free, and lectin-free. One of my favorite childhood desserts, I wanted to convert this recipe to a healthier version for a long time, and finally, here it is. These apple pie bars are made with two layers of gluten-free shortcake crust and a delicious spiced apple pie filling. Perfect with a warm tea or coffee while you are hugged by your favorite blanket.
My Proustian madeleines
There are two desserts that I can say are my Proustian madeleines: crepes and apple pie bars. Their smell, taste, and texture, and even seeing them with my mind’s eye, brings back memories from a long time ago. Food is so much more than just fuel.
When I make these two sweet treats, I want to bring back feelings of comfort and coziness. And finally, I have an easy recipe for my childhood apple pie bars that is lectin-free, gluten-free, and sugar-free.
And my sugar-free, lectin-free crepe recipe is here: Chestnut Flour Crepes with Rose Water.
I was born and spent my youth in Romania, where we call this cake, literally, ‘apple cake‘. In Denmark (where my husband is from), this style of layered pastry is very popular and is called, translated in English, ‘slice‘. In English-speaking countries, this can be called: apple shortcake, apple bar, apple pie bar, apple slice, or apple squares.
Whatever you want to call it, this is an easy-to-make sweet treat that will make the transition to colder and shorter fall days sweeter and cozier.
Use this recipe to make a classic apple pie or other types of pastry bars
If you don’t feel like making it in a sheet pan, you can totally use this recipe to make a classic pie (in a pie plate). I would make an extra cup of sugar-free apple pie filling for this version.
Also, you can use the dough recipe with a different filling, like sugar-free raspberry jam or even a fresh fig filling (someone mentioned they look like fig newtons).
The ingredients for gluten-free and sugar-free apple pie bars
The apple pie filling can’t be easier. The sugar-free apple pie filling is made of cooked grated apple with lemon juice, a small quantity of sweetener, and spices.
The dough is simply made of a mix of lectin-free flour, butter, egg, and coconut cream. Since there is no sugar in the dough, I had to come up with a different, no-fuss way to mix the ingredients, and the result was a very easy-to-handle dough.

This is the complete list of ingredients for this apple pie bars recipe:
FOR THE APPLE PIE FILLING:
3 cups grated apples (about 7 medium apples)
2 tablespoons monk fruit sweetener (or a plant paradox-approved sweetener of your choice)
1 tablespoon fresh lemon juice (one small lemon)
Spices: 2 teaspoons Ceylon cinnamon, 1/4 teaspoon allspice, 1 teaspoon vanilla essence, pinch of nutmeg
NOTE on the spices: I used 1 teaspoon of my Holiday Warming Spice Blend and only 1 teaspoon of cinnamon.
FOR THE DOUGH:
1/2 cup sorghum flour + EXTRA 5, 6 tablespoons for kneading
1/4 cup tapioca flour
1/4 cup chestnut flour
1/2 teaspoon baking powder
100 grams of unsalted French or Italian butter, cubed, at room temperature
1 pastured egg
1/4 cup coconut cream
1 tablespoon sweetener of your choice (monk fruit is great)
1 teaspoon vanilla
zest of one organic lemon
pinch of salt
FOR THE EGG WASH:
1 egg yolk
1 tablespoon hemp milk (or any other milk you prefer)
SHOPPING THE INGREDIENTS: You find links to our suggested flour types, sweeteners and other ingredients on our SHOP PAGE.

How to make gluten-free and sugar-free apple pie bars
MAKE THE APPLE PIE FILLING:
- Grate the apples (skin on), add them to a skillet with the sweetener and the lemon juice and cook on low heat until the liquid evaporates (for about 10 minutes). Add the spices at the end, mix well and let them cool while you make the dough.


MAKE THE DOUGH:
- In a large bowl, combine all the flour types (minus the EXTRA sorghum), and baking powder.
- In a food processor or stand mixer, combine the room-temperature butter, egg, sweetener, coconut cream, vanilla, lemon zest, and salt.
- Add the butter and egg mixture to the dry ingredients bowl, fold with a spatula, then mix with your hands until you gate a super soft, sticky dough.


- Start adding the EXTRA sorghum flour, 1 tablespoon at a time, and gently knead until you get a soft but not sticky dough (don’t worry if it seems too soft to roll out, it will go in the fridge and will change texture). The final dough should have about 500 grams.
- Divide the dough into two equal parts, shape it into a ball, wrap each ball in plastic, and put it in the fridge for about 35-40 minutes. You want it to harden up so you can easily work with it.


ROLL OUT THE DOUGH:
- Now you can preheat the oven to 350F/180C. Prepare a baking pan, preferably a size that can go into the fridge. If it’s cold outside, you can just keep it somewhere cold while you prepare the second layer.
- Take one of the balls out of the fridge, and spread it with your palms into a rectangle on a sheet of parchment paper. I use a silicon mat as a base, so the paper doesn’t slide. Add a second sheet on top and gently roll out with a rolling pin until you get a rectangle of about 11″x9.5″. Gently slide the paper with the dough layer on the sheet pan, dust it with some sorghum flour, and place it in the fridge, or if it’s cold outside, you can just keep it somewhere cold while you prepare the second layer.
- Repeat with the second layer, using the same technique. Place the second layer in a cold spot.


ASSEMBLE THE CAKE:
- Now evenly spread the apple pie filling on the first layer, after you dust it with a bit of sorghum flour.
- Dust the second layer with a little bit of sorghum flour, then flip the second layer on top of the filling, then gently peel off the parchment paper. Dust with a little more sorghum flour. While this might seem difficult, just work carefully, the dough is pretty sturdy. Cracks will happen when baking anyway, so don’t worry if the top layer is not perfect.
- Brush the top layer with the egg wash.
- OPTIONAL: This is optional, but you can cut the uneven edges if you like (see the picture above), and with the extra dough, you can shape some leaves and decorate the top layer.
- Bake for about 40 minutes or until the top layer is golden brown.
- Place the baking tray in a cold spot to cool completely before you slice it.
- Dust with inulin powder and enjoy. Store in the fridge in a covered glass container. I love it when it’s cold.
NOTE: You can use this dough recipe as a base for any pie crust.


How to store and serve apple pie bars
These apple pie bars will last a few days in the fridge, and they are even better the next day when they are cold.
I created a nutritional label for this recipe, and you can find it below the recipe card. While the cake will make 16 squares, I think it’s perfectly fine for me to have 2 bars in one serving 😊. So I think there are 8 servings in this recipe, but you do you!
My husband loved them (it’s similar to one of his favorite Danish pastry desserts) and he even added some ice cream. I can only imagine that would be delicious.


Please let me know if you make these gluten-free and sugar-free apple pie bars.
If you love ‘apple anything’, you can also try our Apple Galette with Hazelnut Crumble and Easy Gluten-Free Apple Cake.
If you want to learn more about my sugar-free journey and alternative sweeteners I use in my cooking, you can check this article: How I Quit Sugar 5 Years Ago. And I Still Eat the Cake.

This recipe is part of our 10+ Sorghum Flour Recipe Round-Up.
This post contains affiliated links, which means I get a small commission if you choose to purchase something via one of my links, at no extra cost to you.
Print
Sugar-Free Apple Pie Bars (Gluten-Free)
- Prep Time: 1 hour
- Cook Time: 40 minutes
- Total Time: 1 hour 40 minutes
- Yield: 8
- Category: Dessert
- Method: Baking
- Diet: Gluten-Free
Description
You would not believe these 3-layer apple pie bars are sugar-free, gluten-free, and lectin-free. One of my favorite childhood desserts, I wanted to convert this recipe to a healthier version for a long time, and finally, here it is. These apple pie bars are made with two layers of gluten-free shortcake crust and a delicious spiced apple pie filling. Perfect with a warm tea or coffee while you are hugged by your favorite blanket.
Ingredients
FOR THE APPLE PIE FILLING
- 3 cups grated apples (about 7 medium apples)
- 2 tablespoons monk fruit sweetener (or a plant paradox-approved sweetener of your choice)
- 1 tablespoon fresh lemon juice (one small lemon)
- Spices: 2 teaspoons Ceylon cinnamon, 1/4 teaspoon allspice, 1 teaspoon vanilla essence, pinch of nutmeg
FOR THE DOUGH
- 1/2 cup sorghum flour + EXTRA 5, 6 tablespoons for kneading
- 1/4 cup tapioca flour
- 1/4 cup chestnut flour
- 1/2 teaspoon baking powder
- 100 grams of unsalted French or Italian butter, cubed, at room temperature
- 1 pastured egg
- 1/4 cup coconut cream
- 1 tablespoon of sweetener of your choice (monk fruit is great)
- 1 teaspoon vanilla
- zest of one organic lemon
- pinch of salt
FOR THE EGG WASH
- 1 egg yolk
- 1 tablespoon hemp milk (or any other milk you prefer)
Instructions
MAKE THE APPLE PIE FILLING
- Grate the apples (skin on), add them to a skillet with the sweetener and the lemon juice and cook on low heat until the liquid evaporates (for about 10 minutes). Add the spices at the end, mix well and let them cool while you make the dough.
MAKE THE DOUGH
- In a big mixing bowl, combine all the flour types (minus the EXTRA sorghum), and baking powder.
- In a food processor or stand mixer, combine the room-temperature butter, egg, sweetener, coconut cream, vanilla, lemon zest, and salt.
- Add the butter and egg mixture to the dry ingredients bowl, fold with a spatula, then mix with your hands until you gate a super soft, sticky dough.
- Start adding the EXTRA sorghum flour, 1 tablespoon at a time, and gently knead until you get a soft but not sticky dough (don’t worry if it seems too soft to roll out, it will go in the fridge and will change texture). The final dough should have about 500 grams.
- Divide the dough into two equal parts, shape it into a ball, wrap each ball in plastic, and put it in the fridge for about 35-40 minutes. You want it to harden up so you can easily work with it.
ASSEMBLE THE CAKE
- Now you can preheat the oven to 350F/180C. Prepare a sheet pan, preferably a size that can go into the fridge. If it’s cold outside, you can just keep it somewhere cold while you prepare the second layer.
- Take one of the balls out of the fridge, and spread it with your palms into a rectangle on a sheet of parchment paper. I use a silicon mat as a base, so the paper doesn’t slide. Add a second sheet on top and gently roll out with a rolling pin until you get a rectangle of about 11 inches x 9.5 inches. Gently slide the paper with the dough layer on the sheet pan, dust it with some sorghum flour, and place it in the fridge, or if it’s cold outside, you can just keep it somewhere cold while you prepare the second layer.
- Repeat with the second layer, using the same technique. Place the second layer in a cold spot.
- Now evenly spread the apple pie filling on the first layer, after you dust it with a bit of sorghum flour.
- Dust the second layer with a little bit of sorghum flour, then flip the second layer on top of the filling, then gently peel off the parchment paper. Dust with a little more sorghum flour. While this might seem difficult, just work carefully, the dough is pretty sturdy. Cracks will happen when baking anyway, so don’t worry if the top layer is not perfect.
- Brush the top layer with the egg wash.
- This is optional, but you can cut the uneven edges if you like (see the picture in the above post). And with the extra dough, you can shape some leaves and decorate the top layer. Bake for about 40 minutes or until the top layer is golden.
- Place the baking tray in a cold spot to cool down before you slice it.
- Dust with inulin powder and enjoy. Store in the fridge in a covered glass container. I love it when it’s cold.
Notes
Check the post above for a visual guide of the process.

10 Comments
Amy
June 17, 2025 at 4:30 pmHealthy, lectin-free pop tarts… Yeah! I make these with a mix of frozen, wild blue berries and black currants (from my garden) instead of the apples. I freeze them and warm them up in my toaster oven when I want to quick snack. I love them! Thank-you so much Claudia for creating this wonderful recipe… miam!
Claudia
June 19, 2025 at 4:42 amHi Amy! What a great idea. Never thought of these as pop tarts, but I think it makes sense. I will try the blueberry version this summer, thank you! -Claudia
Amy
October 30, 2024 at 11:34 amWhat would be able to used instead of coconut cream? I don’t do coconut. Would yogurt work?
Thanks!
Claudia
October 30, 2024 at 12:21 pmHi Amy! You can use regular cream. -Claudia
Leonie
May 30, 2024 at 2:03 amHi Claudia, I just wanted to say thank you for sharing this wonderful recipe. I made it last night and it was amazing! Your instructions were spot on. The pastry is light and beautifully nutty and the apple filling was perfect. I’ve never cooked apple that way before but it worked beautifully. It’s certainly gone down a treat with everyone here and I will definitely be making this again. Well done to you and thank you for your generosity. I will be buying your cookbook
Claudia
May 30, 2024 at 3:16 amThank you so much for the kind words, Leonie! So happy you loved one of my favorite desserts. I hope you will enjoy cooking from the books!Hugs -Claudia
M siren miller
April 29, 2023 at 6:29 pmHi I am new to your site and love it
I have been trying it go gluten free
Sugar Free it is not easy but can happen
What is coconut cream and where do I find itis there a substitute what is sorghum flour and how can I find it thank you
Claudia
April 30, 2023 at 3:54 amThank you! For specific products, you should check your local or online stores. I have no idea where you live, so I can’t help you with a specific place. You can also check my SHOP page, we have links for both coconut cream and sorghum flour, if you are in the US. Also, use this website’s search bar to find the articles I wrote about sorghum flour and anything else you are interested to find out more about. You will find a lot of resources that can be helpful. xx – Claudia
Sally
October 16, 2022 at 11:02 amIs there anything g I could substitute for the chestnut flour?
Claudia
October 17, 2022 at 3:17 amHi Sally, chestnut flour is very tasty and sweet, so it matters in this recipe. However, if you can’t find it, use more of the other flour. You might need to compensate with more flavor and sweetness, though, since sorghum and tapioca flours are bland.