Description
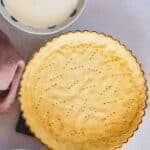
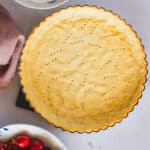
This gluten-free tart crust combines millet, almond, and tapioca flour for a tender, buttery texture and a dough that is easy to make and work with. Versatile enough for baked custard tarts and no-bake fillings, it can be partially or fully baked as needed. It is lightly sweetened with allulose, keeping it sugar-free, although powdered sugar can be used instead. This recipe makes enough dough for an 8-inch (20-centimeter) tart; double the quantities for a 10- to 12-inch (25- to 30-centimeter) tart.
Ingredients
- 70 grams millet flour
- 30 grams almond flour
- 10 grams tapioca flour
- 20 grams allulose or monk fruit sweetener
- Pinch of salt
- 35 grams cold unsalted butter, cubed
- 20 grams beaten egg (less than 1 whole egg)
Instructions
Make the tart dough
- In a mixing bowl, combine the millet flour, almond flour, tapioca flour, sweetener, and salt. Add the cold, cubed butter and rub it into the dry ingredients with your fingertips until the mixture resembles coarse sand.
- Add the beaten egg and mix gently until the dough comes together, but don’t over knead the dough. If the dough feels too soft, you may add a little more millet flour, but keep in mind that it will firm up in the refrigerator.
- Shape the dough into a disc, wrap it in plastic wrap, and refrigerate for 30 minutes.
- Roll out the chilled dough between two sheets of parchment paper lightly dusted with millet flour, forming a circle approximately 9 inches (23 centimeters) in diameter—large enough to cover the bottom and sides of the tart pan. Remove the top sheet of parchment paper, then use the remaining sheet to lift and invert the dough over an 8-inch (20-centimeter) tart pan with a removable bottom. Gently peel away the parchment paper and fit the dough into the bottom and sides of the pan. If the dough breaks around the edges, simply patch it with your fingers, making sure the sides are covered evenly.
- Prick the bottom of the crust with a fork and freeze for at least 30 minutes.
For a partially prebaked crust
- Preheat the oven to 170°C (340°F) and place a sheet pan on the middle rack.
- Transfer the frozen crust directly to the sheet pan and bake for 12 minutes, until set and beginning to turn golden. Let it cool before adding a custard or another filling that will continue baking in the crust.
For a fully baked crust
- Preheat the oven to 170°C (340°F) and place a sheet pan on the middle rack.
- Transfer the frozen crust directly to the sheet pan and bake for about 20 minutes, until deeply golden and cooked through. Let it cool completely before adding a filling that does not require baking and only needs refrigeration.
Notes
Tart pan: This recipe requires an 8-inch (20-centimeter) nonstick tart pan with a removable bottom. Double the quantities for a larger 10- to 12-inch (25- to 30-centimeter) tart.
Make ahead: The raw crust can be prepared one day in advance. After shaping it in the tart pan, pricking the bottom, and freezing it for 30 minutes, cover it well and keep it frozen overnight. Bake it directly from frozen the following day.
Choosing the baking method: Partially prebake the crust for approximately 12 minutes when using a custard or another filling that will continue baking in the oven. Bake it fully for about 20 minutes when using a no-bake filling that only requires refrigeration.
Nutritional value: The following nutritional label is for the version made with a non-caloric sweetener (allulose) and for 1 serving of naked crust (out of 6 servings in total).