Description
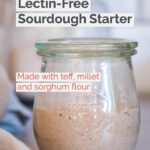
In this post, you will learn how to make a lectin-free and gluten-free sourdough starter with a mix of millet, teff, sorghum flour, and homemade yeast water made of fruits. After you make this starter, you will be able to use it to make lectin-free and gluten-free sourdough bread loaves, pizza, flatbread, focaccia, and more.
Ingredients
STEP 1: CREATE THE YEAST WATER
- (Tools needed: 34oz mason jar with a tight lid, wooden or glass spoon / stick to stir, PH strips, patience)
- 1/2 cup organic blueberries
- 1 small organic apple
- 1-2 tablespoons organic, sugar-free dried fruits (dates or dried aronia berries are perfect, in my starter I used the aronia berries)
- Filtered, spring, or bottled water (avoid chlorine, fluoride, reverse osmosis, or tap water)
STEP 2: PRIMARY SOURDOUGH MIX
- (Tools needed: a glass jar with a plastic or glass lid that can hold about 400g of content, a wooden or silicon spoon)
- 100 grams flour mix (33g teff, 33g millet, 34g sorghum)
- 100g yeast water (measured in grams)
STEP 3: SOURDOUGH STARTER
- (Tools needed: a small jar with a glass lid that can hold about 200-250g of content, a spoon or a spatula to mix with; a normal stainless steel spoon can be used)
- 10g of the Primary Mix (after 24 hours)
- 30g water, up to 35g is needed (filtered, chlorine-free; avoid reverse osmosis water)
- 35g flour mix (equal parts teff, sorghum, and millet)
Instructions
STEP 1: CREATE THE YEAST WATER
- Prepare the Fruits: Gently rinse the blueberries and apple with filtered water, to preserve the wild yeast on the fruits. Cut the apple into wedges without removing the skin or core. Make sure the dry fruits are organic, with no other ingredients added.
- Ferment: Place the fruits in a jar and cover with water, leaving an inch of space at the top. Seal tightly and keep at room temperature (but a slightly warm place) for 24 hours, then stir twice daily for up to 5 days. In the 5th or 6th day, measure the PH. When bubbles form and the pH is below 6, the yeast water is ready. Strain and store in the fridge until use.
STEP 2: CREATE THE PRIMARY SOURDOUGH MIX
- Mix: In a clean jar, combine 100g of the flour blend with 100g of yeast water. Stir until a well-hydrated paste forms, adjusting with a little more water if necessary to ensure no dry spots remain. Cover with the glass lid and let it sit at room temperature for 24 hours, looking for signs of activity such as bubbles. After 24 hours, there will be cracks on top, and the texture of the paste will be airy. It might double in size, but that’s not always the case.
STEP 3: CREATE THE SOURDOUGH STARTER
- Prepare Feeding Flour Mix: Mix equal parts teff, sorghum, and millet flours and store it in a flour jar. Use this blend for feeding your starter.
- Initial Culture: Combine 10g of the Primary Sourdough Mix with 30g of water and 35g of the feeding flour mix in a new, clean jar. Mix to a smooth paste, adding a bit more water if necessary. This is now your sourdough starter, so please give it a name. What’s left of the primary mix can be discarded.
- Feeding Routine: Place the starter at room temperature, covered loosely. Feed it twice a day by transferring 10g of the starter to a clean jar and adding 30g of water and 35g of the feeding flour mix. Stir well and let it sit until the next feeding. The consistency you are looking for is a well hydrated paste. If it needs more water, you can add up to 35g, but please don;t make it too runny. What’s left in the previous jar is called discard, which you can accumulate in a jar in the fridge (well closed), and use it to make discard recipes.
- Ready to use: The starter is ready to use after a few feedings every 12 hours (I like to feed it for about 3 days, which means 6 feedings). The signs your starter is ready are that it doubles in size, is bubbly and airy, and, at peak activity, will form a dome and a few cracks on top. It will also smell fruity and pleasant. If it develops an acetone, or vinegary smell, it simply means it’s hungry. Just continue to feed it as per the schedule until that smell disappears.
STEP 4: MAINTENANCE AND BAKING
- Feeding: Maintain the starter with twice-daily feedings for optimal health.
- Storage: If not used daily, the starter can be refrigerated post-feeding. Cover with a tight lid when in the fridge. Resume regular feedings at least 2 times before baking.
- Baking: To bake, create a preferment (also called levain) with the starter, following the feeding ratios described in each recipe. This preferment is the leavening agent for your bread, imparting the sourdough’s distinct flavor and texture.
Notes
Please read the entire post before proceeding to start. It is important you get the starter right in order to be able to make bread later. If you have any questions, please ask below in the comments.